

Top
Authors
Updated
30 Mar 2023Form Number
LP1682PDF size
12 pages, 604 KBSubscribed to LP1682.
Thank you for your feedback.
Abstract
This technical brief will highlight the innovative and advanced Azure services enabled by Azure Arc on-premises on Lenovo ThinkAgile MX systems.
Hybrid, Edge and Multi-Cloud Management On-Premises
Customer IT environments have become very complicated with many applications running on diverse infrastructure spread over on-premises data centers, on the edge, and in multiple clouds. With different tools and frameworks in use and multiple technologies like DevOps and Kubernetes, these IT resources have become hard to view, manage and secure. With the ever-increasing adoption of cloud services, cloud service providers are doing most of their innovation in the cloud today.
Microsoft Azure Arc is a set of technologies that allows customers to view and manage both their on-premises and cloud resources with a single pane of glass. With Azure Arc you can manage both your VMs in Azure and VMs on-premises, apply security policies to both and provide tough governance easily through a self-service portal. This paper will highlight the innovative and advanced Azure services enabled by Azure Arc on-premises on Lenovo ThinkAgile MX systems.
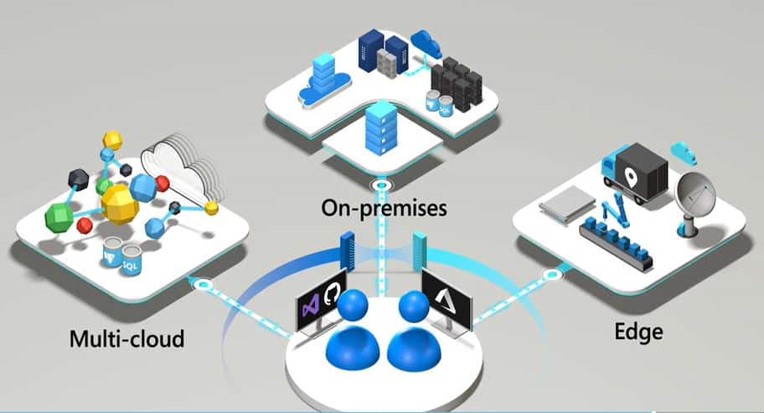
Figure 1. High-level Arc Integration
With Azure Arc, you can:
- Manage your entire environment together by projecting your existing non-Azure and/or on-premises resources into Azure Resource Manager.
- Manage virtual machines, Kubernetes clusters, and databases as if they are running in Azure.
- Use familiar Azure services and management capabilities, regardless of where they live.
- Continue using traditional ITOps while introducing DevOps practices to support new cloud native patterns in your environment.
- Configure custom locations as an abstraction layer on top of Azure Arc-enabled Kubernetes clusters and cluster extensions.
Why Azure Arc Service on Azure Stack HCI?
Azure Stack HCI provides enterprise customers with a highly available, cost-efficient, flexible platform to run high-performance workloads. These workloads could run within traditional virtual machines or within containers, ensuring you get the best utilization from your hyperconverged infrastructure. While Azure Stack HCI provides a flexible hyperconverged infrastructure to modernize on-premises environments, Azure Hybrid Service and Azure Arc provide the latest security, performance and feature updates. Bringing them together, Windows Admin Center allows you to remotely manage and enable your Azure Services.
In many organizations, there are legacy workloads that cannot be moved - or that the business has decided are not going to the cloud. In other organizations, there are data privacy regulations, intellectual property (IP) concerns, or application entanglement that requires an on-premises presence. In these situations, a hybrid cloud environment is needed – one with consistency across the different environments. A hybrid cloud environment where you can connect back to the cloud and take advantage of the control plane and cloud practices.
A single control plane. Azure Arc provides the governance control, via a control plane, that gives you a common view and a single way to do it. Additionally, Azure Arc also provides you with the ability to run Azure services anywhere and to start leveraging the portability of Kubernetes. In that way, IT end-developers can start leveraging the same skills and same technology everywhere.
Push governance on-premises. Hybrid is much larger than the single pane. The ARM Control plane is designed for hybrid, from the beginning: inventory, governance, configuration management, policy aspects, security. This enables push governance down into on-premises environments. Some examples include:
- Email applications like Office365 are covered by rules and regulations. With the appropriate governance rules in place through Azure Arc, you should be able to pass when an auditor comes to check the environment. The same should be true when you start using the governance practices from the cloud in your on-premises environment.
- A simple (real-time) inventory can be run if you are using the cloud to govern your on-premises environment instead of an outdated configuration management database (CMDB) application. You can use Resource Graph to query the Azure resources and on-premises resources. You can use the same Azure Policies for your cloud resources and what is on-premises as well.
Scalability. Finally, another important benefit of hybrid solutions is scalability. When computing and processing demand is cyclical and increases beyond an on-premises datacenter’s capabilities, businesses can use the cloud to instantly scale capacity up to support the business. Moreover, it allows them to avoid the time and cost of purchasing, installing, and maintaining new servers that may not always be needed.
Before You Get Started
The following summarizes, at a high-level, what you will need to run Azure Arc.
To use Arc, you must deploy an Azure Arc resource bridge (preview) in your ThinkAgile MX environment. The resource bridge provides an ongoing connection between your ThinkAgile MX servers and Azure. Once you've connected your ThinkAgile MX server to Azure, components on the resource bridge discover your ThinkAgile MX inventory. You can enable them in Azure and start performing virtual hardware and guest OS operations on them using Azure Arc.
- An Azure subscription with the appropriate permissions.
- Any ThinkAgile MX server running Azure Stack HCI 22H2 with ethernet access.
- You need a Azure AD account that can: Read all inventory.
- Deploy and update VMs to all the resource pools (or clusters), networks, and VM templates that you want to use with Azure Arc.
- For the Arc-enabled ThinkAgile MX solution, the resource bridge has the following minimum virtual hardware requirements:
- 16 GB of memory
- 4 vCPUs
- An external virtual switch that can provide access to the internet directly or through a proxy. If internet access is through a proxy or firewall, ensure these URLs are allow-listed.
- Deploying the Connected Machine agent on a machine requires that you have administrator permissions to install and configure the agent. On Linux this is done by using the root account, and on Windows, with an account that is a member of the Local Administrators group.
- Before you get started, be sure to review the agent prerequisites and verify the following:
- Your target machine is running a supported operating system.
- Your account has the required Azure built-in roles.
- Ensure the machine is in a supported region.
- Confirm that the Linux hostname or Windows computer name doesn't use a reserved word or trademark.
- If the machine connects through a firewall or proxy server to communicate over the Internet, make sure the URLs listed are not blocked.
Deploying Azure Arc Service on Azure Stack HCI on Lenovo Servers
The first step in the process is to obtain and setup your Lenovo server that will support Azure Stack HCI.
Step 1: Hardware and OS configuration for Azure Arc Service on Azure Stack HCI
Lenovo certified Azure Stack HCI solutions can be found at this link – ThinkAgile MX.
Lenovo rack systems feature innovative hardware, software and services that solve customer challenges today and deliver an evolutionary fit-for-purpose, modular design approach to address tomorrow’s challenges. These servers capitalize on best-in-class, industry-standard technologies coupled with differentiated Lenovo innovations to provide the greatest possible flexibility in x86 servers. Key advantages of deploying Lenovo rack servers include:
- Highly scalable, modular designs to grow with your business
- Industry-leading resilience to save hours of costly unscheduled downtime
- Expansive storage capacity and flexible storage configurations for optimized workloads
With fast flash technologies for lower latencies, quicker response times and smarter data management in real-time for cloud deployments, database, or virtualization workloads, trust Lenovo racks for world-class performance, power-efficient designs and extensive standard features at an affordable price.
The following Lenovo servers have been certified for Microsoft Azure Stack HCI and are equipped to support 4 to 64-core processors, up to 4TB of memory and over 100TB of storage:
- Lenovo ThinkAgile MX3530 Integrated systems / MX3531 validated nodes (based on ThinkSystem SR650 V2)
- Lenovo ThinkAgile MX3330 Integrated systems / MX3331 validated nodes (based on ThinkSystem SR630 V2)
- Lenovo ThinkAgile MX3520 Integrated systems / MX validated nodes (based on ThinkSystem SR650)
- Lenovo ThinkAgile MX1020 Integrated systems / MX1021 validated nodes (based on ThinkSystem SE350)
- Lenovo ThinkSystem SR630 validated nodes
- Lenovo ThinkSystem SR665 validated nodes
- Lenovo ThinkSystem SR655 validated nodes
- Lenovo ThinkSystem SR645 validated nodes
- Lenovo ThinkSystem SR635 validated nodes
- Lenovo ThinkEdge SE450 validated nodes
With your Lenovo servers racked, configured, and connected, you are ready to deploy the Azure Stack HCI OS. The first step in deploying Azure Stack HCI is to download Azure Stack HCI and install the operating system on each server that you want to cluster. You can deploy Azure Stack HCI using your preferred method – this could be via USB, network deployment, ISO boot over a dedicated OOB management port, etc. Step through the simple Azure Stack HCI OS installation wizard, and once complete, you should be at the Server Configuration Tool (SCONFIG) interface. If you need to, make any simple changes here, but all that should be required is a single NIC with an IP address on your management network.
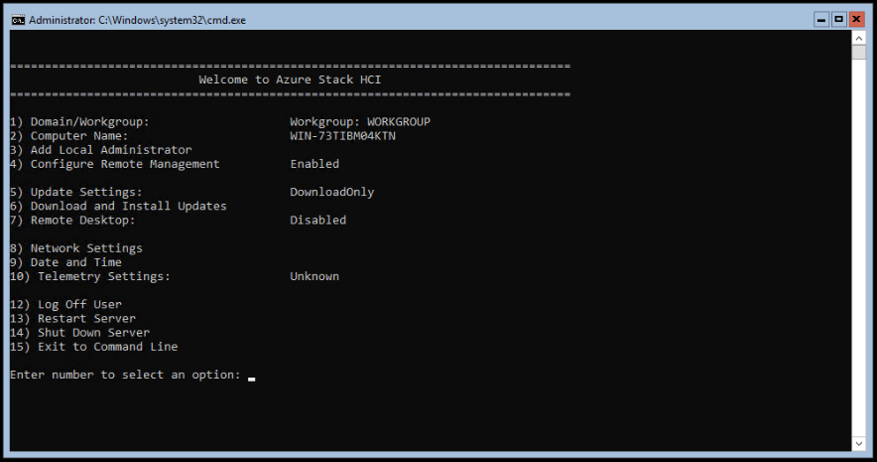
Figure 2. SCONFIG in Azure Stack HCI
Step 2: Deploy and Configure Windows Admin Center
With your Azure Stack HCI nodes deployed, and accessible over the network, the next step is to deploy the Windows Admin Center. If you haven’t already, download the Windows Admin Center software. This should be installed on a Windows 10 or Windows Server 2016/2019 machine. This machine should also be joined to your management domain. This should be the same domain that your Azure Stack HCI nodes will be joined to.
Step 3: Create an Azure Stack HCI Cluster
With the Windows Admin Center installed, open the Windows Admin Center, and step through the process of creating an Azure Stack HCI cluster.
The wizard will walk you through selecting your nodes, joining the nodes to the domain, installing required roles and features, and updates, before moving on to configuring the physical and virtual networks, clustering and software defined storage. When the wizard is complete, you should see your new cluster in your All connections view within Windows Admin Center.
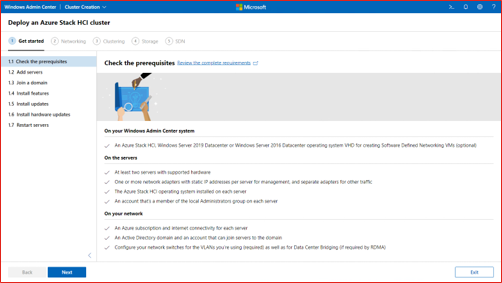
Figure 3. Deploying an Azure Stack HCI Cluster in Windows Admin Center
Step 4: Check the registration of the cluster
With your Azure Stack HCI cluster under dashboard of Windows Admin Center, the next step is to check that the status of the Azure Connection.
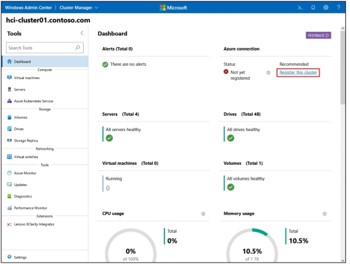
Figure 4. Validating the Azure Registration in Windows Admin Center
Step 5: Deploy a new virtual machine on your Azure Stack HCI infrastructure and join it to a domain
You can easily create a new VM using Windows Admin Center.
- On the Windows Admin Center home screen, under All connections, select the server or cluster you want to create the VM on.
- Under Tools, scroll down and select Virtual machines.
- Under Virtual machines, select the Inventory tab, then select Add and New.
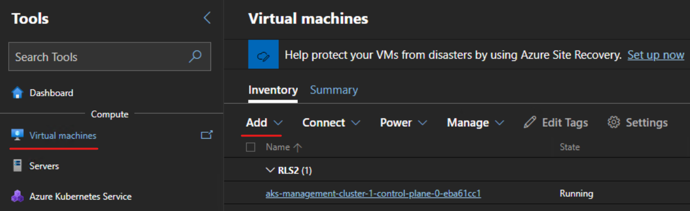
Figure 5. VM Creation from Windows Admin Center
- Under New virtual machine, enter a name for your VM.
- Select Generation 2 (Recommended).
- Under Host, select the server you want the VM to reside on.
- Under Path, select a preassigned file path from the dropdown list or click Browse to choose the folder to save the VM configuration and virtual hard disk (VHD) files to. You can browse to any available SMB share on the network by entering the path as \server\share.
- Under Virtual processors, select the number of virtual processors and whether you want nested virtualization enabled for the VM. If the cluster is running Azure Stack HCI, version 21H2, you'll also see a checkbox to enable processor compatibility mode on the VM.
- Under Memory, select the amount of startup memory (4 GB is recommended as a minimum), and a min and max range of dynamic memory as applicable to be allocated to the VM.
- Under Network, select a virtual switch from the dropdown list.
- Under Network, select one of the following for the isolation mode from the dropdown list:
- Set to Default (None) if the VM is connected to the virtual switch in access mode.
- Set to VLAN if the VM is connected to the virtual switch over a VLAN. Specify the VLAN identifier as well.
- Set to Virtual Network (SDN) if the VM is part of an SDN virtual network. Select a virtual network name, subnet, and specify the IP Address. Optionally, select an access control list that can be applied to the VM.
- Set to Logical Network (SDN) if the VM is part of an SDN logical network. Select the logical network name, subnet, and specify the IP Address. Optionally, select an access control list that can be applied to the VM.
- Under Storage, click Add and select whether to create a new empty virtual hard disk or to use an existing virtual hard disk. If you're using an existing virtual hard disk, click Browse and select the applicable file path.
- Under Operating system, do one of the following:
- Select Install an operating system later if you want to install an operating system for the VM after the VM is created.
- Select Install an operating system from an image file (*.iso), click Browse, then select the applicable .iso image file to use.
- When finished, click Create to create the VM.
- Under State, verify that the VM state is running.
Step 6: Enable Azure ARC on the Virtual Machine on Azure Stack HCI
Launch the Azure Arc service in the Azure portal by clicking All services, then searching for and selecting Servers - Azure Arc.
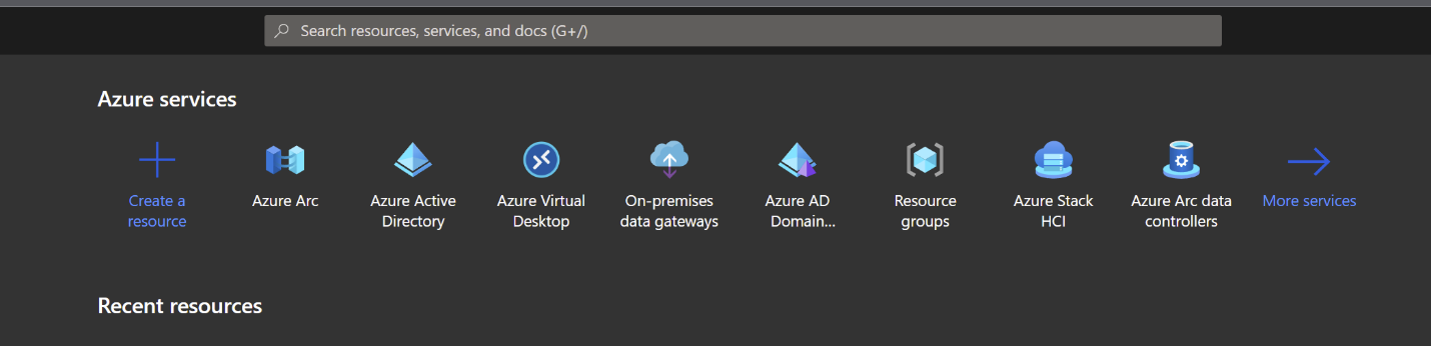
Figure 6. Azure Services form Azure Portal
- On the Servers - Azure Arc page, select Add at the upper left.
- On the Select a method page, select the Add servers using interactive script tile, and then select Generate script.
- On the Generate script page, select the subscription and resource group where you want the machine to be managed within Azure. Select an Azure location where the machine metadata will be stored. This location can be the same or different, as the resource group's location.
- On the Prerequisites page, review the information and then select Next: Resource details.
- On the Resource details page, provide the following:
- In the Resource group drop-down list, select the resource group the machine will be managed from.
- In the Region drop-down list, select the Azure region to store the servers' metadata.
- In the Operating system drop-down list, select the operating system that the script be configured to run on.
- If the machine is communicating through a proxy server to connect to the internet, specify the proxy server IP address or the name and port number that the machine will use to communicate with the proxy server. Enter the value in the format http://(proxyURL):(proxyport).
- Select Next: Tags.
- On the Tags page, review the default Physical location tags suggested and enter a value, or specify one or more Custom tags to support your standards.
- Select Next: Download and run script.
- On the Download and run script page, review the summary information, and then select Download. If you still need to make changes, select Previous.
- Log in to the server.
- Open an elevated 64-bit PowerShell command prompt.
- Change to the folder or share that you copied the script to and execute it on the server by running the ./OnboardingScript.ps1 script.
On the Azure platform the Machine will appear under the Azure Arc systems as connected.

Figure 7. Azure ARC status on Azure Portal
Managing Lenovo Systems through Windows Admin Center
Microsoft Windows Admin Center (WAC) is a browser-based application that is deployed locally and used to manage Windows Servers, Windows Server Clusters and Azure Stack HCI clusters. Microsoft has made WAC extensible so that hardware partners can build additional features specific to their hardware and firmware. Lenovo XClarity Integrator is an example of one such extension implementation. Lenovo XClarity Integrator is designed to help users manage and monitor the Lenovo ThinkSystem servers and ThinkAgile systems through Lenovo XClarity Administrator in Windows Admin Center. Lenovo XClarity Integrator and Windows Admin Center run in the same environment. Lenovo XClarity Integrator is integrated with Lenovo XClarity Administrator and can be used as an out-of-box management tool and a high-efficiency tool for managing and monitoring the Lenovo servers and components (e.g. monitoring the overall status of servers, viewing the inventory of components, checking the firmware consistency of cluster nodes, and launching the management interface).
This link provides information on features in the Lenovo XClarity Integrator extension and instructions for installing the extension for Windows Admin Center.
Summary
Following this guide, you have installed Azure Stack HCI, deployed Windows Admin Center and integrated the Azure Arc Service extension on Lenovo ThinkAgile MX systems. You can then deploy the Azure Kubernetes Service management cluster onto your Azure Stack HCI cluster, and setup the integration for the management of your workloads.
Why Lenovo?
Lenovo is a US$70 billion revenue Fortune Global 500 company serving customers in 180 markets around the world. Focused on a bold vision to deliver smarter technology for all, we are developing world-changing technologies that power (through devices and infrastructure) and empower (through solutions, services and software) millions of customers every day.
For More Information
To learn more about this Lenovo solution contact your Lenovo Business Partner or visit: https://www.lenovo.com/us/en/servers-storage/solutions/
Trademarks
Lenovo and the Lenovo logo are trademarks or registered trademarks of Lenovo in the United States, other countries, or both. A current list of Lenovo trademarks is available on the Web at https://www.lenovo.com/us/en/legal/copytrade/.
The following terms are trademarks of Lenovo in the United States, other countries, or both:
Lenovo®
ThinkAgile®
ThinkEdge®
ThinkSystem®
XClarity®
The following terms are trademarks of other companies:
Linux® is the trademark of Linus Torvalds in the U.S. and other countries.
Microsoft®, Arc®, Azure®, PowerShell, Windows Server®, and Windows® are trademarks of Microsoft Corporation in the United States, other countries, or both.
Other company, product, or service names may be trademarks or service marks of others.
Configure and Buy
Please select a locale
Full Change History
Course Detail
Employees Only Content
The content in this document with a is only visible to employees who are logged in. Logon using your Lenovo ITcode and password via Lenovo single-signon (SSO).
The author of the document has determined that this content is classified as Lenovo Internal and should not be normally be made available to people who are not employees or contractors. This includes partners, customers, and competitors. The reasons may vary and you should reach out to the authors of the document for clarification, if needed. Be cautious about sharing this content with others as it may contain sensitive information.
Any visitor to the Lenovo Press web site who is not logged on will not be able to see this employee-only content. This content is excluded from search engine indexes and will not appear in any search results.
For all users, including logged-in employees, this employee-only content does not appear in the PDF version of this document.
This functionality is cookie based. The web site will normally remember your login state between browser sessions, however, if you clear cookies at the end of a session or work in an Incognito/Private browser window, then you will need to log in each time.
If you have any questions about this feature of the Lenovo Press web, please email David Watts at dwatts@lenovo.com.


