

Top
Authors
Published
31 Mar 2023Form Number
LP1713PDF size
16 pages, 3.0 MBSubscribed to LP1713.
Thank you for your feedback.
Table of Contents
- Step 5: Run the Onboarding Script
- Step 6: Enable VMware vCenter resource in Azure
- Step 7: Enable existing virtual machines in Azure
- Step 8: Arc-enabled VMware vSphere built-in roles
- Step 9: Create a virtual machine on VMware vCenter using Azure Arc
- Step 10: How to create a VM in the Azure portal
- Why Lenovo?
- Related product families
- Trademarks
Abstract
This guide helps you deploy Microsoft Azure Arc in a VMware vSphere virtualized environment on Lenovo ThinkAgile MX.
Introduction
Customer IT environments have become very complicated with many applications running on diverse infrastructure spread over on-premises data centers, on the edge, and in multiple clouds. With different tools and frameworks in use and multiple technologies like DevOps and Kubernetes, these IT resources have become hard to view, manage and secure. With the ever-increasing adoption of cloud services, cloud service providers are doing most of their innovation in the cloud today.
Microsoft Azure Arc is a set of technologies that allows customers to view and manage both their on-premises and cloud resources with a single pane of glass self-service portal. Azure Arc allows you to run innovative and advanced Azure services on your on-premises infrastructure - ThinkAgile MX or VMware vSphere as described in this paper. With Azure Arc you can manage both your VMs in Azure and VMs on-premises with a single pane of glass, apply security policies to both and govern them tougher in an easy way.
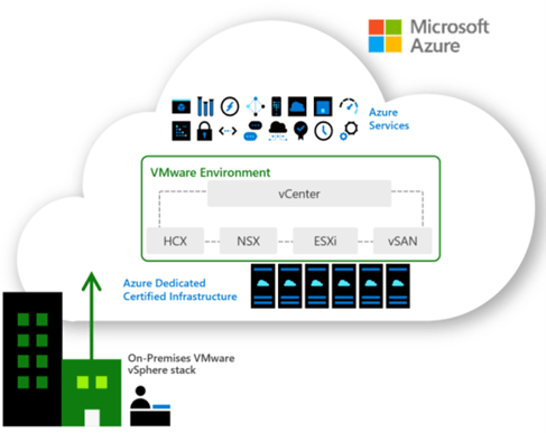
Figure 1. High-level Arc vSphere integration
Azure Arc Service on VMware vSphere
Azure Arc integration with VMware vSphere offers a hybrid solution that provides customers with the benefits of both Azure and vSphere environments. This integration enables customers to manage their on-premises and multi-cloud infrastructure as well as Azure resources from a single unified control plane, resulting in increased operational efficiency. With Azure Arc integration, customers can leverage the scalability and security features of Azure, while preserving their existing vSphere investment. Additionally, the integration allows customers to use Azure services, such as Azure Kubernetes Service and Azure Policy, on their on-premises and multi-cloud infrastructure, enabling them to modernize their applications and operations. Other benefits include:
- Centralized management: Azure Arc allows customers to manage their on-premises, multi-cloud and Azure resources from a single control plane, which simplifies management and increases operational efficiency.
- Leverage existing investment: With Azure Arc, customers can leverage their existing vSphere investment while taking advantage of the scalability and security features offered by Azure.
- Modernize applications: The integration enables customers to use Azure services, such as Azure Kubernetes Service, on their on-premises and multi-cloud infrastructure, allowing them to modernize their applications and operations.
- Improved security: Azure Arc provides security features such as Azure Policy and Azure Security Center, allowing customers to enhance the security of their infrastructure and applications.
- Compliance and auditing: Azure Arc provides compliance and auditing capabilities, which makes it easier for customers to meet regulatory requirements and adhere to industry standards.
In summary, Azure Arc integration with vSphere offers a hybrid solution that provides customers with the benefits of both Azure and vSphere environments, enabling them to simplify their infrastructure management, modernize their applications, and enhance their security.
A single control plane
Overall, a single control plane provides customers with a centralized, unified, and efficient way to manage their infrastructure, improving their operational efficiency and reducing the complexity of managing multiple disparate systems.
- Simplified management: By having a single control plane, customers can manage all their on-premises, multi-cloud, and Azure resources from a single console, reducing the complexity of managing multiple disparate systems.
- Improved efficiency: With a single control plane, customers can automate and streamline their management processes, reducing the time and effort required to manage their infrastructure.
- Enhanced visibility: A single control plane provides customers with a unified view of their infrastructure, allowing them to easily monitor and manage their resources.
- Consistent policies: By having a single control plane, customers can enforce consistent policies across their infrastructure, ensuring that their resources are configured and managed in a consistent manner.
- Better collaboration: A single control plane makes it easier for teams to collaborate and share information, improving communication and decision-making.
Before you get started
The following summarizes, at a high-level, what you will need to run Azure Arc.
To use Arc-enabled VMware vSphere, you must deploy an Azure Arc resource bridge (preview) in your VMware vSphere environment. The resource bridge provides an ongoing connection between your VMware vCenter server and Azure. Once you've connected your VMware vCenter server to Azure, components on the resource bridge discover your vCenter inventory. You can enable them in Azure and start performing virtual hardware and guest OS operations on them using Azure Arc.
Requirements:
- An Azure subscription with the appropriate permissions.
- Any system running a vCenter Server versions 6.7 and 7 with ethernet access.
- A vSphere account that can:
- Read all inventory.
- Deploy and update VMs to all the resource pools (or clusters), networks, and VM templates that you want to use with Azure Arc.
- For Arc-enabled VMware vSphere, resource bridge has the following minimum virtual hardware requirements:
- 16 GB of memory
- 4 vCPUs
- An external virtual switch that can provide access to the internet directly or through a proxy. If internet access is through a proxy or firewall, ensure these URLs are allow-listed.
- Deploying the Connected Machine agent on a machine requires that you have administrator permissions to install and configure the agent. On Linux this is done by using the root account, and on Windows, with an account that is a member of the Local Administrators group.
- Before you get started, be sure to review the agent prerequisites and verify the following:
- Your target machine is running a supported operating system.
- Your account has the required Azure built-in roles.
- Ensure the machine is in a supported region.
- Confirm that the Linux hostname or Windows computer name doesn't use a reserved word or trademark.
- If the machine connects through a firewall or proxy server to communicate over the Internet, make sure the URLs listed are not blocked.
Step 1: Deploy and Configure VMware ESXi on physical host
- Download the ESXi ISO image from the VMware website.
- Burn the ISO image to a CD or USB drive.
- Insert the CD or USB drive into the physical host and boot from it.
- Choose the appropriate installation option from the boot menu.
- Select the target storage device for the ESXi installation.
- Configure the network settings for the ESXi host, including IP address, subnet mask, and default gateway.
- Create a password for the root user account.
- Review and confirm the installation settings.
- Wait for the installation to complete.
- Remove the CD or USB drive and restart the physical host.
- Log in to the ESXi host using the vSphere client or web client, and configure additional settings as needed, such as datastores, virtual switches, and virtual machine
Step 2: Configure VMware vSphere
- Download and install the VMware vSphere client on a management system.
- Connect the vSphere client to the ESXi host and log in as the root user.
- Create a new datacenter in the vSphere client.
- Create a new cluster within the datacenter.
- Add the ESXi host to the cluster.
- Create and configure virtual switches for network connectivity.
- Create and configure datastores for storage.
- Create virtual machines and configure their hardware, operating system, and applications.
- Configure virtual machine options, such as snapshots, cloning, and resource pools.
- Monitor the performance of the vSphere environment using the vSphere client or other management tools.
Note: The steps above provide a high-level overview of the process, and actual deployment will depend on the specific requirements of your ESXi & vSphere environment. It's recommended to follow the official VMware documentation for a detailed guide.
Step 3: Deploy an Arc Resource Bridge Appliance
The next step is to deploy the Azure Resource Bridge Appliance with your VMware vSphere and have it accessible over the network. This should be installed on a Windows 10 or Windows Server machine.
- Access Azure Portal
- Go to Azure Arc > Add your infrastructure for free
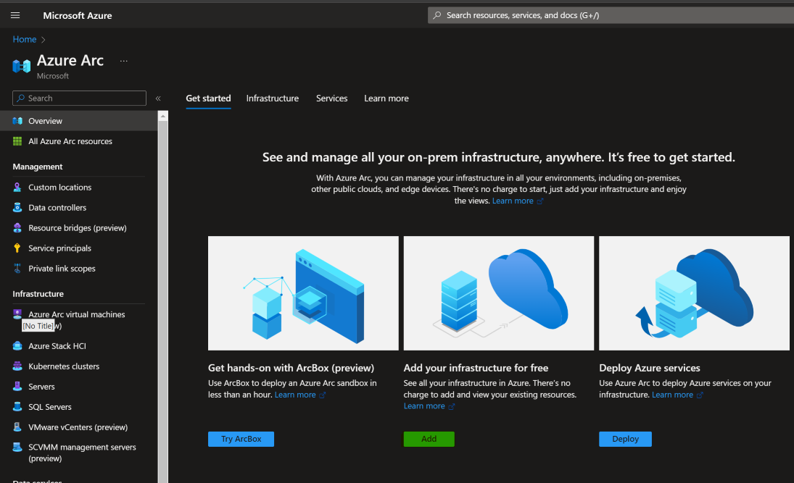
Figure 2. Azure Arc overview on Azure portal
- Select Platform > VMware vSphere

Figure 3. Azure Arc add infrastructure on Azure portal
- Create a new Resource Bridge
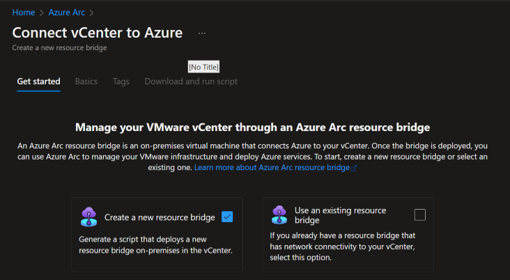
Figure 4. Azure Arc connect vCenter on Azure portal
- Select the Resource group and define the custom location
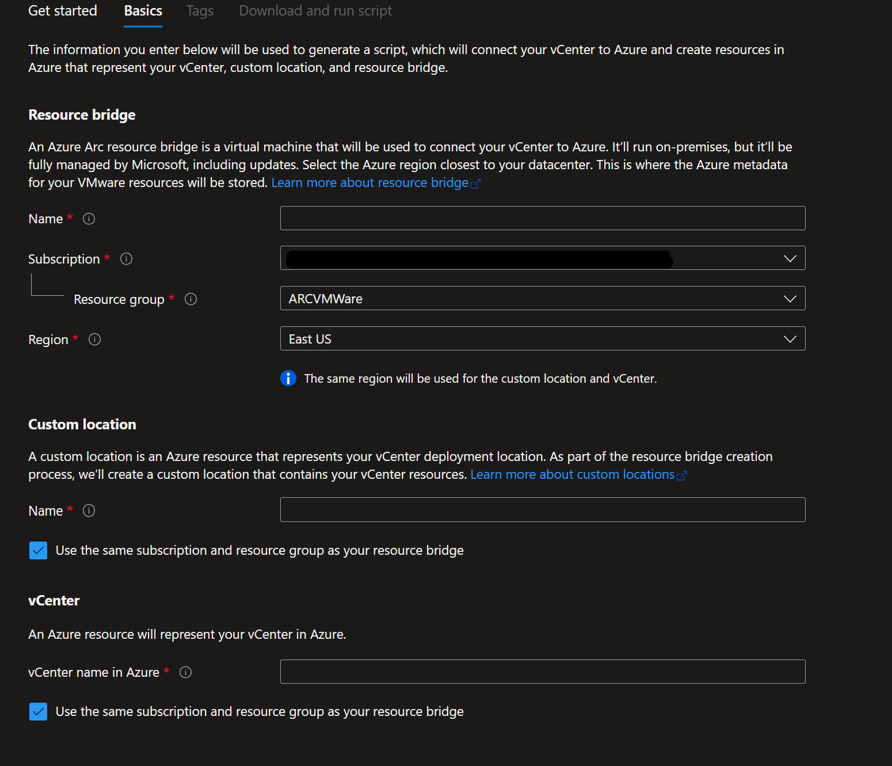
Figure 5. Azure Arc Resource Bridge deployment on Azure portal
Step 4: Onboarding vCenter to Azure
After you provide the required information in the Basic tab, it will generate an Onboarding Script that will be run on any VM that can access both vCenter and vSphere.
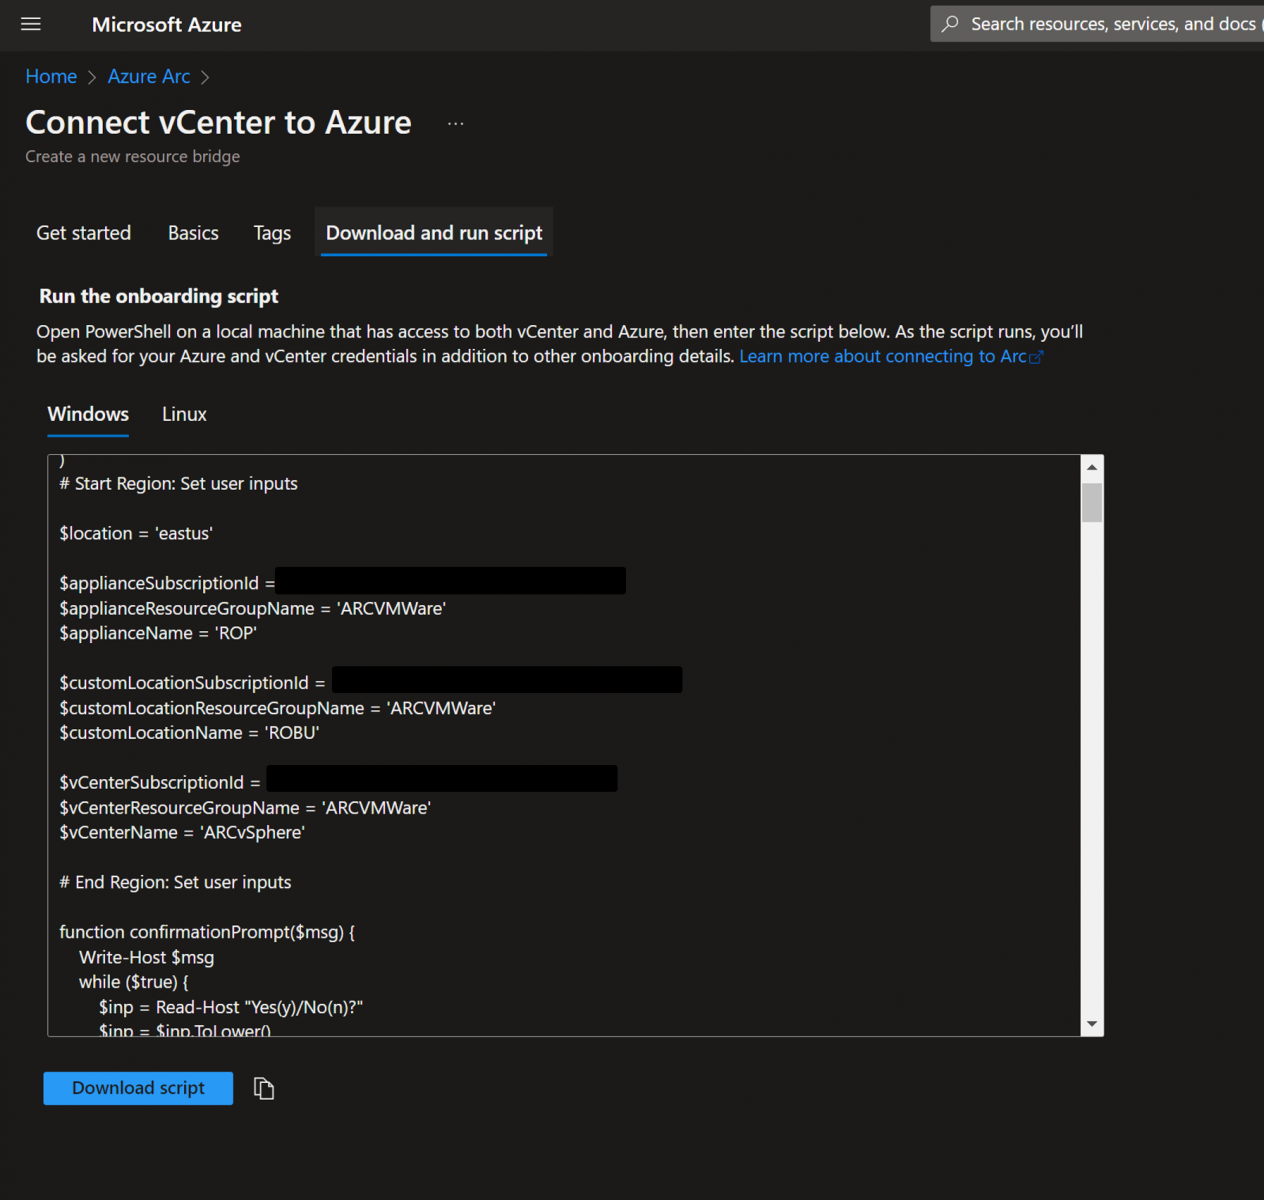
Figure 6. Onboarding script in Azure Arc on Azure portal
Azure Arc-enabled VMware vSphere uses the vSphere account credentials you provided during the onboarding to communicate with your vCenter server. These credentials are only persisted locally on the Arc resource bridge VM. As part of your security practices, you might need to rotate credentials for your vCenter accounts. As credentials are rotated, you must also update the credentials provided to Azure Arc to ensure the functioning of Azure Arc-enabled VMware services. You can also use the same steps in case you need to use a different vSphere account after onboarding. You must ensure the new account also has all the required vSphere permissions.
Step 5: Run the Onboarding Script
Before run the script execute the following: Set-ExecutionPolicy -Scope Process -ExecutionPolicy Bypass
Copy the Onboarding script in PowerShell or execute the file containing the script and follow the instructions by providing network details and credentials of the vCenter and the script will deploy the arc appliance.
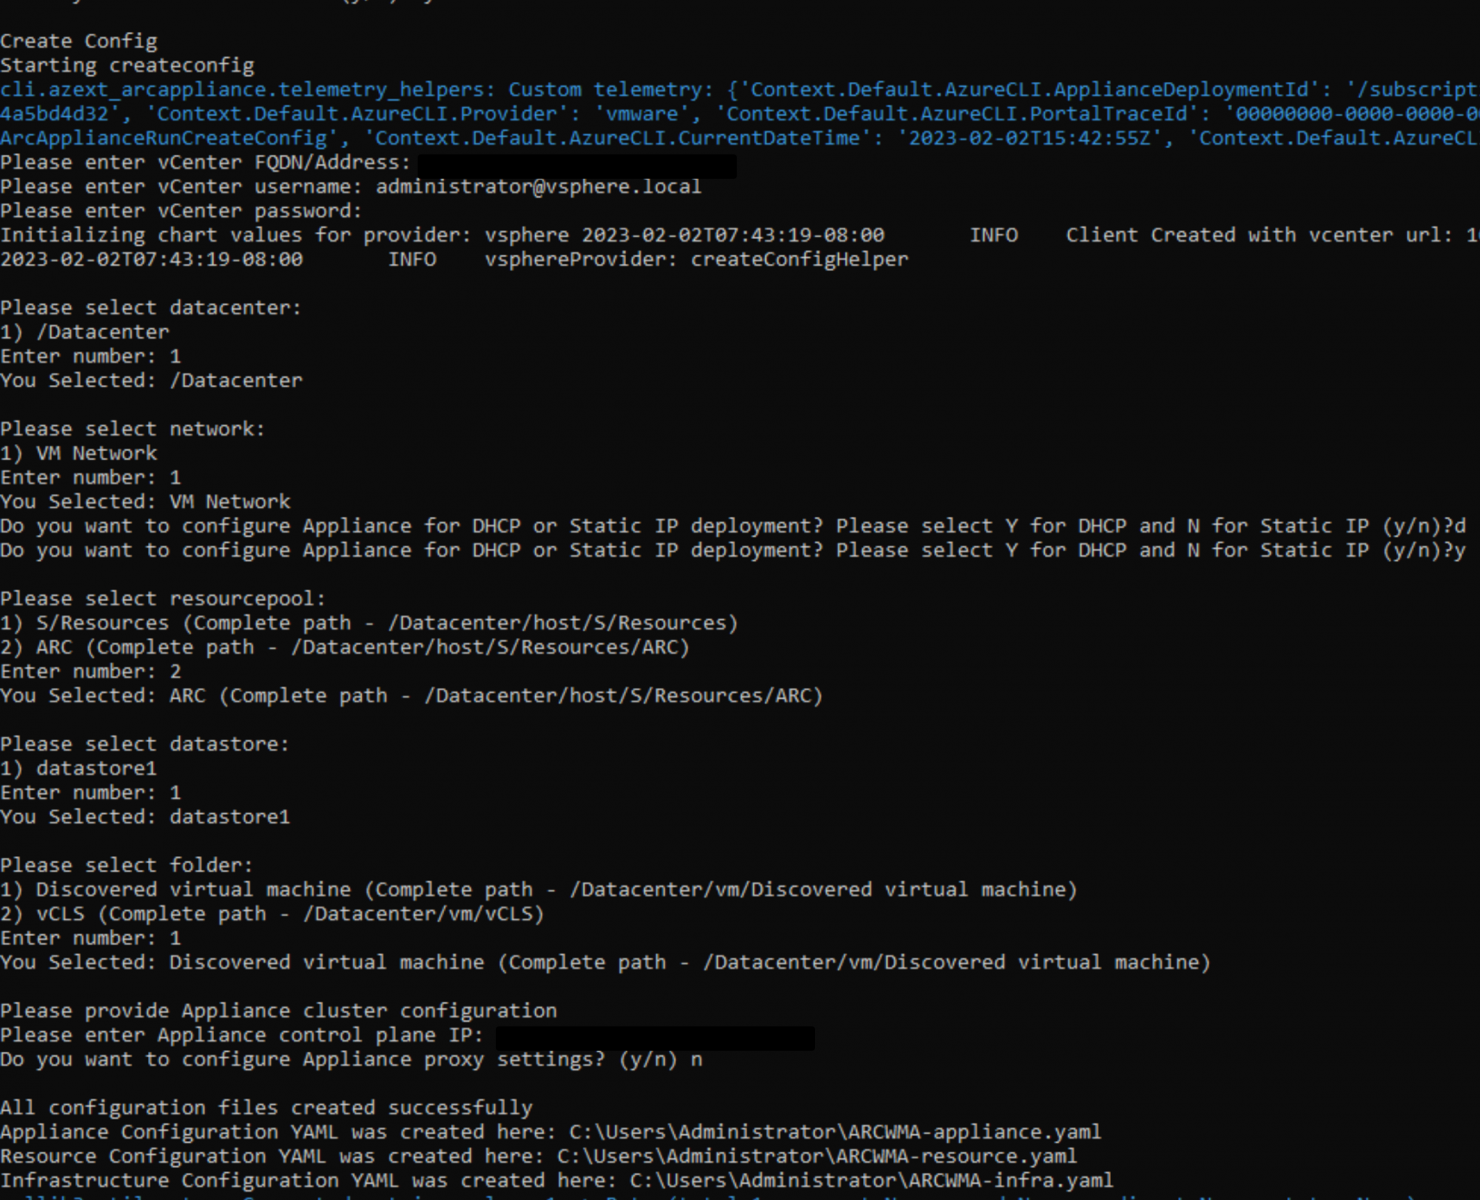
Figure 7. Onboarding script execution on the local appliance
Step 6: Enable VMware vCenter resource in Azure
Visit the VMware vCenter section in Azure Arc Center to view all the connected vCenters.
From there, you’ll see your virtual machines (VMs), resource pools, templates, and networks. From the inventory of your vCenter resources, you can select and enable one or more resources in Azure.
When you enable a vCenter resource in Azure, it creates an Azure resource that represents your vCenter resource. You can use this Azure resource to assign permissions or conduct management operations while managing the resources in the custom location defined.
To enable your VMware vSphere resources in Azure, start by accessing the vCenter's blade on Azure Arc Center through your browser. From there, navigate to the inventory resources blade.
Next, choose the specific resource or resources that you wish to enable and select the "Enable in Azure" option.
Then, you'll need to select your Azure Subscription and Resource Group before clicking on the "Enable" button. This will trigger a deployment process and create a representation of your VMware vSphere resources in Azure.
By doing so, you'll gain the ability to manage access to these resources through Azure role-based access control (RBAC) in a granular manner.
Finally, repeat the same steps for any other resources such as network, resource pool, and VM template, that you wish to enable.
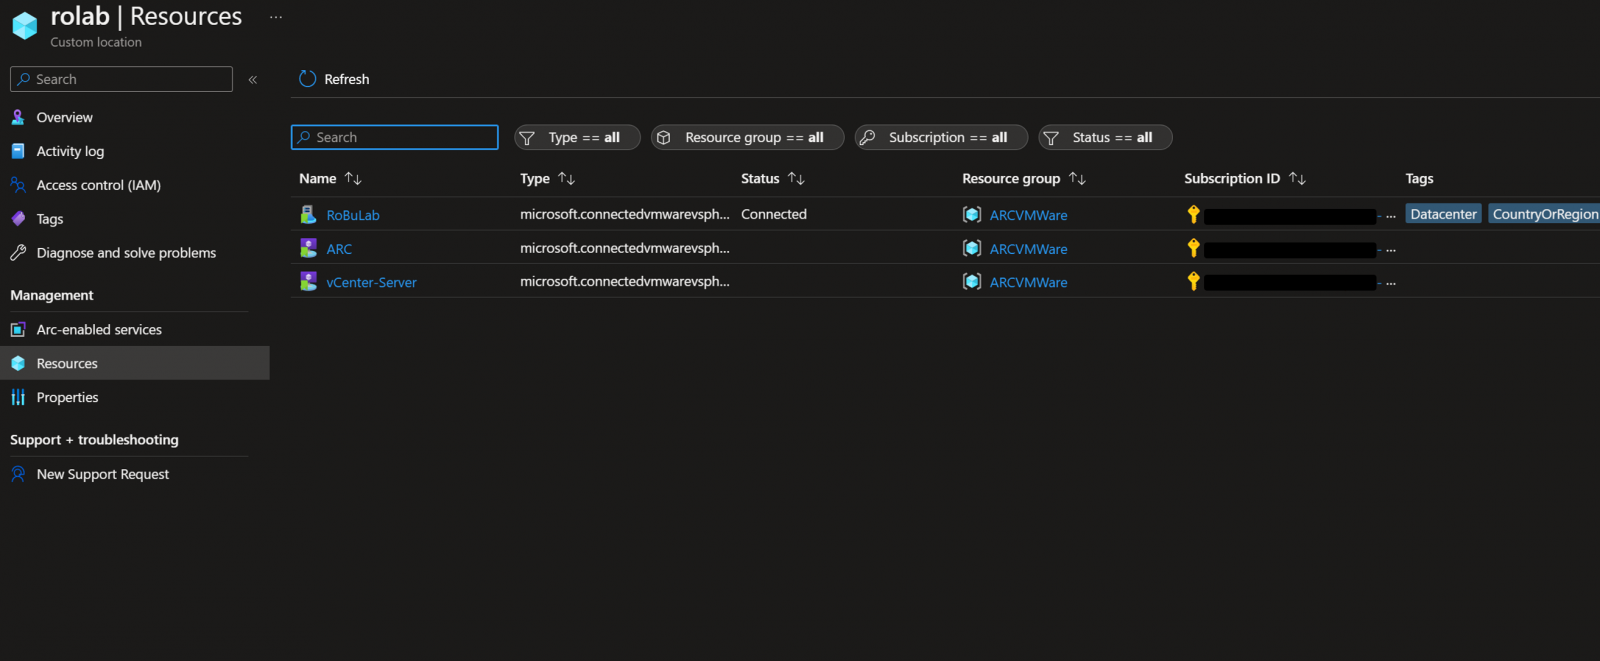
Figure 8. Resources inside the custom location created in Azure portal
Step 7: Enable existing virtual machines in Azure
From your browser, go to the vCenter's blade on Azure Arc Center and navigate to your vCenter.
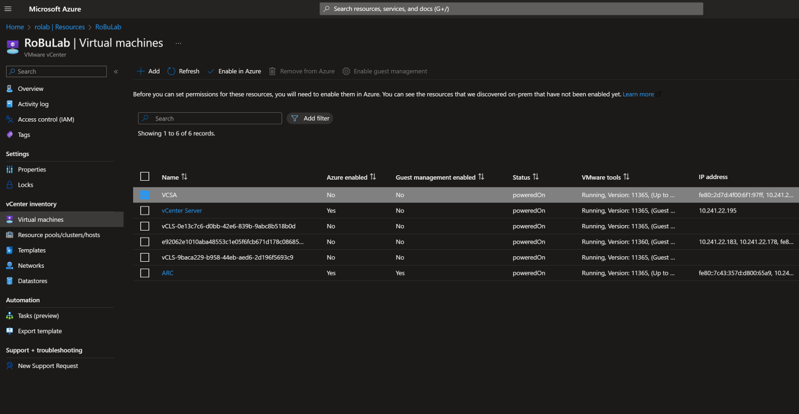
Figure 9. vCenter virtual machine exposed in Azure portal
- Navigate to the VM inventory resource, select the VMs you want to enable, and then select Enable in Azure.
- Select your Azure Subscription and Resource Group.
- (Optional) Select Install guest agent and then provide the Administrator username and password of the guest operating system.
- The guest agent is the Azure Arc connected machine agent. You can install this agent later by selecting the VM in the VM inventory view on your vCenter and selecting.
- Select Enable to start the deployment of the VM represented in Azure.
Once your VMware vCenter resources have been enabled in Azure, the final step in setting up a self-service experience for your teams is to provide them access. This article describes how to use built-in roles to manage granular access to VMware resources through Azure and allow your teams to deploy and manage VMs.
Step 8: Arc-enabled VMware vSphere built-in roles
There are three built-in roles to meet your access control requirements. You can apply these roles to a whole subscription, resource group, or a single resource.
- Azure Arc VMware Administrator role - a predefined role that grants full permissions for all operations related to the Microsoft.ConnectedVMwarevSphere resource provider. This role is intended for administrators who manage Azure Arc enabled VMware vSphere deployments. You can assign this role to individual users or groups.
- Azure Arc VMware Private Cloud User role - a preconfigured role that allows users to access VMware vSphere resources through Azure. This role is intended for individuals or groups who need to create, modify, or delete VMs. It is recommended that you assign this role at the resource pool, host, or cluster level, as well as for the virtual network or template that the user will use to deploy VMs. This will ensure that the user has the appropriate permissions to perform their tasks while maintaining security and access control.
- Azure Arc VMware VM Contributor role - a built-in role that provides permissions to conduct all VMware virtual machine operations. Assign this role to any users or groups that need to deploy, update, or delete VMs. We recommend assigning this role at the subscription or resource group you want the user to deploy VMs.
Assigning the roles to users/groups
- Go to the Azure portal.
- Search and navigate to the subscription, resource group, or the resource at which scope you want to provide this role.
- To find the Arc-enabled VMware vSphere resources like resource pools, clusters, hosts, datastores, networks, or virtual machine templates:
- navigate to the resource group and select the Show hidden types checkbox.
- search for "VMware".
- Click on Access control (IAM) in the table of contents on the left.
- Click on Add role assignments on the Grant access to this resource.
- Select the custom role you want to assign (one of Azure Arc VMware Administrator, Azure Arc VMware Private Cloud User, or Azure Arc VMware VM Contributor).
- Search for the Azure Active Directory (Azure AD) user or group to which you want to assign this role.
- Select the Azure AD user or group name. Repeat this for each user or group to which you want to grant this permission.
- Repeat the above steps for each scope and role.
Step 9: Create a virtual machine on VMware vCenter using Azure Arc
Prerequisites
- You need an Azure subscription and resource group for which you have the Arc VMware VM contributor role.
- You must have the Arc Private Cloud Resource User Role for the resource pool/cluster/host where you want to deploy your VM.
- You must also have the Arc Private Cloud Resource User Role for the virtual machine template resource you want to use.
- Finally, you need to have the Arc Private Cloud Resource User Role for the virtual network resource you plan to attach the VM to.
Step 10: How to create a VM in the Azure portal
- Open your web browser and navigate to the Azure portal.
- Find the virtual machines browse view and click on it.
- You will see a unified browsing experience for both Azure and Arc virtual machines. Click on "Add" and choose "Azure Arc machine" from the drop-down menu.
- Choose the subscription and resource group where you want to deploy the virtual machine.
- Provide a name for the virtual machine and select a custom location that has been shared with you by your administrator.
- If multiple kinds of virtual machines are supported, select "VMware" from the virtual machine kind drop-down menu.
- Select the resource pool/cluster/host where you want to deploy the virtual machine.
- Choose the datastore that you want to use for storage.
- Select a template based on which you will create the virtual machine.
- If you have selected a Windows template, provide a username and password for the administrator account.
- If necessary, you can change the disks and network interfaces that are configured in the template. For example, you can add more disks or update existing ones, and you can add or update network interface (NIC) cards.
- You can also change the network to which the NIC will be attached, provided that you have the appropriate permissions to the network resource.
- If necessary, you can add tags to the virtual machine resource.
- Review all the properties and click on "Create" to provision the virtual machine. It may take a few minutes for the virtual machine to be created.
Why Lenovo?
Lenovo is a US$70 billion revenue Fortune Global 500 company serving customers in 180 markets around the world. Focused on a bold vision to deliver smarter technology for all, we are developing world-changing technologies that power (through devices and infrastructure) and empower (through solutions, services and software) millions of customers every day.
For More Information
To learn more about this Lenovo solution contact your Lenovo Business Partner or visit: https://www.lenovo.com/us/en/servers-storage/solutions/
Trademarks
Lenovo and the Lenovo logo are trademarks or registered trademarks of Lenovo in the United States, other countries, or both. A current list of Lenovo trademarks is available on the Web at https://www.lenovo.com/us/en/legal/copytrade/.
The following terms are trademarks of Lenovo in the United States, other countries, or both:
Lenovo®
ThinkAgile®
The following terms are trademarks of other companies:
Linux® is the trademark of Linus Torvalds in the U.S. and other countries.
Microsoft®, Active Directory®, Arc®, Azure®, PowerShell, Windows Server®, and Windows® are trademarks of Microsoft Corporation in the United States, other countries, or both.
Other company, product, or service names may be trademarks or service marks of others.
Configure and Buy
Please select a locale
Full Change History
Course Detail
Employees Only Content
The content in this document with a is only visible to employees who are logged in. Logon using your Lenovo ITcode and password via Lenovo single-signon (SSO).
The author of the document has determined that this content is classified as Lenovo Internal and should not be normally be made available to people who are not employees or contractors. This includes partners, customers, and competitors. The reasons may vary and you should reach out to the authors of the document for clarification, if needed. Be cautious about sharing this content with others as it may contain sensitive information.
Any visitor to the Lenovo Press web site who is not logged on will not be able to see this employee-only content. This content is excluded from search engine indexes and will not appear in any search results.
For all users, including logged-in employees, this employee-only content does not appear in the PDF version of this document.
This functionality is cookie based. The web site will normally remember your login state between browser sessions, however, if you clear cookies at the end of a session or work in an Incognito/Private browser window, then you will need to log in each time.
If you have any questions about this feature of the Lenovo Press web, please email David Watts at dwatts@lenovo.com.


