Author
Published
16 Oct 2023Form Number
LP1837PDF size
21 pages, 2.4 MBAbstract
Serial over LAN (SOL) is a very powerful IPMI tool that provides serial line access over the management LAN. The typical goal of Serial over LAN is to redirect the traffic to/from a local asynchronous serial controller interface. This can be used to implement a virtual remote serial terminal that enables the user or remote software to interact with serial-based interfaces of the operating systems and management services.
Serial over LAN is available on Lenovo ThinkSystem servers in the XClarity Controller BMC with IPMI v2.0. SOL is achieved by redirecting information destined for the serial port over the LAN. With SOL console redirection, system administrators can remotely view the text-based console on their remote servers or PC from anywhere and perform any task that does not require a GUI.
This document describes how to configure and use SOL to remote control the OS Direct Console and guest OS console in VMware vSphere on Lenovo ThinkSystem servers. This document is intended for technical specialists, and IT administrators who are familiar with Serial over LAN and vSphere products.
Introduction
Serial over LAN (SOL) is the name of the redirection of baseboard serial controller traffic over an IPMI session. The following figure presents an example block diagram for the purposes of illustrating the concept of SOL. The lines represent the flow of the serial port data. BMC (Baseboard Management Controller) redirects the serial traffic over LAN, then the remote server or PC can interact with BIOS or OS via IPMI LAN session.
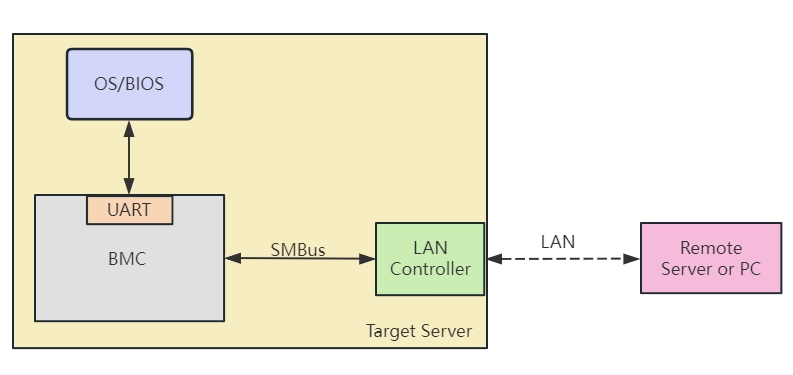
Figure 1. Serial over LAN concept
SOL can be used to enable asynchronous serial-based OS and pre-OS communication over a connection to the BMC. SOL provides users with a method to interact with serial text interfaces at remote consoles, such as operating system command-line, serial redirected BIOS interfaces, and serial text-based application over an IPMI LAN session. A single remote console application can use SOL to simultaneously provide LAN access to IPMI platform management and serial text redirection under a unified user interface. Access privileges for SOL are managed under the same user configuration interfaces that are used for IPMI management. This simplifies the creation of configuration software, remote management applications, and cross-platform configuration utilities.
Prerequisites for using SOL
The prerequisites for using SOL are listed below and these requirements are necessary for SOL to work properly.
The target server:
- Check IPMI over LAN: make sure that IPMI over LAN is enabled in XClarity Controller.
- Configure Serial Port Setting in UEFI: ensure the serial port settings are correct.
- Configure console redirection in vSphere: redirect OS direct log to the serial port.
The remote server of PC:
- ipmitool with IPMI v2.0 support: ipmitool v1.8.18 is recommended.
The following sections cover each of these items in detail. Click the above links to jump to each section.
Check IPMI over LAN status
Before configuring SOL, make sure that IPMI over LAN is enabled. On ThinkSystem servers, IPMI via the Ethernet port (IPMI over LAN) is supported, however it is disabled by default. You can configure it in XClarity Controller via BMC Configuration → Network → IPMI over LAN as shown in Figure 2.
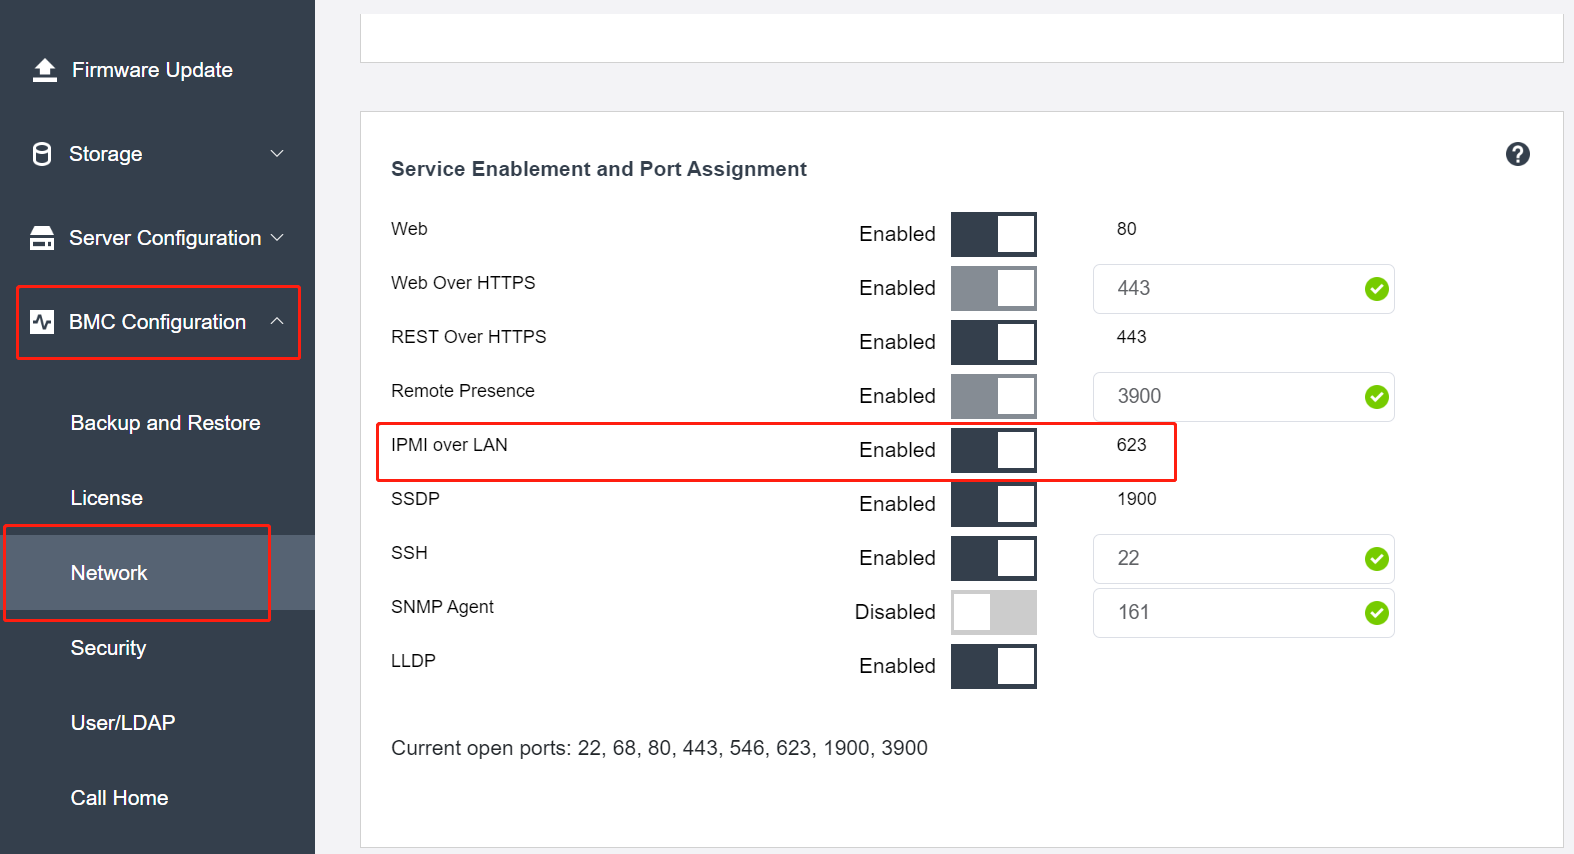
Figure 2. The IPMI over LAN setting of XCC
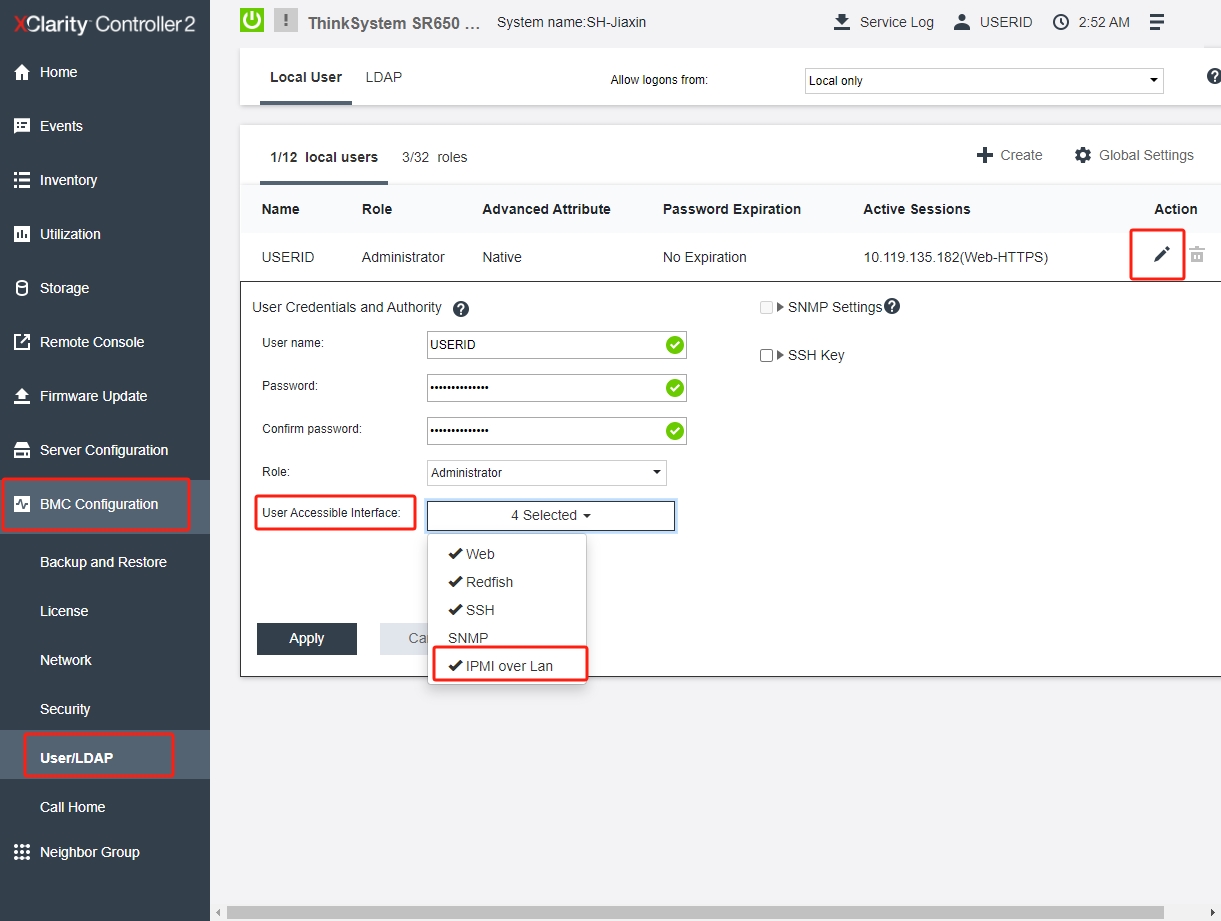
Besides enabling IPMI over LAN, it is necessary to confirm your BMC users have IPMI over LAN access if the User Accessible Interface option is available in XClarity Controller. Navigate to BMC Configuration → User/LDAP, select your user to edit. If it has the User Accessible Interface option, make sure the IPMI over Lan option is selected as shown in Figure 3.
Configure Serial Port Settings in UEFI
To communicate normally, it is necessary to enable Serial Port Console Redirection and ensure that the parameters of the serial port are correct. You can configure Serial Port Console Redirection in Lenovo UEFI.
Power on the Lenovo ThinkSystem server and then press F1 to enter System Setup.
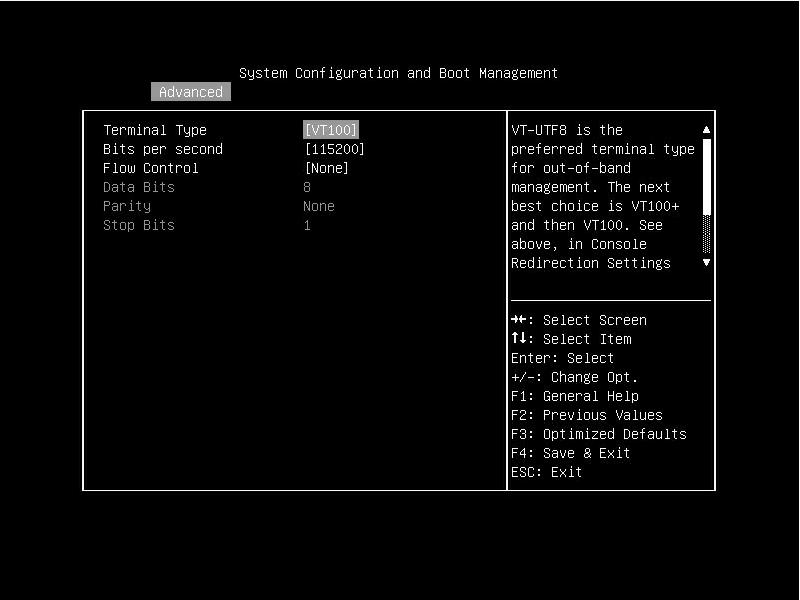
Select System Settings → Devices and I/O Ports → Console Redirection Settings where you can configure the settings of the server serial port as shown in Figure 4 and set the Console Redirection Settings accordingly.
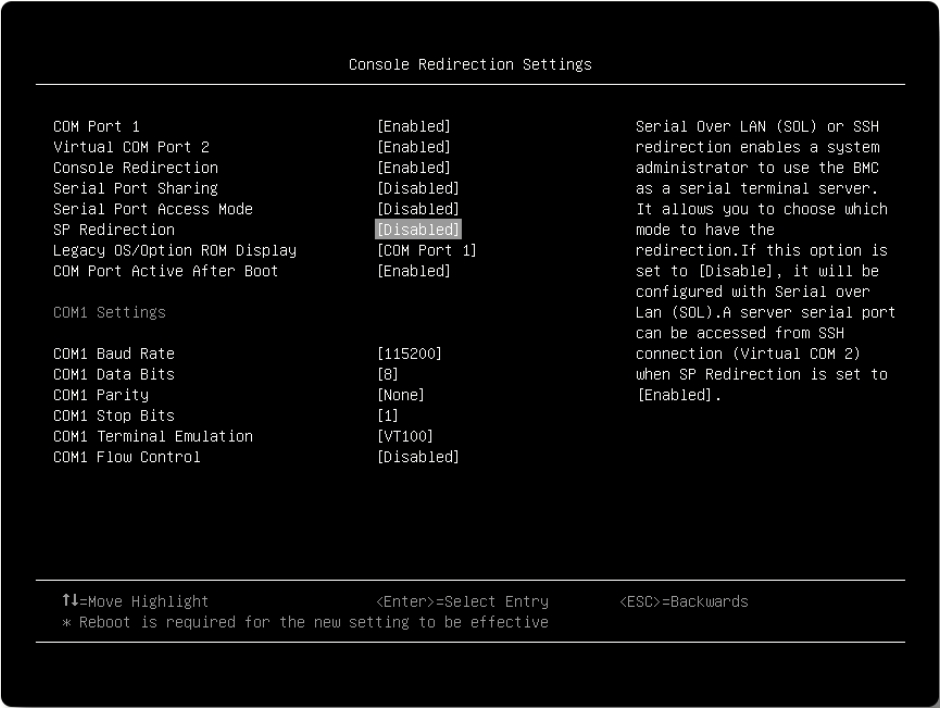
Figure 4. Server serial port settings in UEFI setting
These are mandatory items to be set for Console Redirection Settings
- COM Port 1: [Enabled], to enable COM1 device. On Lenovo ThinkSystem server, SOL is related to Console Redirection via COM 1, so enabled COM1 is essential to using SOL.
- Console Redirection: [Auto] or [Enabled], to enable console redirection. When [Auto] is selected, Console Redirection is enabled automatically if IPMI Serial over LAN status is active.
- Serial Port Sharing: [Disabled], the serial port is assigned to BMC unless “Serial Port Access Mode” is set to [Disabled].
- Serial Port Access Mode: [Disabled]. When Serial Port Access Mode set to disabled, the setting of Serial Port Sharing will not affect the use of SOL. When Serial Port Access Mode is not disabled and Serial Port Sharing is disabled, COM1 will be disabled. This will make SOL no output, so we suggest disabling both Serial Port Sharing and Serial Port Access Mode.
- COM Port Active After Boot: [Enabled]
- COM1 Baud Rate: [115200]
- COM1 Data Bits: [8]
- COM1 Parity: [None]
- COM1 Stop Bits: [1]
- COM1 Terminal Emulation: [VT100]. vSphere supports the VT100 terminal type and the PuTTy terminal emulator to view the direct console over the serial port.
ThinkSystem SR635 and SR655
For ThinkSystem SR635 and SR655, the Console Redirection for Windows Emergency Management Services (EMS) needs to be enabled as shown in Figure 5 and configure the Console Redirection Settings of EMS correctly as shown in Figure 6, to make COM1 work properly. In general, the default mapping between I/O ports and serial ports in OS is COM1→ 0x3F8, COM2→ 0x2F8. However, the I/O port 0x3F8 on ThinkSystem SR635 and SR655 cannot work. If EMS is enabled, UEFI will notify the OS through the SPCR table to set the port of COM1 to 0x2F8, so that COM1 can work normally.
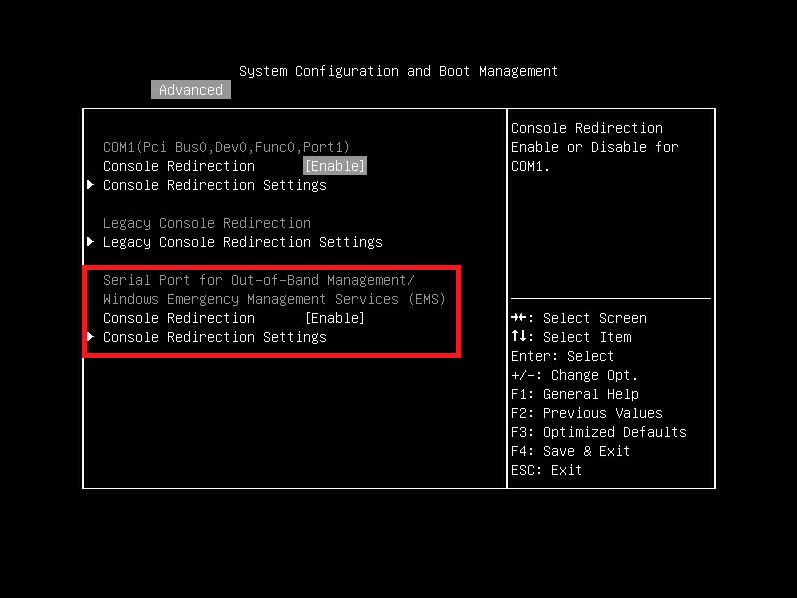
Figure 5. The Windows Emergency Management Services (EMS) settings on SR655
Configure console redirection in vSphere
After ensuring that the UEFI settings are configured, we also need to redirect the direct console in vSphere to manage vSphere remotely via SOL. SOL binding with COM 1 on ThinkSystem servers, so we need to redirect the direct console to COM1.
vSphere supports three ways to redirect the direct console to a serial port, as described in the following sections:
Redirect the Console by Setting the Boot Options Manually
The following are steps for redirecting the direct console to a serial port by setting the boot options.
- Start the host.
- When loading the VMware Hypervisor window appears, you can see the prompt “<SHIFT+O: Edit boot options>” in the bottom right as shown in Figure 7. Press Shift + O to edit boot options.
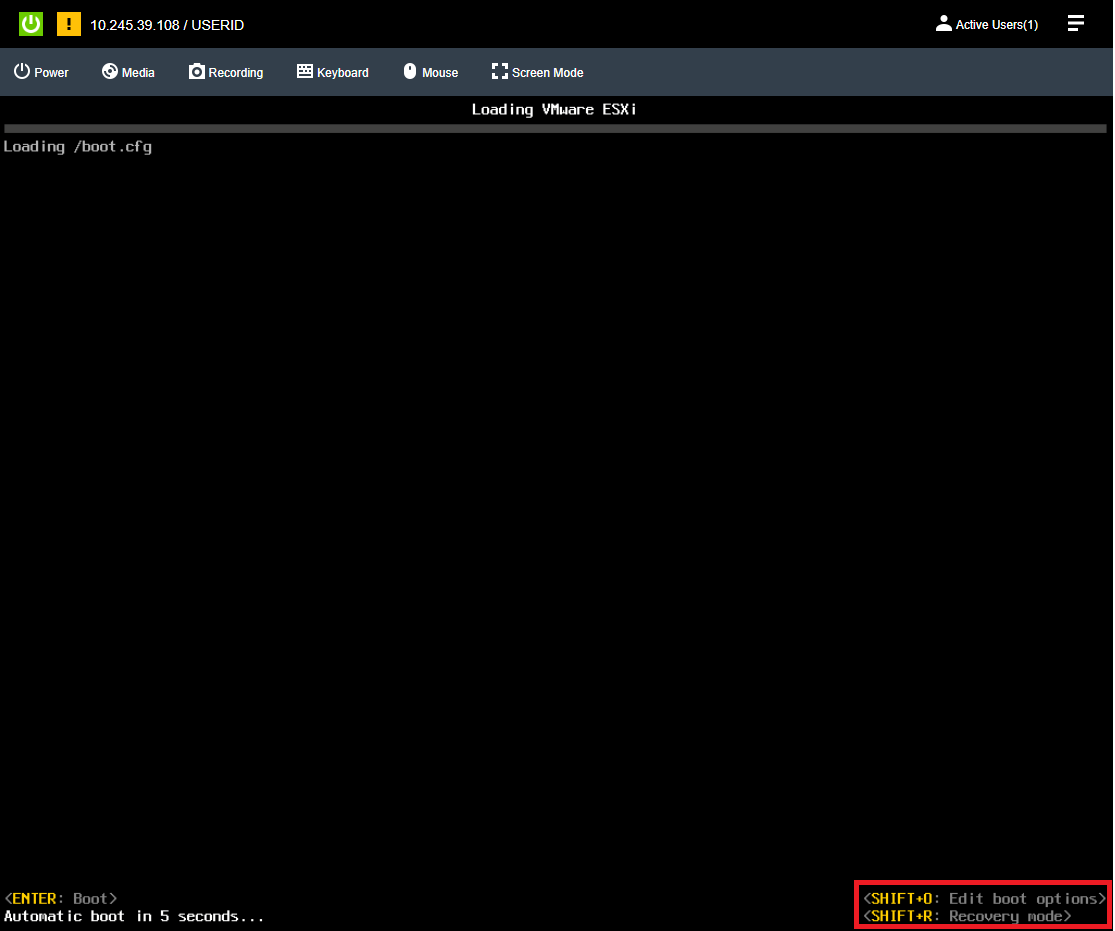
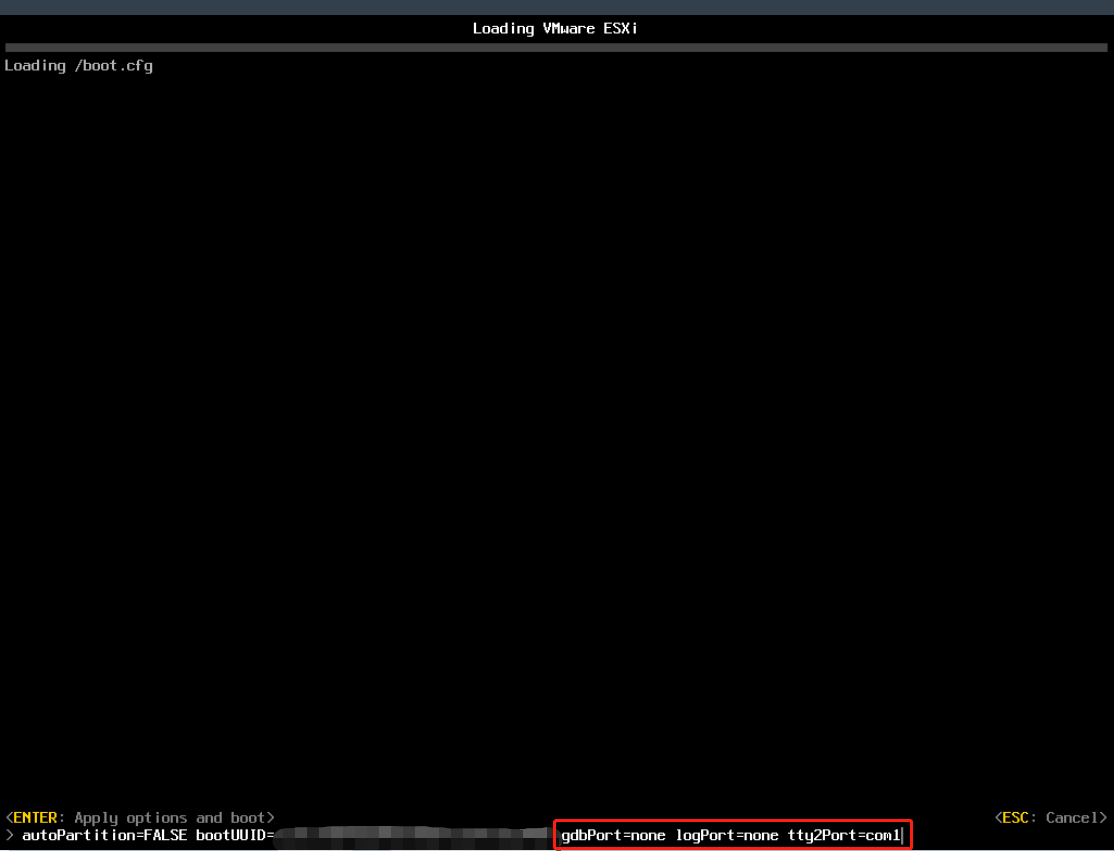
Figure 7. VMware ESXi with the Shift+O message (ESXi 7.0 U3) - Deactivate the logPort and gdbPort on com1 and set tty2Port to com1 by entering the following boot options, and add the following options after the original boot options as shown in Figure 8.
gdbPort=none logPort=none tty2Port=com1 - After adding these boot options, press the Enter key to boot ESXi with new boot options.
Tip: Redirecting to the serial port by setting the boot options manually only works once at first boot. To redirect the direct console for subsequent boots, please use other methods.
Redirect the console from the ESXi host client
VMware vSphere supports setting the direct console redirection form the ESXi host Client. Different from setting via boot options, when you use the ESXi host Client to redirect the direct console to a serial port, the boot option that you set persists after subsequent reboots.
The following are steps for redirecting the direct console to a serial port from the ESXi host Client.
- Make sure ESXi boots up, and you can access the host from ESXi Host Client.
- In the ESXi Host Client, select Manage → System → Advanced settings as shown in Figure 9.
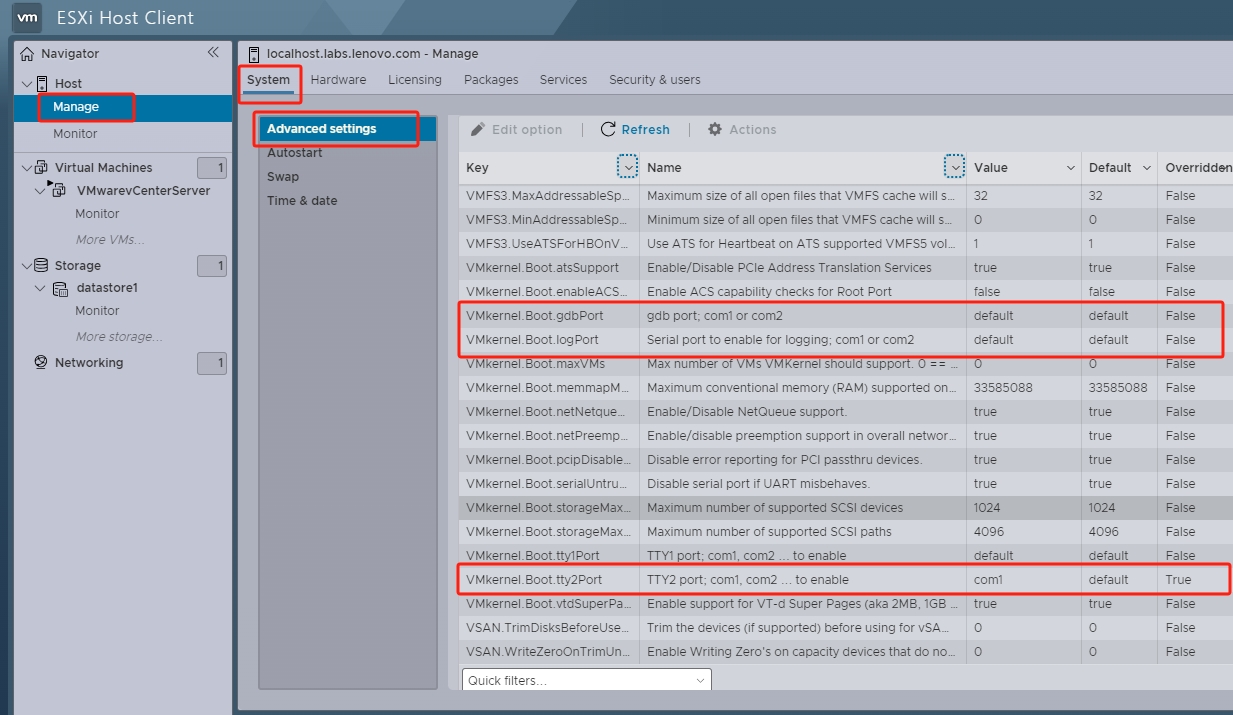
Figure 9. The settings of the direct console redirection in ESXi host client - As shown in Figure 9, make sure that the Boot.logPort and VMkernel.Boot.gdbPort fields are not set to use the com port that you want to redirect the direct console to. Set VMkernel.Boot.tty2Port to the serial port to redirect the direct console to: com1.
- Reboot the host to make the settings to take effect.
Or you can set these settings with ESXi command.
- Run the following CLI command to set the direct console redirection settings.
~# esxcfg-advcfg -k none gdbPort ~# esxcfg-advcfg -k none logPort ~# esxcfg-advcfg -k com1 tty2Port - Run the command to check the configuration. The output of the command is shown in Figure 10.
~# esxcfg-advcfg -j gdbPort
~# esxcfg-advcfg -j logPort
~# esxcfg-advcfg -j tty2Port
Redirect the Console from the vCenter
VMware vSphere supports setting the direct console redirection form the vCenter. When you use the ESXi host Client to redirect the direct console to a serial port, the boot option that you set persists after subsequent reboots just like setting from the ESXi host client does. And you can make that setting part of the host profile that persists when you reprovision the host with Auto Deploy.
The following are steps for redirecting the direct console to a serial port from the vCenter.
- Make sure you can access the host from the vCenter. Then, from the vSphere Client, connect to the vCenter Server.
- In the vSphere Client, select the host in the inventory → Click the Configure tab → select Advanced System Settings under System as shown in Figure 11.
- As shown in Figure 11, make sure that the Boot.logPort and VMkernel.Boot.gdbPort fields are not set to use the com port that you want to redirect the direct console to. Set VMkernel.Boot.tty2Port to the serial port to redirect the direct console to: com1.
- Reboot the host to make the settings to take effect.
- If you want the settings persist when you reprovision the host with Auto Deploy, save the host profile, and attach the host to the profile.
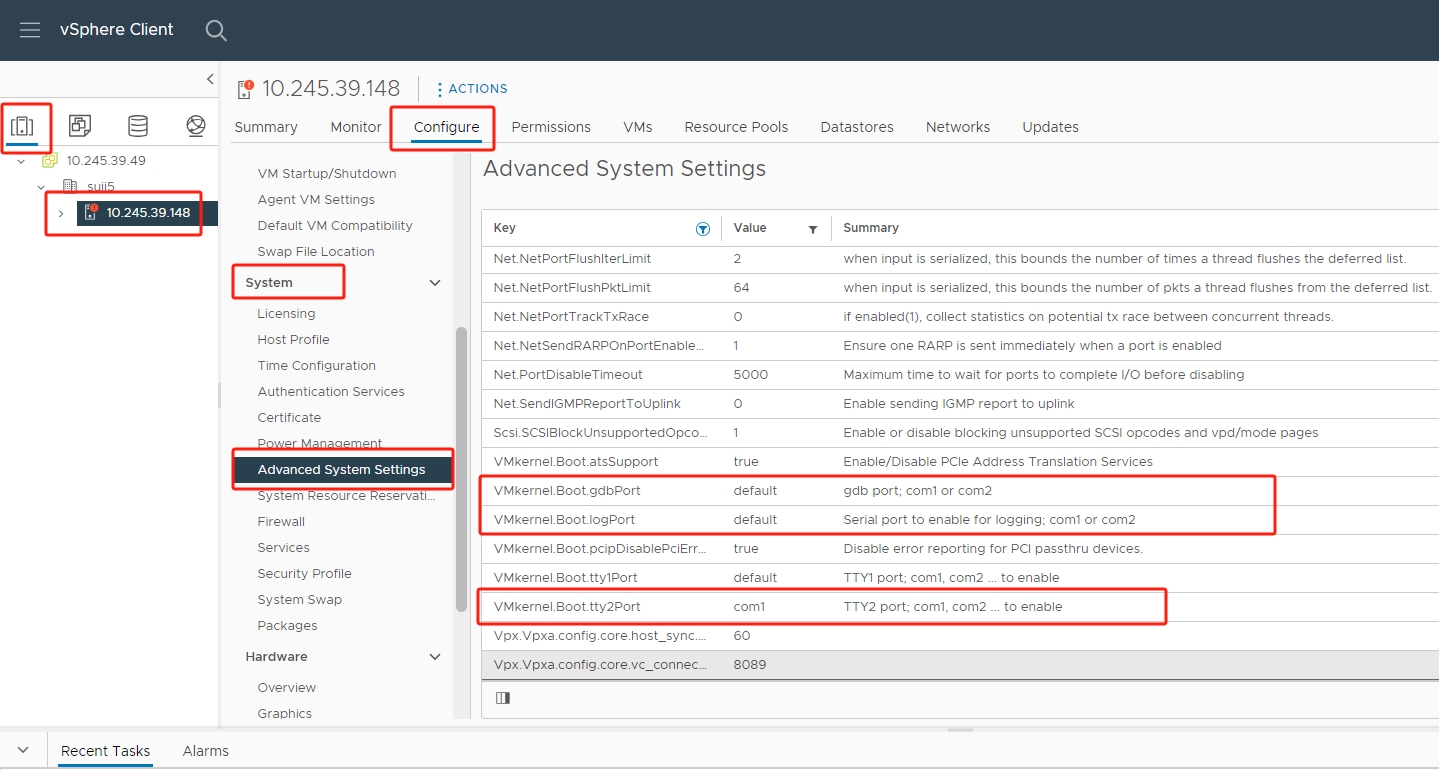
Figure 11. Settings of the direct console redirection in vSphere Client
Use ipmitool Remote Monitor Console
After setting up console redirection in UEFI and redirecting the direct console in ESXi, the direct console of ESXi output to COM1, then redirect information destined for COM1 over to the LAN. You can use ipmitool on your PC to interact with ESXi remotely.
SOL is implemented under IPMI v2.0, which requires ipmitool to support IPMI v2.0. The ipmitool v1.6.0 and later are available, and we recommend ipmitool v1.8.18.
The following are steps for using ipmitool to interact with ESXi remotely:
- Make sure ipmitool works on your PC and that your PC is on the same local area network as the target server's BMC.
- In order to connect to SOL use the following IPMI command from an external PC or server:
ipmitool -C 17 -I lanplus -H <IP address of BMC > -U ADMIN -P ADMIN sol activateFor example:
ipmitool -C 17 -I lanplus -H 10.10.10.10 -U ADMIN -P ADMIN sol activateThe IPMI SOL commands are listed in the following table:
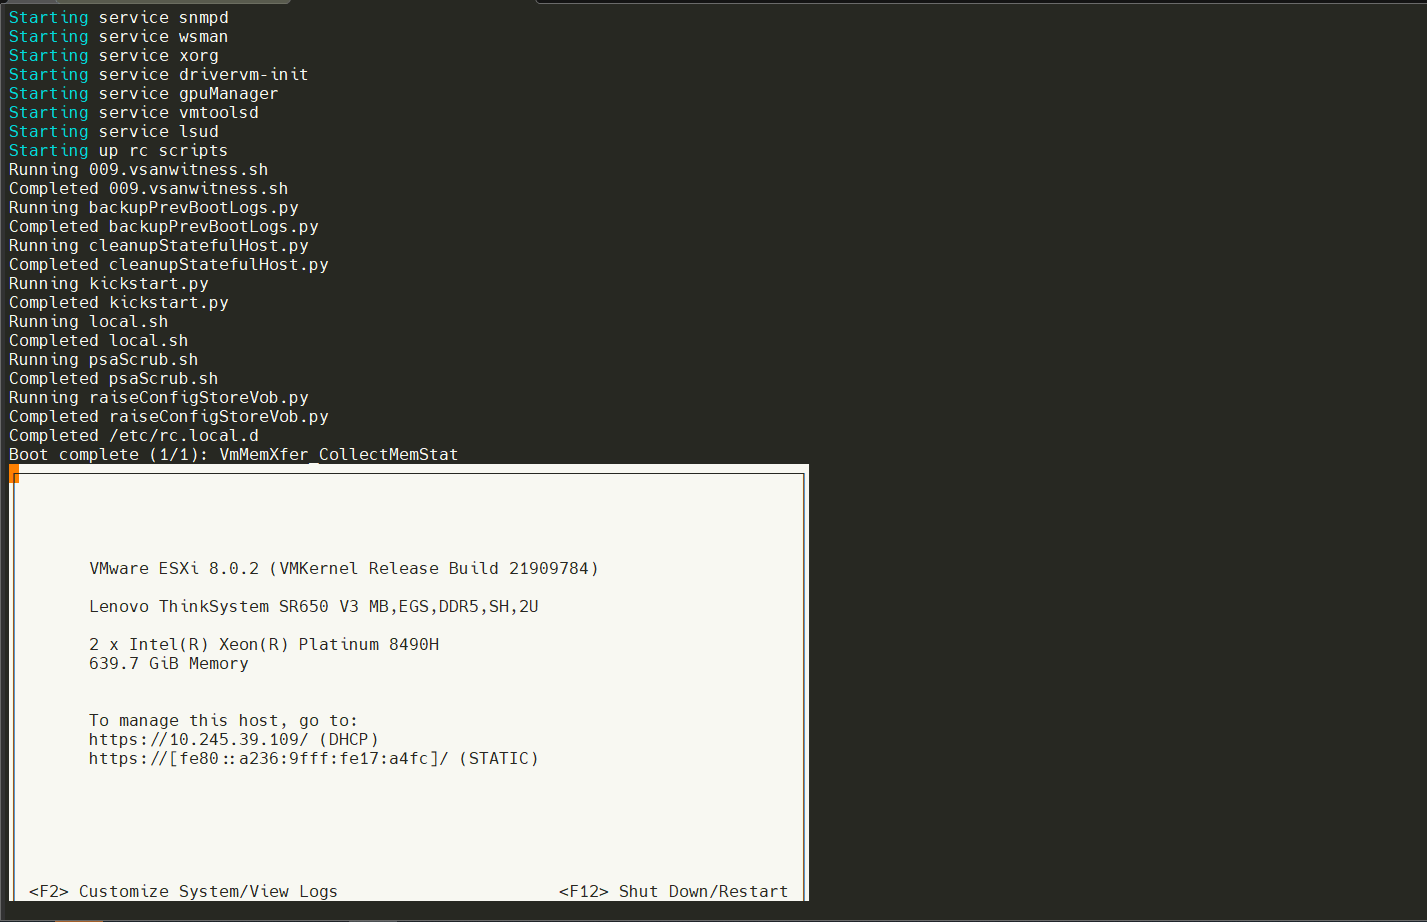
- Reboot the ESXi then you can see the context of the ESXi direct console in the session as shown in Figure 12.
Redirect the Guest OS Console to SOL
In addition to the serial port of the ESXi host, vSphere also supports redirecting the serial port of the guest OS to the SOL. ESXi console redirection and guest OS console redirection will conflict when used together, so use one with the other turned off.
The following steps are an example of redirecting the Linux guest OS console to SOL:
- Power off the virtual machine and then right-click the virtual machine in the inventory and select Edit Settings to add a Serial port.
- On the Virtual Hardware tab, click Add other device and select Serial port form the drop-down menu, as shown in Figure 13.
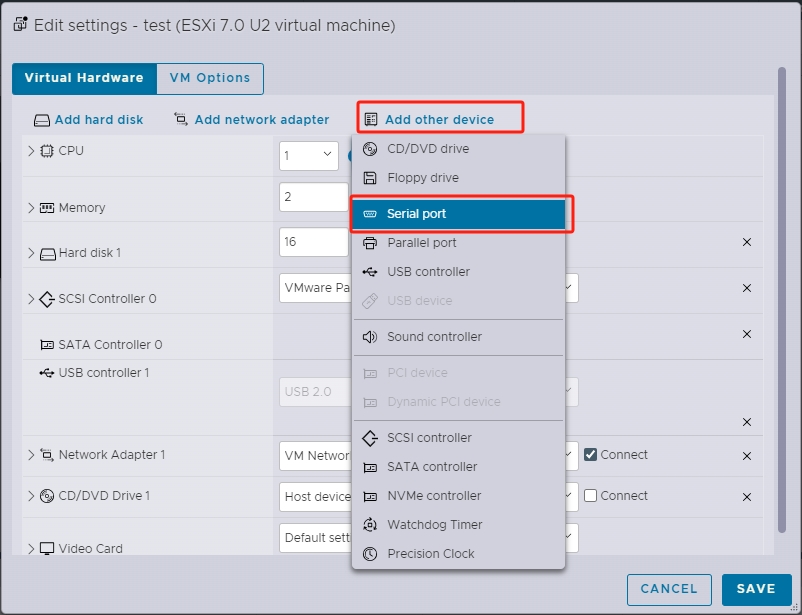
Figure 13. Add Serial port on host web client in ESXi 7.0 U3 - In the New Serial port text box, select Use physical serial port and /dev/char/serial/uart0, as shown in Figure 14.
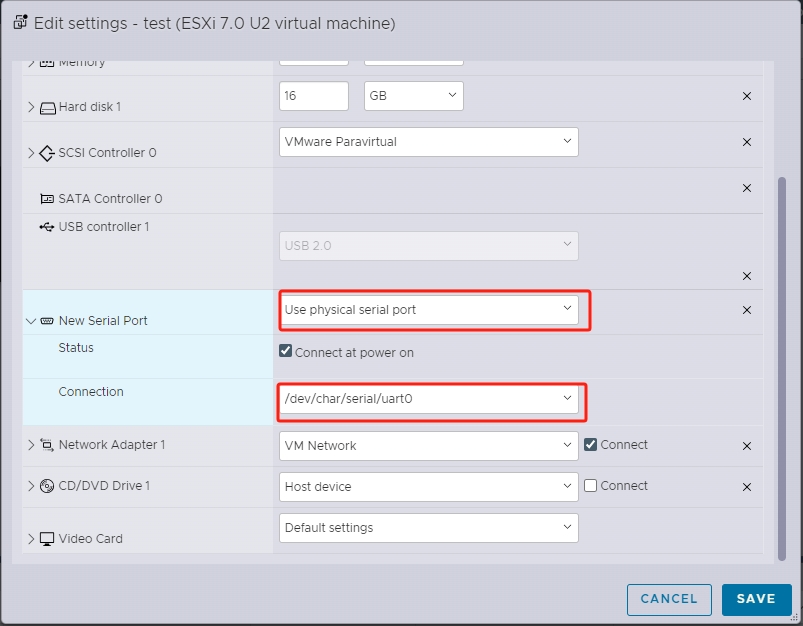
Figure 14. Configure New Serial Port on host web client in ESXi 7.0 U3 - Power on the virtual machine, and use the following steps to set guest OS console output via serial port.
For the Linux OS:
- Edit the /etc/default/grub file as shown in Figure 15.
- Add console=tty0 console=ttyS0,115200 to the end of the GRUB_CMDLINE_LINUX
- Add GRUB_TERMINAL="serial" to a new line.
- Add GRUB_SERIAL_COMMAND="serial --speed=115200 --unit=0 --word=8 --parity=no --stop=1" to a new line.
- Enter the following command to generate a grub config file.
UEFI mode:
~# grub2-mkconfig -o /boot/efi/EFI/redhat/grub.cfgLegacy mode:
# grub2-mkconfig -o /boot/grub2/grub.cfg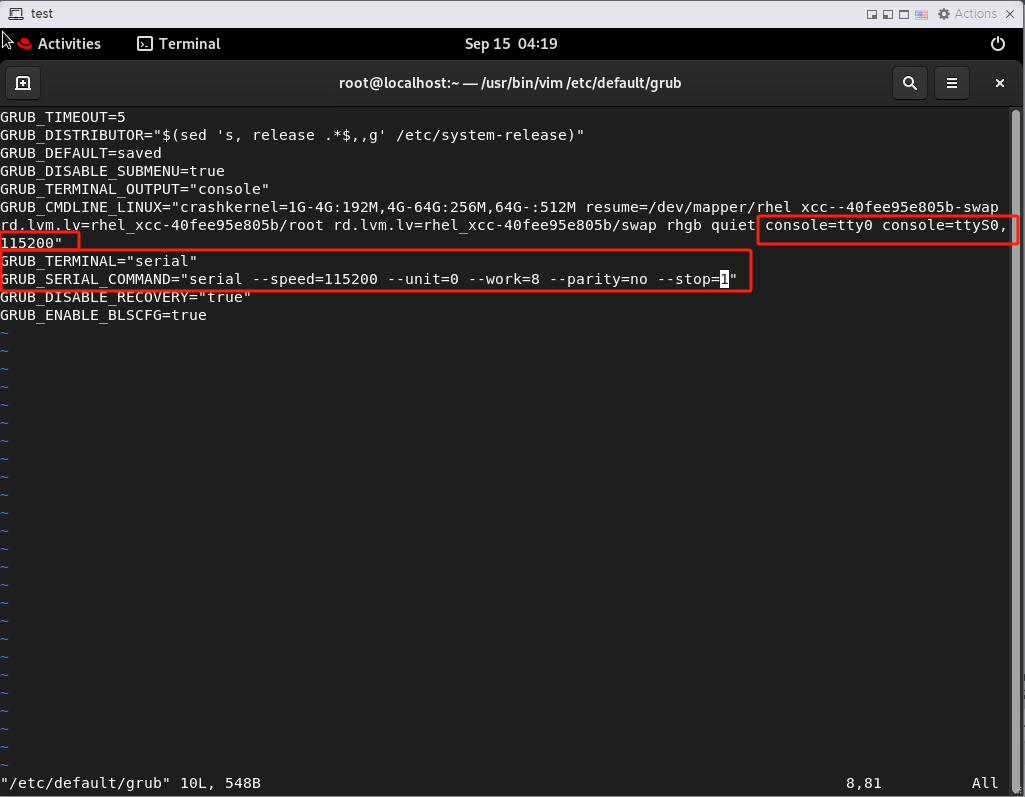
Figure 15. Edit /etc/default/grub on RHEL9.0 virtual machine
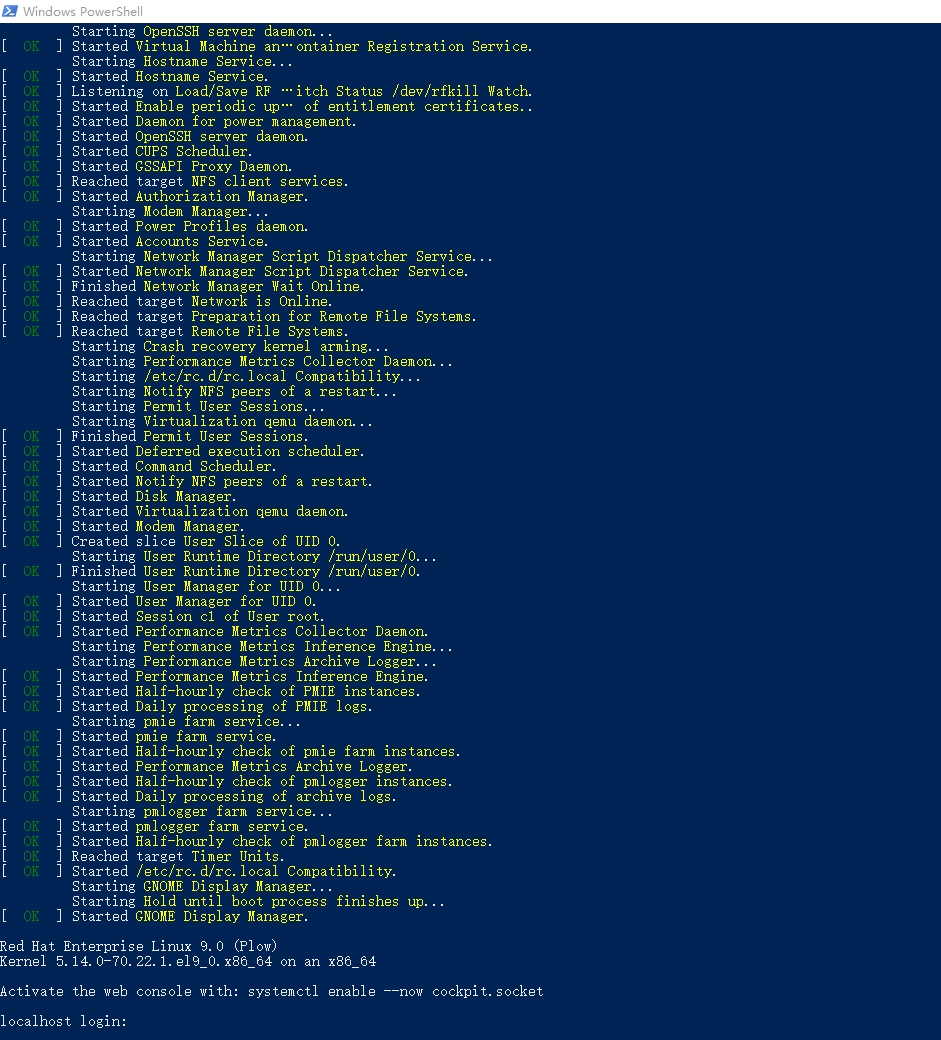
- Reboot the virtual machine. When the virtual machine restarts, you can get the context of the virtual machine console via SOL, as shown in Figure 16.
References
Review the following web pages for more information:
- ThinkSystem server with AMD EPYC (1-socket, 1st, 2nd, 3rd Gen)
https://pubs.lenovo.com/uefi_amd_1p_1st_2nd_3rd/ - Intelligent Platform Management Interface Specification Second Generation v2.0
https://www.intel.cn/content/dam/www/public/us/en/documents/product-briefs/ipmi-second-gen-interface-spec-v2-rev1-1.pdf#zoom=100ajor-advance-in-memory-and-storage-architecture
About the author
Skyler Zhang is a VMware Engineer at the Lenovo Infrastructure Soiutions Group, based in Beijing, China. She joined the OS team in 2022.
Thanks to the following specialists for their contributions and suggestions:
- Boyong Li, Lenovo OS Technical Leader
- Chengcheng Peng, Lenovo VMware Engineer
- Alpus Chen, Lenovo VMware Engineer
- Gary Cudak, OS Architect and WW Technical Lead
- David Watts, Lenovo Press
Trademarks
Lenovo and the Lenovo logo are trademarks or registered trademarks of Lenovo in the United States, other countries, or both. A current list of Lenovo trademarks is available on the Web at https://www.lenovo.com/us/en/legal/copytrade/.
The following terms are trademarks of Lenovo in the United States, other countries, or both:
Lenovo®
ThinkSystem®
XClarity®
The following terms are trademarks of other companies:
AMD and AMD EPYC™ are trademarks of Advanced Micro Devices, Inc.
Linux® is the trademark of Linus Torvalds in the U.S. and other countries.
Windows® is a trademark of Microsoft Corporation in the United States, other countries, or both.
Other company, product, or service names may be trademarks or service marks of others.
Configure and Buy
Full Change History
Course Detail
Employees Only Content
The content in this document with a is only visible to employees who are logged in. Logon using your Lenovo ITcode and password via Lenovo single-signon (SSO).
The author of the document has determined that this content is classified as Lenovo Internal and should not be normally be made available to people who are not employees or contractors. This includes partners, customers, and competitors. The reasons may vary and you should reach out to the authors of the document for clarification, if needed. Be cautious about sharing this content with others as it may contain sensitive information.
Any visitor to the Lenovo Press web site who is not logged on will not be able to see this employee-only content. This content is excluded from search engine indexes and will not appear in any search results.
For all users, including logged-in employees, this employee-only content does not appear in the PDF version of this document.
This functionality is cookie based. The web site will normally remember your login state between browser sessions, however, if you clear cookies at the end of a session or work in an Incognito/Private browser window, then you will need to log in each time.
If you have any questions about this feature of the Lenovo Press web, please email David Watts at dwatts@lenovo.com.

