

Top
Author
Published
22 Dec 2023Form Number
LP1874PDF size
21 pages, 2.1 MBSubscribed to LP1874.
Thank you for your feedback.
Abstract
4th Gen and 5th Gen Intel Xeon Scalable processors include a broad set of integrated and power-efficient accelerators to offload specialized functions and reserve compute cores for general-purpose tasks.
In this paper, we introduce two of the accelerators, Intel Dynamic Load Balancer (DLB) and Intel QuickAssist Technology (QAT), and how to enable them with VMware ESXi 7.0 U3 and a Red Hat Enterprise Linux 8 virtual machine.
This paper is for technical specialists who are looking to deploy these accelerators. The paper assumes the reader is familiar with DLB, QAT and VMware vSphere products.
Introduction
Compute architecture and workloads are evolving and digital traffic has grown tremendously, and this has pushed data centers to be larger than ever, driving an explosive demand for compute. Modern workloads place increased demands on compute, storage and network resources. To deal with the ever-increasing need for compute power, many customers deploy power-efficient accelerators to offload specialized functions and reserve compute cores for general-purpose tasks. Offloading specialized tasks to AI, security, HPC, networking and analytics can result in power savings and faster time to results.
The 4th Gen and 5th Gen Intel Xeon Scalable processors include a broad set of integrated accelerators, which speed up data movement, encryption, and compression for faster networking and storage, boost query throughput for more responsive analytics, and offload scheduling and queue management to dynamically balance loads across multiple cores.
Applications from storage, database, networking, and big data can greatly benefit from the higher performance, reduced latency, lower data footprint and processing efficiencies these accelerator engines will deliver.
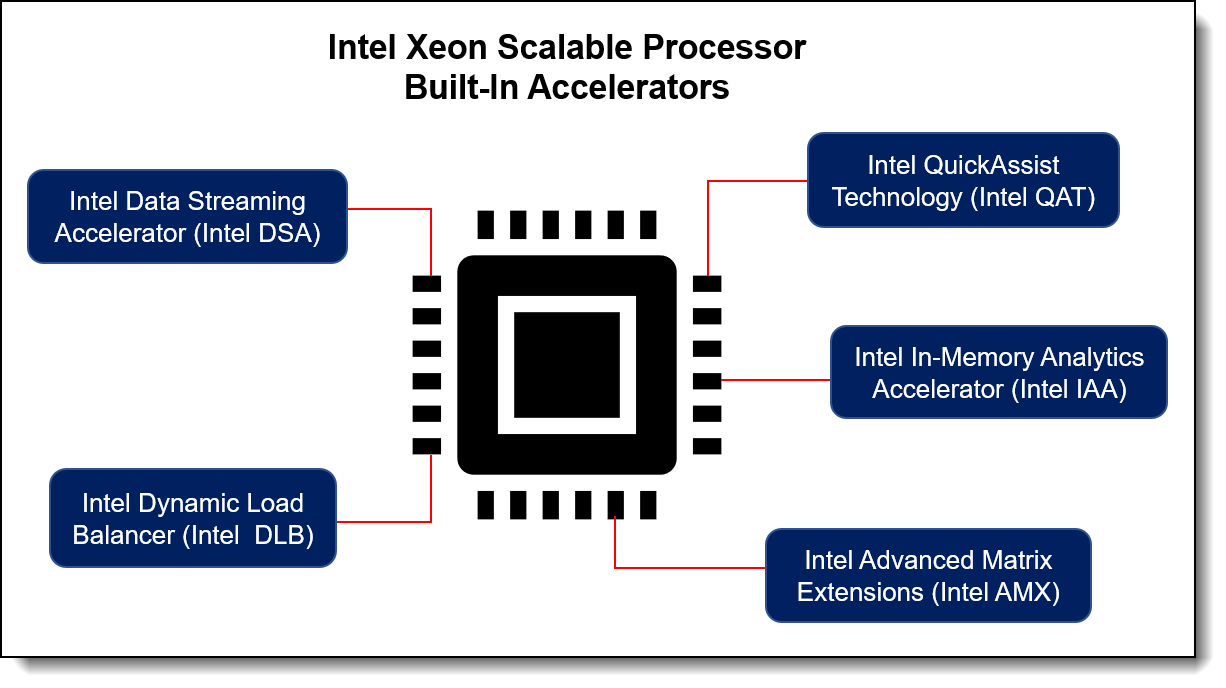
Figure 1. Built-in accelerators of the 4th Gen and 5th Gen Intel Xeon Scalable processor
As the above figure shows, the 4th Gen and 5th Gen Intel Xeon Scalable processor include a set of dedicated accelerator engines for the most common processing functions in the data center:
- Intel Advanced Matrix Extension (Intel AMX) to speed up low-precision math and accelerate AI/ML.
- Intel Data Streaming Accelerator (Intel DSA) to copy and move data faster and assist PDK.
- Intel QuickAssist Technology (Intel QAT) to accelerate compression, encryption, and decryption.
- Intel In-memory Analytics Accelerator (Intel IAA) to speed up query processing performance.
- Intel Dynamic Load Balancer (Intel DLB) to help speed up data queues.
The availability of accelerators varies depending on the processor SKU. For details which processor SKUs include each accelerator, see the Lenovo Press processor comparison reference:
https://lenovopress.lenovo.com/lp1262-intel-xeon-scalable-processor-comparison
In this paper, we demonstrate two of the accelerators, Intel DLB and Intel QAT, with VMware ESXi 7.0 U3. Installing Intel accelerator driver for enables single root I/O virtualization (SR-IOV) to create the virtual function (VF) from a single physical function (PF) to support hardware acceleration for guest virtual machine.
Intel Dynamic Load Balancer
Intel Dynamic Load Balancer (Intel DLB) is a hardware managed system of queues and arbiters connecting producers and consumers. It supports high queuing rates, load balancing across consumers, multi-priority queuing arbitration, multiple scheduling types, and efficient queue notification. Intel DLB appears to software as a PCIe device that provides load-balanced, prioritized scheduling of events (packets) across CPU cores/threads enabling efficient core-to-core communication.
Traditionally, the queues in the memory model have fundamental performance and algorithmic limitations. Some examples include: impact of lock latency, lock contention, memory latency, cache and snooping behaviors, and polling of multiple queues. This can lead to insufficient core compute cycles being available to meet real-time requirements for more complicated queue configurations and/or more complicated scheduling decisions such as: multiple queues, priority between queues, and consumer load balancing.
With the queues and the associated pointers implemented in the Intel DLB accelerator, the limitations of locking, memory/cache latencies, and snooping behaviors are addressed by storing the pointers and the queue itself in Intel DLB local memory. The compute and polling limitations are solved by using purpose-built logics in the Intel DLB.
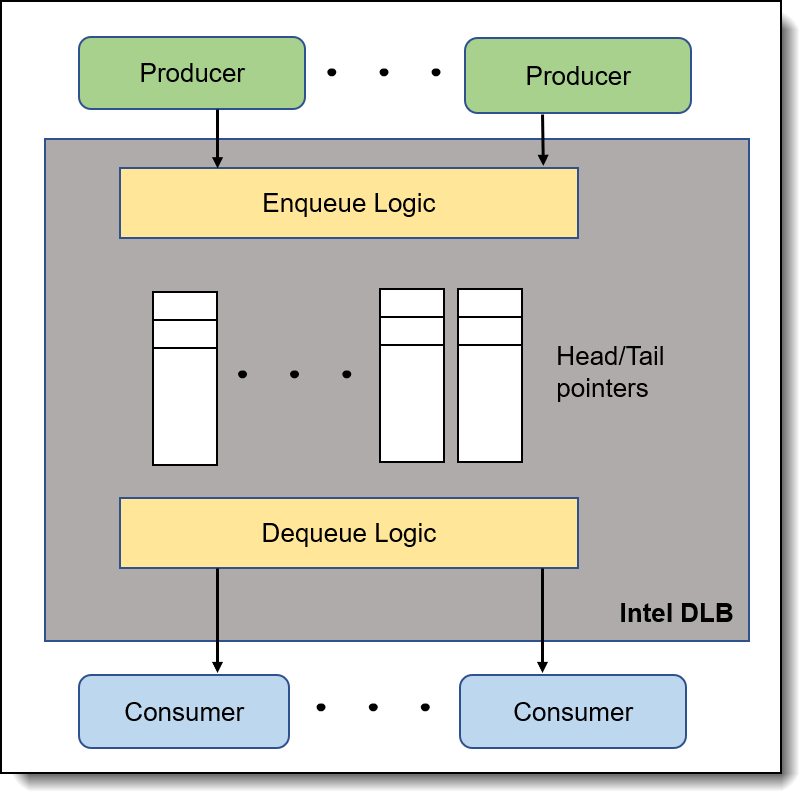
Figure 2. Intel DLB with producer/consumer model
Intel DLB supports a producer/consumer model as the above figure shows. A producer is an agent that has a type of message to place onto a queue. A consumer is an agent that removes the message from the queue. These messages typically describe work for the consumer to execute.
The high-level Intel DLB data flow is as follows:
- Software threads interact with the hardware by enqueuing and dequeuing Queue Elements (QEs).
- QEs are sent through a Producer Port (PP) to the Intel DLB internal QE storage (internal queues), optionally being reordered along the way.
- The Intel DLB schedules QEs from internal queues to a consumer according to a two-stage priority arbiter.
- Once scheduled, the Intel DLB writes the QE to a main-memory-based Consumer Queue (CQ), which the software thread reads and processes.
The supported processors have 0, 1, 2 or 4 DLB accelerators depending on the processor SKU. For specifics, refer to Intel Xeon Scalable processor comparison reference:
https://lenovopress.lenovo.com/lp1262-intel-xeon-scalable-processor-comparison#term=dlb
Implementing Intel DLB
This section describes the steps we took to configure and enable Intel DLB with VMware ESXi 7.0 U3 using SR-IOV technology, to create virtual function from physical function for providing acceleration in the virtual machine.
The test configuration of ThinkSystem SR630 V3 is listed in the following table.
Important restrictions related to Intel DLB:
- The DLB driver release doesn't support VMware vSphere vMotion
- The number of PCI passthrough devices per VM is limited. Refer to the configuration maximum guide for more information: https://kb.vmware.com/s/article/1003497
The steps to implement Intel DLB are as follows:
- Power up the server and boot to the UEFI setup menu. Ensure that Intel VT for Directed I/O (VT-d) and SRIOV options are enabled as shown in the following figure.

Figure 3. Intel VT-d and SRIOV options in the UEFI setup menu -
Go to the Intel website and download the driver for Intel DLB hardware version 2.0 for VMware ESXi:
- Install VMware ESXi 7.0 U3 on the server and then install the Intel DLB driver component as shown below.
- Reboot the system to complete driver installation.
- Verify the Intel DLB driver is loaded in OS after reboot. The following figure shows there are two DLB devices with PCI ID 8086:2710 in the system.
- Login to vSphere client.
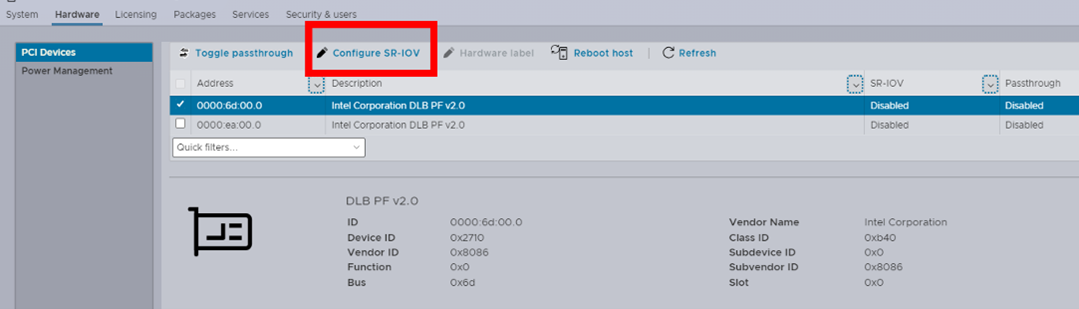
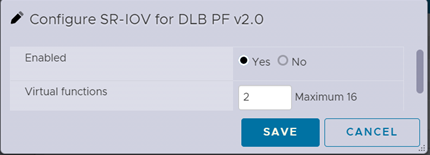
- From the left-hand navigation menu, select Manage > Hardware > PCI Devices. Select Intel Corporation DLB PF v2.0 > Configure SR-IOV, set the Enabled option to Yes and input the desired number of virtual function devices in the range between 1 and maximum indicated in the window, as shown in the two figures below.
- Save the settings and reboot system to make changes take effect.
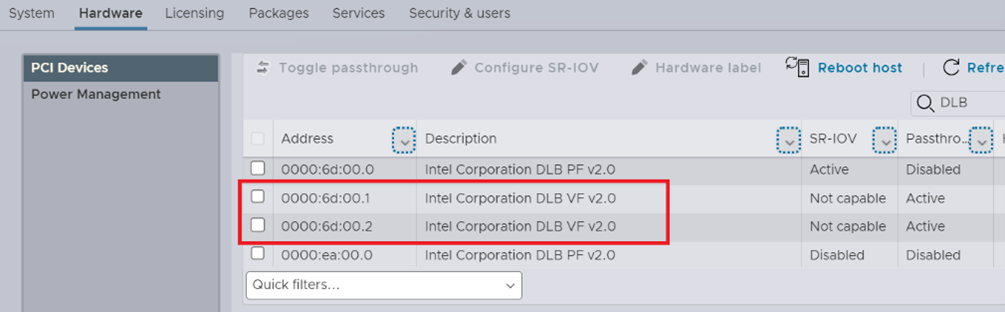
- Login to the vSphere client again to verify the two DLB virtual functions (PCI ID 8086:2711) have been enabled with the description text “Intel Corporation DLB VF v2.0”, as shown below.
- Create a new VM and install RHEL 8.7 guest OS in the VM.
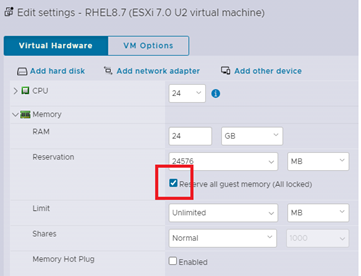
- Before powering on the VM, click the Edit button to configure Memory RAM of desired size, and set Reserve all guest memory (All locked) checkbox, as shown below.
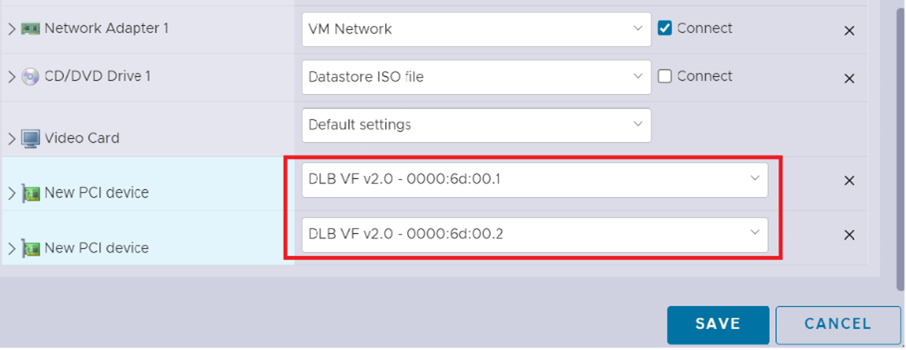
- Click Add other device > PCI device and add “DLB VF v2.0 – 0000:6d:00.1” and “DLB VF v2.0 – 0000:6d:00.2” as new PCI devices, as shown below.
- Click Save to finish the setting and power on the VM to install guest OS.
- When guest OS installation completes, login to the guest OS and check there are two DLB devices (PCI ID 8086:2711) in the virtual machine, as shown in the following figure.
- Download Intel DLB Linux software package which contains the Intel DLB kernel driver and the libdlb client library for non-dpdk application, and copy the software package to the RHEL 8.7 guest OS.
https://www.intel.com/content/www/us/en/download/686372/intel-dynamic-load-balancer.htmlLibdlb is a POSIX based client library for building Intel DLB based application and provides sample code for directed and load balanced traffic tests to demonstrate features supported by the Intel DLB. The sample code is located in the dlb/libdlb/examples/ directory.
- The Intel DLB Linux software package can be extracted using the following command:
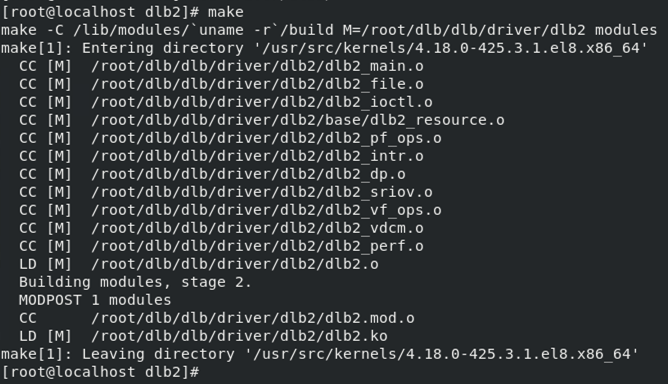
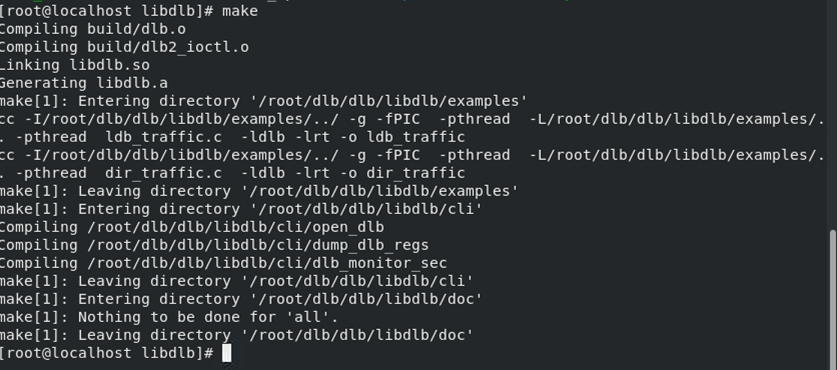
~# tar xfJ dlb_linux_src_release_8.4.0.txz - Go to dlb/driver/dlb2/ directory, simply run the command make to build out-of-tree driver from source code and get the dlb2.ko driver module, as shown in the following figure.
- Go to dlb/libdlb/ directory and run the command make to build libdlb library, as shown in the following figure. The sample source code is located at dlb/libdlb/examples/ directory.
- Use the following commands to load the DLB driver module before running the sample application:
~# modprobe mdev; modprobe vfio_mdev
~# insmod dlb/driver/dlb2/dlb2.ko ; cd libdlb


Now that the drivers are installed, you can perform some tests.
The following figure shows OS log message when the DLB driver modules is loaded in Linux OS.

For Directed Traffic test, run the following command:
~# LD_LIBRARY_PATH=$PWD ./examples/dir_traffic -w poll -n 128 -f 4
Where:
- -w option to specify wait mode,
- -n option to specify number of looped events
- -f to specify number of worker threads that forward events
As the following figure shows, the 128 events are evenly distributed to the 4 workers (each worker received 32 events) in the directed traffic test.

Figure 15. Sample code – directed traffic test
For Load Balanced Traffic test, run the following command:
~# LD_LIBRARY_PATH=$PWD ./examples/ldb_traffic -w poll -n 128 -f 4
As the following figure shows, the 128 events are dynamic distributed to the 4 workers in the load balanced traffic test.

Intel QuickAssist Technology
Intel QuickAssist Technology (Intel QAT) is an integrated accelerator for compute intensive workloads, Intel QAT offloads bulk cryptography, compression/decompression, and Public Key Encryption (PKE). It has support for additional standards and features, including Key Protection Technology, Shared Virtual Memory (SVM), Scalable IO Virtualization (SIOV), Extended RAS (uncorrectable and fatal error support), as the following figure shows.
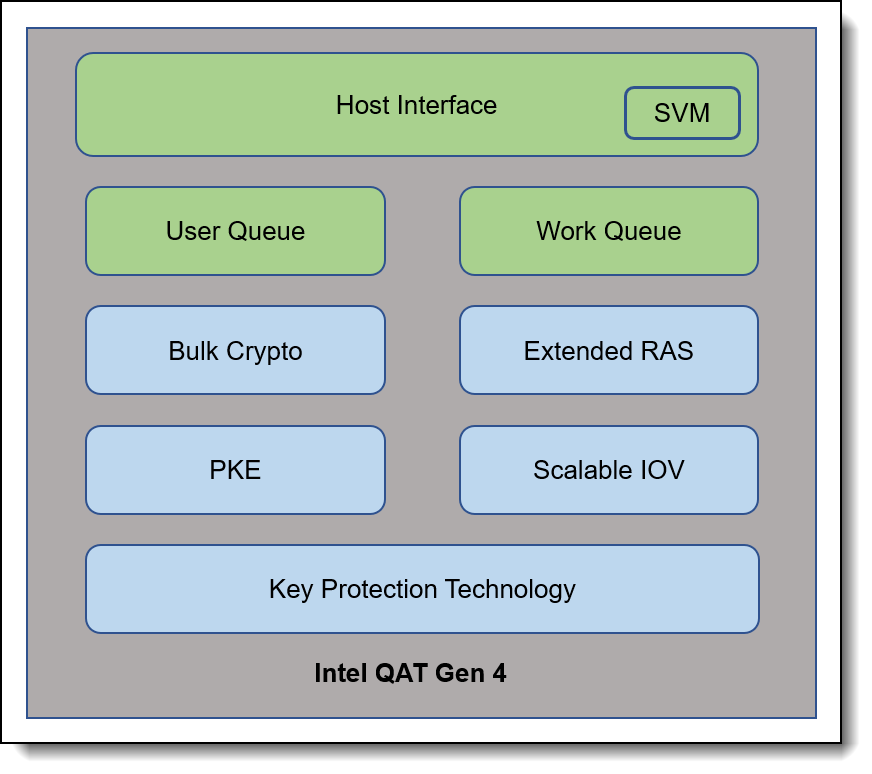
Figure 17. Intel QAT components
Intel Xeon Scalable processors have 0, 1, 2 or 4 QAT accelerators depending on the processor SKU. For specifics, refer to Intel Xeon Scalable processor comparison reference:
https://lenovopress.lenovo.com/lp1262-intel-xeon-scalable-processor-comparison#term=qat
The CPU cores access the QAT acceleration services via a standard PCIe interface. Application developers can use the feature through the QAT API, which is the top-level API for Intel QAT and enables easy interfacing between the customer application and the Intel QAT acceleration driver.
For more information about Intel QAT technology, refer to the Intel website:
https://www.intel.com/quickassist
Implementing Intel QAT
This section describes the steps we took to configure and enable Intel QAT with VMware ESXi 7.0 U3 using SR-IOV technology, to create virtual function from physical function for providing cryptographic and compression acceleration capabilities in the virtual machine.
The test configuration of the ThinkSystem SR650 V3 is listed in the following table.
Important notes regarding Intel QAT:
- The QAT driver release doesn't support VMware vSphere vMotion
- Number of PCI passthrough devices per VM is limited. Please refer to the configuration maximum guide for more details: https://kb.vmware.com/s/article/1003497
- VMKernel supports 1024 interrupt cookies by default. On system with large number of accelerators, interrupt cookies could be exhausted, which may lead to various issues and accelerator HW will be not available. Use below command to check the current interrupt cookie allocations of PCI devices in OS:
~# cat /var/run/log/vmkernel.log | grep "allocate.*interrupts"Increase interrupt cookies number to the desired value (up to 4096) to support more devices via the following command:
~# esxcli system settings kernel set -s maxIntrCookies -v 4096
The steps to implement Intel DLB are as follows:
- Power up the server and boot to the UEFI setup menu. Ensure that Intel VT for Directed I/O (VT-d) and SRIOV options are enabled as shown in the following figure.
Figure 18. Intel VT-d and SRIOV options in the UEFI setup menu - Go to the Intel website and download the driver for Intel QAT hardware version 2.0 for VMware ESXi:
- Install VMware ESXi 7.0 U3 on the server and then install the Intel QAT driver component.
- Reboot the system to complete driver installation.
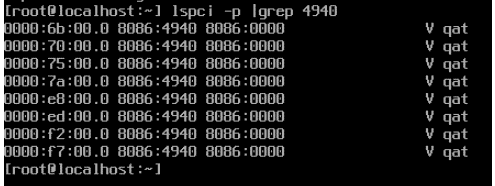
- Verify the QAT driver is loaded in OS after reboot. The following figure shows there are eight QAT devices with PCI ID 8086:4940 in the system.
- Login to vSphere client.
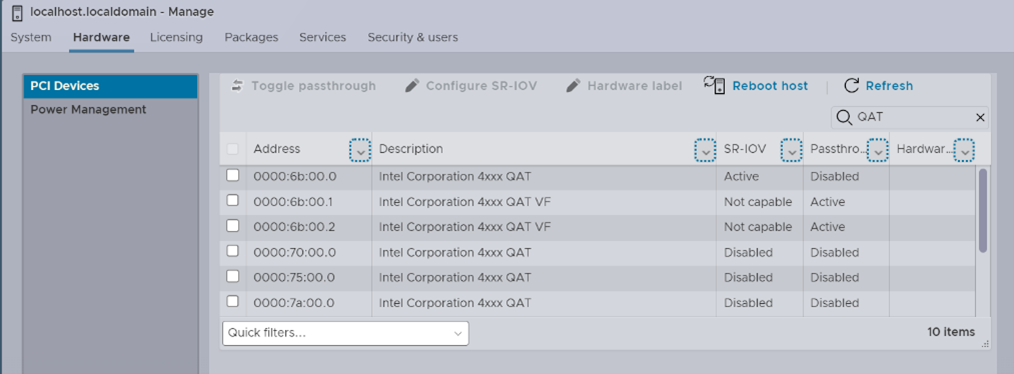
- From the left-hand navigation menu, select Manage > Hardware > PCI Devices, then select Intel Corporation 4xxx QAT > Configure SR-IOV, set the Enabled option to Yes and input the desired number of virtual function devices, as shown below.
- Save the settings and reboot system to make changes take effect.
- Login to the vSphere client and verify the QAT virtual function (PCI ID 8086:4941) has enabled with the description text “Intel Corporation 4xxx QAT VF”, as shown in the following figure.
- Create a new VM and install RHEL 8.7 guest OS in the VM.
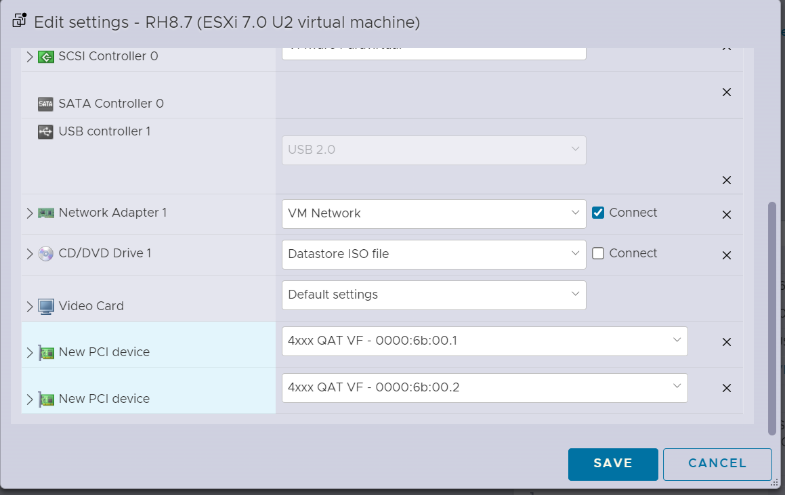
- Before powering on the VM, click the Edit button to configure Memory RAM of desired size, check the box Reserve all guest memory (All locked) checkbox. Click Add other device > PCI device and add “4xxx QAT VF – 0000:6b:00.1” and “4xxx QAT VF – 0000:6b:00.2” as new PCI devices, as shown in the following figure.
- When RHEL8 U7 guest OS installation completes, a number of libraries must be installed to resolve QAT package dependencies. Install these using the OS package management tool:
- “Development Tools” group
- boost-devel
- systemd-devel
- openssl-devel
- yasm
RHEL 8.7 does not include the yasm package, so it will need to be manually downloaded and installed, using the following commands:
~# wget http://www.tortall.net/projects/yasm/releases/yasm-1.3.0.tar.gz ~# tar zxvf yasm-1.3.0.tar.gz ~# cd yasm-1.3.0/ ~# ./configure ~# make && make install - Download from the following URL, the out-of-tree Intel QAT software package which contains Intel QAT hardware 2.0 driver for Linux OS and copy the package to the RHEL8 U7 guest OS.
- Extract the Intel QAT software package using the following command:
~# tar zxvf QAT20.L.1.0.50-00003.tar.gz - Use the following commands to build and install the QAT driver and sample application, and then reboot:
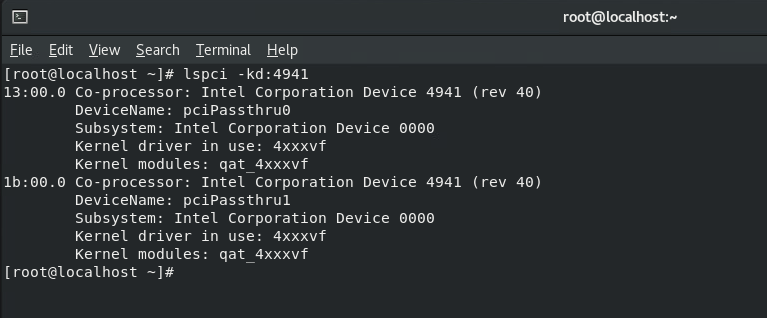
~# ./configure ~# make && make install ~# make samples && make samples-install ~# reboot - Login to the guest OS and check that there are two QAT devices (PCI ID 8086:4941) with kernel module qat_4xxxvf loaded in the virtual machine, as shown in the following figure.
- Check status of the two QAT endpoints (qat_dev0, qat_dev1) are “up” as shown below.
- Check that the QAT service is activated.


Now that the drivers are installed, you can perform some tests.
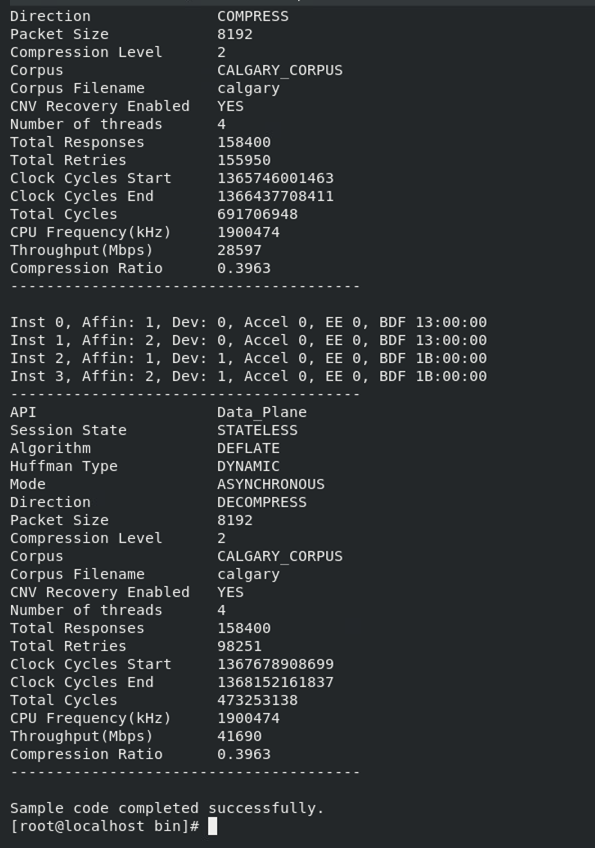
The QAT software package contains a sample application to demonstrate accelerating crypto/compression operation. To run the sample code, execute the following commands:
~# cd /usr/local/bin
~# ./cpa_sample_code

Figure 27. QAT sample code running
By default, the sample code will run all tests (RAS test, DSA test, compression test, etc). During the application running, the result of each test is printed to the terminal window, as these two figures show. After all the tests have been executed, it will display the message “Sample code completed successfully” as shown in the figure below.
References
For more information, see these resources:
- Intel Accelerator Engines overview
https://www.intel.com/content/www/us/en/products/docs/accelerator-engines/overview.html - Intel DLB downloads
https://www.intel.com/content/www/us/en/download/686372/intel-dynamic-load-balancer.html - Intel QAT downloads
https://www.intel.com/content/www/us/en/developer/topic-technology/open/quick-assist-technology/overview.html
Author
Alpus Chen is an OS Engineer at the Lenovo Infrastructure Solutions Group in Taipei, Taiwan. As a specialist in Linux and VMware technical support for several years, he is interested in operating system operation and recently focuses on VMware OS.
Thanks to the following specialists for their contributions and suggestions:
- Chengcheng Peng, Lenovo VMware Engineer
- Skyler Zhang, Lenovo VMware Engineer
- Gary Cudak, Lenovo OS Architect
- David Watts, Lenovo Press
Trademarks
Lenovo and the Lenovo logo are trademarks or registered trademarks of Lenovo in the United States, other countries, or both. A current list of Lenovo trademarks is available on the Web at https://www.lenovo.com/us/en/legal/copytrade/.
The following terms are trademarks of Lenovo in the United States, other countries, or both:
Lenovo®
ThinkSystem®
The following terms are trademarks of other companies:
Intel®, the Intel logo and Xeon® are trademarks of Intel Corporation or its subsidiaries.
Linux® is the trademark of Linus Torvalds in the U.S. and other countries.
Other company, product, or service names may be trademarks or service marks of others.
Configure and Buy
Please select a locale
Full Change History
Course Detail
Employees Only Content
The content in this document with a is only visible to employees who are logged in. Logon using your Lenovo ITcode and password via Lenovo single-signon (SSO).
The author of the document has determined that this content is classified as Lenovo Internal and should not be normally be made available to people who are not employees or contractors. This includes partners, customers, and competitors. The reasons may vary and you should reach out to the authors of the document for clarification, if needed. Be cautious about sharing this content with others as it may contain sensitive information.
Any visitor to the Lenovo Press web site who is not logged on will not be able to see this employee-only content. This content is excluded from search engine indexes and will not appear in any search results.
For all users, including logged-in employees, this employee-only content does not appear in the PDF version of this document.
This functionality is cookie based. The web site will normally remember your login state between browser sessions, however, if you clear cookies at the end of a session or work in an Incognito/Private browser window, then you will need to log in each time.
If you have any questions about this feature of the Lenovo Press web, please email David Watts at dwatts@lenovo.com.


