

Top
Author
Updated
18 Aug 2025Form Number
LP1893PDF size
13 pages, 789 KBSubscribed to LP1893.
Thank you for your feedback.
Abstract
AMD Secure Encrypted Virtualization-Secure Nested Paging (SEV-SNP) is a feature of AMD EPYC processors that adds strong memory integrity protection to help prevent malicious hypervisor-based attacks in order to create an isolated execution environment.
This paper introduces SEV-SNP and describes how to enable the feature. The paper is for Linux administrators who want to use SEV-SNP on an AMD-based ThinkSystem server.
Change History
Changes in the August 18, 2025 update:
- Added instructions on UEFI configuration of servers with AMD EPYC 9004/9005 processors - Preparing UEFI and the Host OS section
Introduction
Trusted execution environments have become increasingly common for the execution of security critical code. In their processors, AMD first introduced Secure Encrypted Virtualization (SEV) in 2016, and then introduced Encrypted State (SEV-ES) to encrypt CPU register state of virtual machines (VM) in 2017. The third generation of SEV, Secure Nested Paging (SEV-SNP), enhances memory integrity protection for the malicious attacks from hypervisor.
SEV-SNP is supported on AMD EYPC processors starting with the AMD EPYC 7003 series processors.
AMD SEV-SNP offers powerful and flexible support for the isolation of a guest virtual machine from an untrusted host operating system. It is very useful in public cloud and any untrusted host scenario. Major public cloud vendors already used it in their products, including Amazon Web Services (AWS) and Google Cloud.
This paper describes how to enable SEV-SNP on an AMD-based ThinkSystem server running Red Hat Enterprise Linux (RHEL) 9.2.
SEV-SNP overview
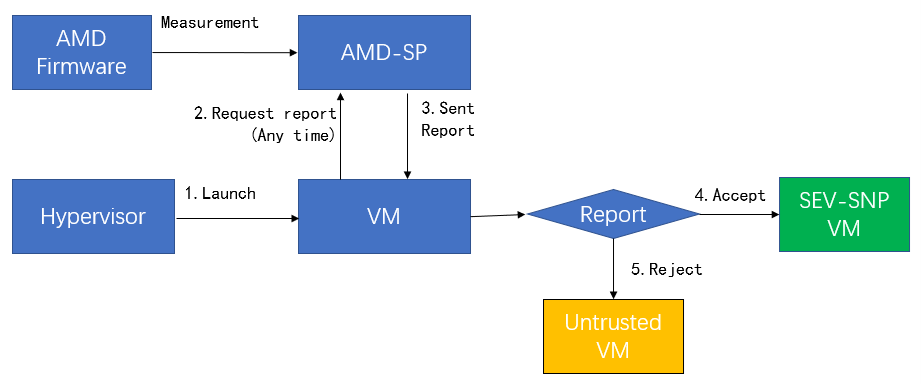
This section will show how to protect the guest VM via SEV-SNP function and what threats can be prevented.
In the following figure, “AMD Hardware and Firmware” and “SEV-SNP VM” are considered trusted in the measurement process, even though the hypervisor is untrusted.
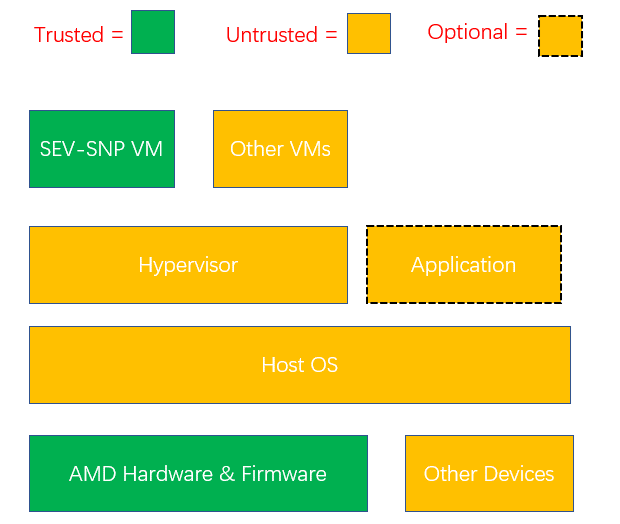
Under the attestation process of SEV-SNP, only a guest owner (third-party) can decide whether the guest is trusted or not based on attestation reports.
The following lists potential threads mitigated by SEV-SNP.
Preparing UEFI and the Host OS
In this section:
UEFI configuration via System Setup
The steps to activate SEV-SNP in UEFI are as follows:
- Press F1 during boot to enter System Setup
- Go to the Processors section.
On servers with EPYC 7003 processors, the Processor section looks like the following. Enable the following items as highlighted:
- SVM Mode: Enable
- SEV-SNP Support : Enable
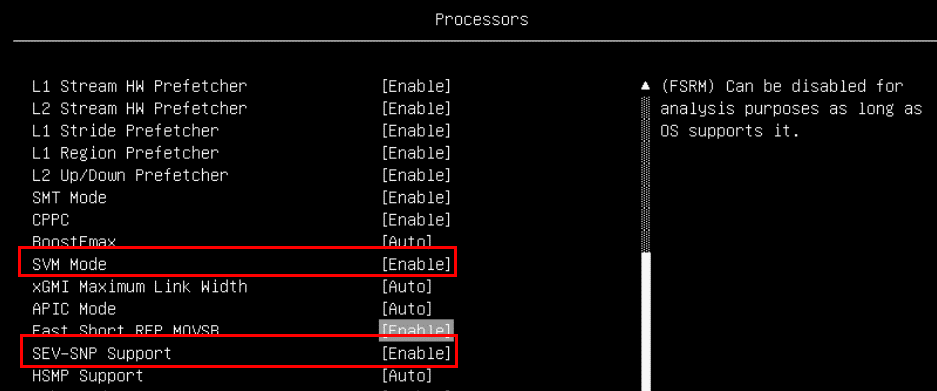
Figure 3. Processor settings in System Setup (AMD EPYC 7003)On servers with EPYC 9004 or 9005 processors, the Processor section looks like the following figure. Enable the following items as highlighted:
- SVM Mode: Enable
- SEV-SNP Support : Enable
- SNP Memory (RMP Table) Coverage: The following choices are offered:
- Enabled: All the memory is reserved for SNP.
- Custom: The user specifies the amount of memory for SNP in the “Amount of Memory to Cover” field
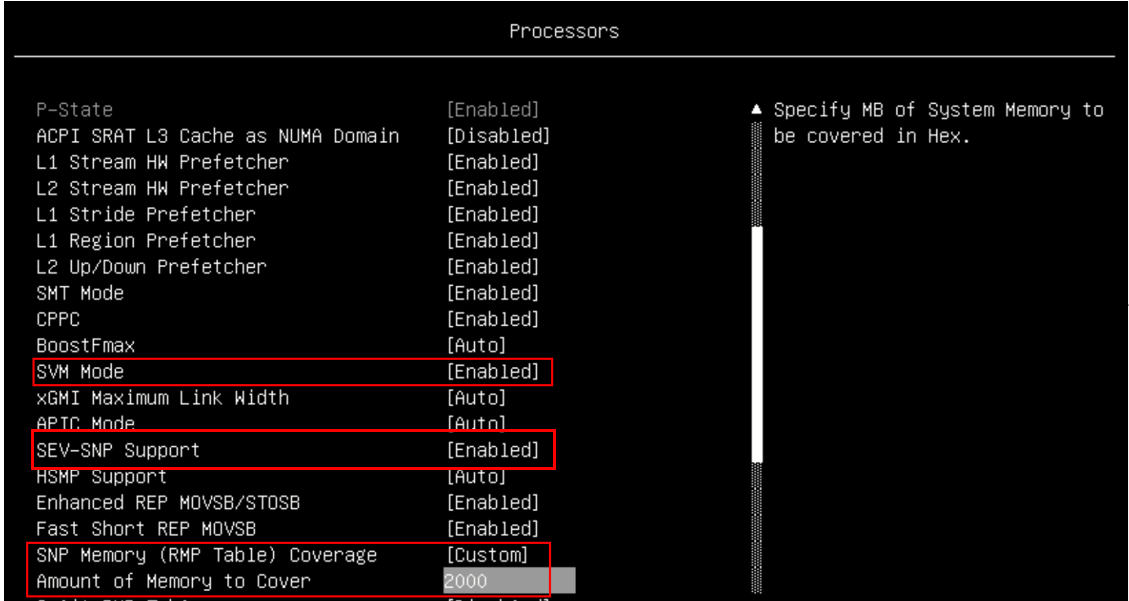
Figure 4. Processor settings in System Setup (AMD EPYC 9004/9005) - In the Memory section, enable these items as shown in the two figures below.
- SMEE: Enable
- SEV-ES ASID Count: AUTO (only for EPYC 7003 processors)
- SEV-ES ASID Space Limit Control: Manual (only for EPYC 7003 processors)
- SEV-ES ASID Space Limit: 10
- SEV Control: Enable

Figure 5. Memory settings in System Setup (AMD EPYC 7003)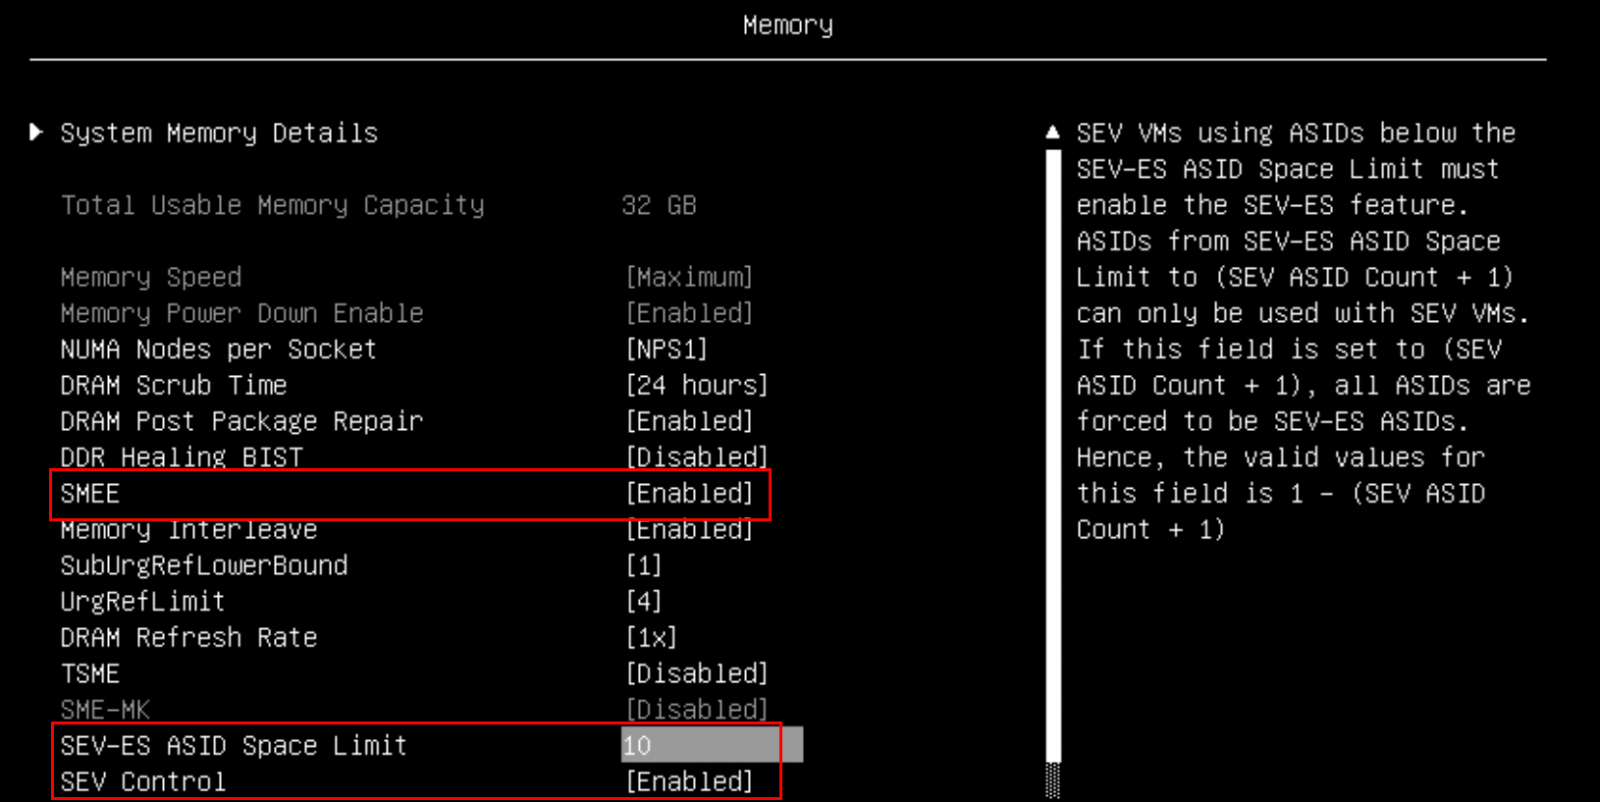
Figure 6. Memory settings in System Setup (AMD EPYC 9004/9005)
UEFI configuration via OneCLI
As an alternative to System Setup, you can use the OneCLI command line tool, which can be downloaded from:
https://support.lenovo.com/us/en/solutions/HT116433
The steps to configure UEFI via OneCLI are as follows:
- Create a configuration file, as follows:
For EPYC 7003 processors, use this command:
[root@sev-snp ~]# cat > snp_uefi.txt << EOF
set Processors.SEV-SNPSupport enable
set Memory.SMEE Enable
set Memory.SEVASIDCount AUTO
set Memory.SEV-ESASIDSpaceLimitControl Manual
set Memory.SEV-ESASIDSpaceLimit 10
set Memory.SEVControl Enable set Processors.SVMMode Enable
EOF
[root@sev-snp ~]#
For EPYC 9004/9005 processors, use this command:
[root@sev-snp ~] # cat > snp_uefi.txt << EOF
Processors.SEV-SNPSupport enable
Processors.SNPMemoryRMPTableCoverage Custom
Processors.AmountofMemorytoCover 2000
Processors.SVMMode Enable
Memory.SMEE Enable
Memory.SEV-ESASIDSpaceLimit 10
Memory.SEVControl Enable
EOF
[root@sev-snp ~]#
- Set up UEFI config via Onecli command:
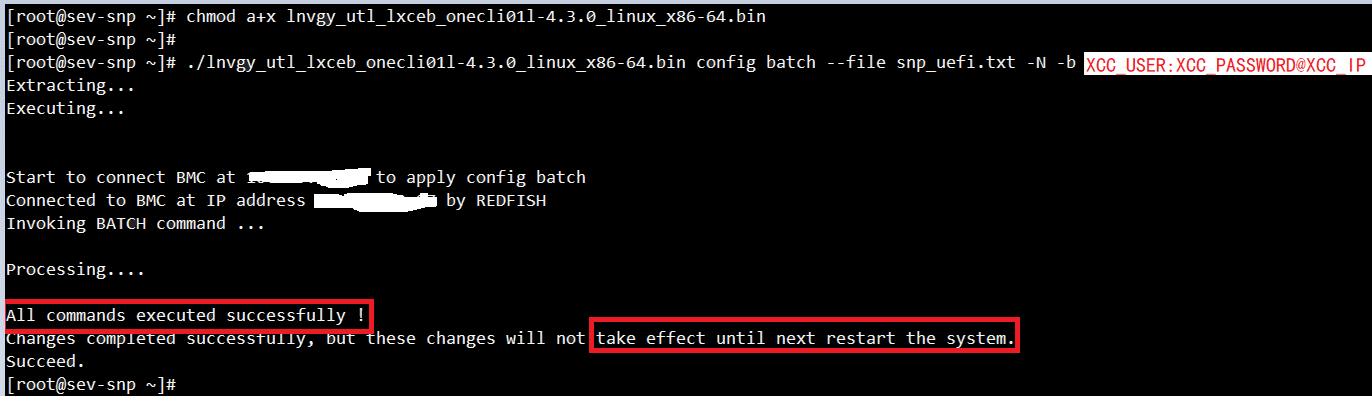
Figure 7. Issuing the OneCLI command to run the configuration file - Restart the server to apply the configuration.
Operating System configuration
As RHEL 9.2 inbox kernel and QEMU hypervisor still do not fully support this feature, users need to compile it by themselves. Ensure your system has access to the Internet and source code will be downloaded automatically during compiling.
- Register your system and enable repository “codeready-builder-for-rhel-9-x86_64-rpms" using the following commands:
[root@sev-snp ~]# subscription-manager register --username XXX --password XXX This system is already registered. Use --force to override [root@sev-snp ~]# [root@sev-snp ~]# subscription-manager repos --enable codeready-builder-for-rhel-9-x86_64-rpms - Install the necessary packages for compiling:
[root@sev-snp ~]# yum install -y ninja-build.x86_64 gthread libgib* glib-devel.x86_64 \ > PackageKit-glib.x86_64 PackageKit-glib-devel.x86_64 pixman pixman-devel.x86_64 \ > nasm.x86_64 uuid-devel.x86_64 glibc-static acpica-tools perl dwarves pkgconfig [root@sev-snp ~]# pip install meson; ln -s /usr/lib64/libuuid.so.1.3.0 /usr/lib64/libuuid.so; ldconfig - Build Linux kernel, QEMU and other components with the following command
# git clone https://github.com/AMDESE/AMDSEV.git
# cd AMDSEV; git checkout snp-latest
# ./build.sh –package
Enabling SEV-SNP on the Host OS
Follow these steps enable and verify SEV-SNP on a host OS:
- Install the compiled kernel
# cd snp-release-<DATE> # sudo cp kvm.conf /etc/modprobe.d/ # rpm -ivh $(find . -name "kernel*host*" | grep -v headers) - Modify the SNP kernel to the default boot entry
# grubby --default-kernel # Get current default boot entry # grubby --info ALL # Get all the boot entry # grubby --set-default-index=ENTRY-INDEX # Set the SNP kernel entry index to the default - Reboot the server
# reboot - Verify the feature was enabled from driver layer:
[root@sev-snp ~]# cat /sys/module/kvm_amd/parameters/sev_snp Y [root@sev-snp ~]# - Verify the dmesg log shows the SEV-SNP support information:
[root@sev-snp ~]# dmesg I grep SEV-SNP
[    0.569182] SEV-SNP: RMP table physical address [0x000000009b700000 - 0x00000000a3cfffff]
[    3.905529] ccp 0000:23:00.1: SEV-SNP API:1.55 build : 14
[   15.047076] kvm_amd: SEV-ES and SEV-SNP supported: 9 ASIDs
Enabling SEV-SNP on a Guest OS
Follow these steps to enable and verify SEV-SNP on guest OS.
- Create SEV-SNP VM with the following commands
# qemu-img create -f qcow2 /home/rh9.qcow2 40G    #Create your qcow2 file for guest storage
# cd AMDSEV/snp-release-
# sed -i "s/CONSOLE=.*$/CONSOLE=\"virtio\"/" launch-qemu.sh
# sed -i "s/readonly/readonly=on/" launch-qemu.sh
# ./launch-qemu.sh -hda /home/rh9.qcow2 -cdrom home/RHEL-9.2.0-20230414.17-x86_64-dvd1.iso
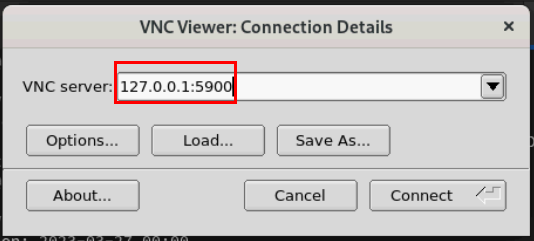
Figure 8. Create SEV-SNP VM - Finish the installation via VNC viewer based on the output about VNC server address.
- Launch the guest OS
# ./launch-qemu.sh -hda /home/rh9.qcow2 -sev-snp #Launch the guest - Access the guest via VNC viewer based on the output about VNC server address.

Figure 10. Get VNC server address - If SEV-SNP is enabled properly in a VM, the log “Memory Encryption Features active:” must include the string “SEV-SNP” in OS log (dmesg):
[root@snp-guest ~]# dmesg | grep -i SEV-SNP
[    0.2712931 Memory Encryption Features active: AMD SEU SEV-ES SEV-SNP
[root@snp-guest ~]#
For more information
For more information, see these resources:
- AMD SEV-SNP:Strengthening VM Isolation
https://www.amd.com/content/dam/amd/en/documents/epyc-business-docs/white-papers/SEV-SNP-strengthening-vm-isolation-with-integrity-protection-and-more.pdf - The github of SEV-SNP
https://github.com/AMDESE/AMDSEV/tree/snp-latest - Introduction to confidential virtual machines
https://www.redhat.com/en/blog/introduction-confidential-virtual-machines - AMD SEV-SNP Attestation: Establishing Trust in Guests
https://www.amd.com/content/dam/amd/en/documents/developer/lss-snp-attestation.pdf
Author
Song Shang is a Linux Engineer in Lenovo Infrastructure Solutions Group, based in TianJin, China.
Thanks to the following people for their contributions to this project:
- David Watts, Lenovo Press
- Adrian Huang, Lenovo Linux Engineer
- Gary Cudak, Lenovo Lead Architect
Trademarks
Lenovo and the Lenovo logo are trademarks or registered trademarks of Lenovo in the United States, other countries, or both. A current list of Lenovo trademarks is available on the Web at https://www.lenovo.com/us/en/legal/copytrade/.
The following terms are trademarks of Lenovo in the United States, other countries, or both:
Lenovo®
ThinkSystem®
The following terms are trademarks of other companies:
AMD and AMD EPYC™ are trademarks of Advanced Micro Devices, Inc.
Linux® is the trademark of Linus Torvalds in the U.S. and other countries.
Other company, product, or service names may be trademarks or service marks of others.
Configure and Buy
Please select a locale
Full Change History
Changes in the August 18, 2025 update:
- Added instructions on UEFI configuration of servers with AMD EPYC 9004/9005 processors - Preparing UEFI and the Host OS section
First published: February 20, 2024
Course Detail
Employees Only Content
The content in this document with a is only visible to employees who are logged in. Logon using your Lenovo ITcode and password via Lenovo single-signon (SSO).
The author of the document has determined that this content is classified as Lenovo Internal and should not be normally be made available to people who are not employees or contractors. This includes partners, customers, and competitors. The reasons may vary and you should reach out to the authors of the document for clarification, if needed. Be cautious about sharing this content with others as it may contain sensitive information.
Any visitor to the Lenovo Press web site who is not logged on will not be able to see this employee-only content. This content is excluded from search engine indexes and will not appear in any search results.
For all users, including logged-in employees, this employee-only content does not appear in the PDF version of this document.
This functionality is cookie based. The web site will normally remember your login state between browser sessions, however, if you clear cookies at the end of a session or work in an Incognito/Private browser window, then you will need to log in each time.
If you have any questions about this feature of the Lenovo Press web, please email David Watts at dwatts@lenovo.com.


