

Top
Author
Published
20 Feb 2024Form Number
LP1894PDF size
16 pages, 1.0 MBSubscribed to LP1894.
Thank you for your feedback.
Abstract
AMD EPYC processors on ThinkSystem servers implement several security features to improve data security in system memory. This paper introduces three such security features, Secure Memory Encryption (SME), Secure Encrypted Virtualization (SEV), and SEV Encrypted State (SEV-ES). The paper is for Linux administrators who want to implement these features in their AMD-based ThinkSystem servers.
Introduction
Prior 2016, server administrators concerned with data security focused mainly on disk encryption, however with the availability of non-volatile memory technology, the desire to also focus on protecting data in memory also became commonplace. AMD first introduced Secure Memory Encryption (SME) and the first generation Secure Encrypted Virtualization (SEV) technology with the release of the EYPC 7001 processor. To continually enhance security, AMD announced SEV-ES (Encrypted State) to encrypt CPU register state of the virtual machine (VM) with EYPC 7002 series processors in 2017.
Secure Memory Encryption (SME) is mainly for main memory encryption against a variety of attacks such as Coldboot.
It is not only full memory encryption, but also partial memory encryption for the flexible usage and better performance. The other benefit is that no application changes are required. The encryption and decryption process are shown in the figure below.

Figure 1. Memory Encryption process
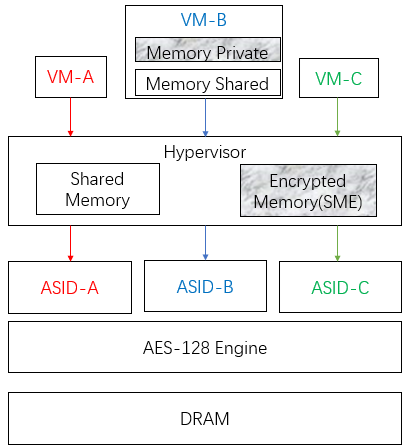
Secure Encrypted Virtualization (SEV) is used to protect virtual machines against the threats from higher privileged code such as the hypervisor. SEV integrates main memory encryption capabilities with the existing AMD-V virtualization architecture. Like SME, SEV also can be used without any application modification to VMs. The SEV architecture is shown in the figure below.
For a VM, CPU register protection is very important as well as memory, because the attackers can obtain some information by reading and replacing the register value from a hypervisor. To prevent VM from register’s threat, SEV-ES was made available in 2017. In the architecture, it added Virtual Machine Control Block (VMCB) for CPU registers as shown in the figure below, that makes a guest VM easily protects required CPU registers and decreases the attack surface from hypervisor.

Enabling SME
Follows these steps to enable SME:
- To use SME, you need to enable it in UEFI. One method is to use F1 at boot to enter System Setup, go to the Memory section, and set SMEE to Enable as shown below.

Figure 4. Memory settings in System SetupAlternatively, you can use the OneCLI command line tool to enable SME using the following command:
./lnvgy_utl_lxceb_onecli01l-4.3.0_linux_x86-64.bin config set memory.smee enabled - Restart the server after the command completes.
- To enable SME in Linux, append boot parameter mem_encrypt=on to enable memory encryption:
[root@sme ~]# grubby --args="mem_encrypt=on" --update-kernel ALL [root@sme ~]# [root@sme ~]# grubby --info DEFAULT - Restart the OS to activate SME.


To verify that SME is enabled, you can check the dmesg log to see what memory features are active:
[root@sme ~]# dmesg | grep SME
[    0.066635] Memory Encryption Features active: AMD SME
[root@sme ~]#
Enabling SEV
Follows these steps to enable and verify SEV:
- To use SEV, you need to enable it in UEFI. One method is to use F1 at boot to enter System Setup, go to the Memory section, and set SMEE to Enable as shown below.
Tip: SMEE is the only setting you need to enable for SEV.
Figure 7. Memory settings in System SetupAlternatively, you can use the OneCLI command line tool to enable SME using the following command:
./lnvgy_utl_lxceb_onecli01l-4.3.0_linux_x86-64.bin config set memory.smee enabled - Restart the server after the command completes.
- In Linux, install the required packages using the following command:
# yum install -y virt-install qemu-kvm qemu-img edk2-ovmf sevctl - Add boot parameters mem_encrypt=on kvm_amd.sev=1 as shown below
[root@sev ~]# grubby --args="mem_encrypt=on kvm_amd.sev=1" --update-kernel ALL [root@sev ~]# [root@sev ~]# grubby --info DEFAULT -
Restart the host OS to active the SEV
-
Create SEV guest VM using the following command:
[rootsme-sev ~]# virt-install --name SEV \
> --machine q35 \
> --boot uefi \
> --launchsecurity sev,policy=0x1 \
> --memtune hard_limit=4563402 \
> --memory 4096 \
> --disk size=30 \
> --autoconsole text \
> --location /mnt/RHEL-9.2.0-20230414.17-x86_64-dvd1. iso \
> --install kernel_args="console=ttyS0"
Figure 10. Create a virtual machineThe install command includes the --launchSecurity parameter which allows you to specify the guest policy. The guest policy is specified as a hexadecimal value, the hex representation of the binary policy flags as listed in Table 2 below. As highlighted in red in the above figure, the policy is policy=0x1 which means the guest VM will enable SEV in non-debug mode (bit 0 set to 1, as shown in Table 2).

To verify that SEV is enabled on the host, the parameter of the module kvm_amd should be “Y” or “1” as shown below:
[root@sme-sev ~]# cat /sys/module/kvm_amd/parameters/sev
Y
[root@sme-sev ~]#
To verify that SEV is enabled in the guest VM, the dmesg log should show the SEV support information:
[root@sev-guest ~]# dmesg | grep SEV
[    0.100517] Memory Encryption Features active: AMD SEV
[root@sev-guest ~]#
Enabling SEV-ES
Follows these steps to enable and verify SEV-ES:
- To use SEV-ES, you need to enable it in UEFI.
One method is to use F1 at boot to enter System Setup, go to the Processor and Memory sections. In the Processors section, set SVM Mode to Enable.
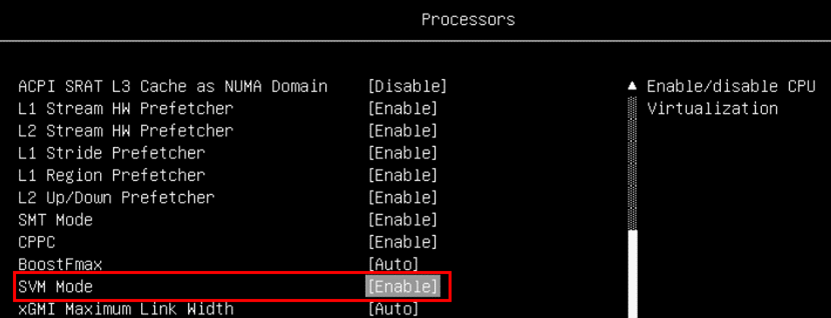
Figure 11. Processor settings in System SetupIn the Memory section, enable these items as shown in the figure below.
- SMEE: Enable
- SEV-ES ASID Count: AUTO
- SEV-ES ASID Space Limit Control: Manual
- SEV-ES ASID Space Limit: 10
- SEV Control: Enable

Figure 12. Memory settings in System SetupAlternatively, you can use the OneCLI command line tool using the following command to build the configuration flie:
You then enable SEV-ES via a OneCLI command with the configuration file (sev-es.cfg):[root@sme-sev ~]# cat > sev-es.cfg << EOF > set Memory.SMEE Enable > set Memory.SEVASIDCount AUTO > set Memory.SEV-ESASIDSpaceLimitControl Manual > set Memory.SEV-ESASIDSpaceLimit 10 > set Memory.SEVControl Enable > set Processors.SVMMode Enable > EOF [root@sme-sev ~]#./lnvgy_utl_lxceb_onecli01l-4.3.0_linux_x86-64.bin config batch --file sev-es.cfg - Restart the server to apply the change.
- In Linux, install the required packages using the following command:
#yum install -y virt-install qemu-kvm qemu-img edk2-ovmf sevctl - Add boot parameters mem_encrypt=on kvm_amd.sev=1 kvm_amd.sev_es=1 as shown below
[root@sme-sev ~]# grubby --args="mem_encrypt=on kvm_amd.sev kvm_amd.sev_es=l" --update-kernel ALL [root@sme-sev ~]# [root@sme-sev ~]# grubby --info DEFAULT - Restart the host OS to active the SEV-ES
-
Create SEV guest VM using the following command:
[root@sme-sev ~]# virt-install --name SEV-ES \
> --machine q35 \
> --boot uefi \
> --launchsecurity sev,policy=0x5 \
> --memtune hard_limit=4563402 \
> --memory 4096 \
> --disk size=30 \
> --autoconsole text \
> --location /mnt/RHEL-9.2.0-20230414.17-x86_64-dvd1.iso \
> --install kernel_args="console=ttyS0"

Figure 15. Create a virtual machineThe install command includes the --launchSecurity parameter which allows you to specify the guest policy. The guest policy is specified as a hexadecimal value, the hex representation of the binary policy flags as listed in the table below. As highlighted in red in the above figure, the policy is policy=0x5 which means (converting 0x5 hex to 0101 binary), the guest VM will enable SEV in non-debug mode (bit 0 set to 1, as shown in the table) and with SEV-ES enabled (bit 2 set to 1, as shown in the table).


To verify that SEV is enabled on the host, the parameter of the module kvm_amd should be “Y” or “1” as shown below:
[root@sme-sev ~]# cat /sys/module/kvm_amd/parameters/sev_es
Y
[root@sme-sev ~]#
To verify that SEV is enabled in the guest VM, the dmesg log should show the SEV support information:
[root@seves-guest ~]# dmesg | grep SEV-ES
[    0.211789] Memory Encryption Features active: AMD SEV SEV-ES
[root@seves-guest ~]#
Special considerations
The following are limitations regarding the use of SME and SEV technologies:
- For some 32-bit legacy devices, it cannot issue DMA to encrypt memory directly, thus needs IOMMU (Input–Output Memory Management Unit) to re-map device request addresses with the C-bit set.
- Full cache flashing is a must to ensure all data has been written to DRAM before accessing a page via a different c-bit.
- SEV and SEV-ES VMs cannot be compatible with Secure Boot.
Resources
For more information, see these resources:
- AMD Memory Encryption
https://www.amd.com/content/dam/amd/en/documents/epyc-business-docs/white-papers/memory-encryption-white-paper.pdf - Protecting VM Register State with SEV-ES
https://www.amd.com/content/dam/amd/en/documents/epyc-business-docs/white-papers/Protecting-VM-Register-State-with-SEV-ES.pdf - SEV on Github
https://github.com/AMDESE/AMDSEV - Secure Encrypted Virtualization API
https://www.amd.com/content/dam/amd/en/documents/epyc-technical-docs/programmer-references/55766_SEV-KM_API_Specification.pdf - AMD Secure Encrypted Virtualization (AMD-SEV) Guide under SLES 15 SP5
https://documentation.suse.com/sles/15-SP5/html/SLES-amd-sev/article-amd-sev.html - Launch security with AMD SEV
https://libvirt.org/kbase/launch_security_sev.html
Author
Song Shang is a Linux Engineer in Lenovo Infrastructure Solutions Group, based in TianJin, China.
Thanks to the following people for their contributions to this project:
- David Watts, Lenovo Press
- Adrian Huang, Lenovo Linux Engineer
- Gary Cudak, Lenovo Lead Architect
Trademarks
Lenovo and the Lenovo logo are trademarks or registered trademarks of Lenovo in the United States, other countries, or both. A current list of Lenovo trademarks is available on the Web at https://www.lenovo.com/us/en/legal/copytrade/.
The following terms are trademarks of Lenovo in the United States, other countries, or both:
Lenovo®
ThinkSystem®
The following terms are trademarks of other companies:
AMD, AMD EPYC™, and AMD-V™ are trademarks of Advanced Micro Devices, Inc.
Linux® is the trademark of Linus Torvalds in the U.S. and other countries.
Other company, product, or service names may be trademarks or service marks of others.
Configure and Buy
Please select a locale
Full Change History
Course Detail
Employees Only Content
The content in this document with a is only visible to employees who are logged in. Logon using your Lenovo ITcode and password via Lenovo single-signon (SSO).
The author of the document has determined that this content is classified as Lenovo Internal and should not be normally be made available to people who are not employees or contractors. This includes partners, customers, and competitors. The reasons may vary and you should reach out to the authors of the document for clarification, if needed. Be cautious about sharing this content with others as it may contain sensitive information.
Any visitor to the Lenovo Press web site who is not logged on will not be able to see this employee-only content. This content is excluded from search engine indexes and will not appear in any search results.
For all users, including logged-in employees, this employee-only content does not appear in the PDF version of this document.
This functionality is cookie based. The web site will normally remember your login state between browser sessions, however, if you clear cookies at the end of a session or work in an Incognito/Private browser window, then you will need to log in each time.
If you have any questions about this feature of the Lenovo Press web, please email David Watts at dwatts@lenovo.com.


