

Top
Author
Updated
10 Apr 2019Form Number
TIPS4DATASHEETSPDF size
13 pages, 1.4 MBSubscribed to TIPS4DATASHEETS.
Thank you for your feedback.
Table of Contents
Abstract
This document provides guidance on how to create and publish datasheets using the Lenovo Press content management system.
Create a new datasheet
The steps to create a new datasheet are as follows:
- In the CMS, click DATASHEETS > Datasheets
- Click the Create button

- The New Datasheet panel appears.
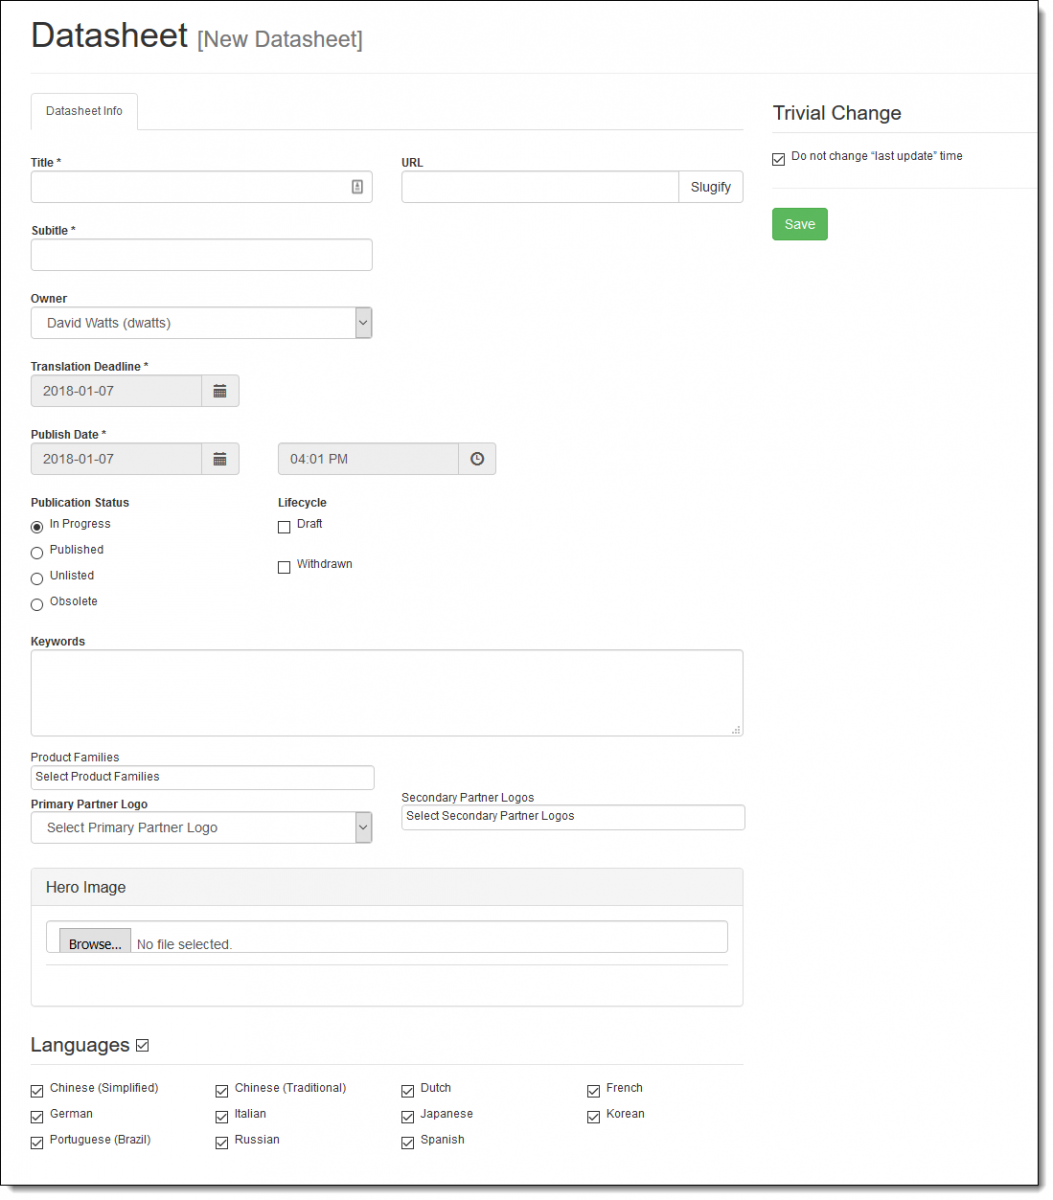
- Enter the title. This will become the headline for the datasheet. For the PDF version, it is also the in the running header on each page.
Tip: Watch out for how the title appears on the PDF. We have found for example, that "Lenovo ThinkSystem SR650" doesn't look good because the "SR650" word appears on the 2nd line of the headline in the PDF. Instead, drop the "Lenovo" from the title.
- The subtitle is optional. If present, in the PDF, it appears just under the heading. In the web version, it appears under the red line, just above the body.
- In the URL field, enter the "slug". This is the portion of the URL that is after the DS number. It should be all lower case and cannot contain spaces.
Tip: Click the Slugify button next to the field and the CMS will automatically insert the heading with hyphens for spaces.
- Select an owner. By default, this is you. The owner receives all emails regarding translation status and all feedback emails sent in by web site visitors once the datasheet is published. You can change the owner at a later date as needed.
- Specify a Translation Deadline. This date is included in the translation submission to The Big Word but it is unclear how TBW actually uses it, nor what happens if the date is in the past. Enter the date when you require translations to be completed by TBW.
- Specify the date and time when the datasheet is to be published. When initially creating a datasheet, you can leave this as is, or set it to the expected publication date. This date will need to be accurate at publish time, since it is the actual date when the datasheet will go live, if the datasheet is to be published on a future schedule.
- Leave the Publication status as In Progress for now. Once the datasheet is ready to be published, you will change the status to Published.
- Leave the Lifecycle checkboxes as is.
- Enter some keywords separated by commas. These are used by the Lenovo Press search engine but not by any other search engines like Google. Only include words that aren't already in the heading or body of the datasheet - there is no need to include those words as they will be automatically indexed once the document is published.
- Specify one or more product families. These families correspond to the menu structure of the Lenovo Press web site. For example, family "rack 1s" corresponds to the Servers > Rack Servers > 1 Socket menu. Ask David for the list of product families. In the web version of the datasheeet, these families will be automatically listed at the end of the datasheet under the heading "Related product families". Product families are not listed in the PDF version of the datasheet.
- Optionally select primary and secondary partner logos. The Primary logo appears in the bottom right corner of every page in the PDF. The secondary logo appears in the bottom middle of of only the front page of the PDF. They also appear at the bottom of the web version. If the logo you want to use isn't a selection, use the Partner Logos page in the CMS to upload a new logo.
- Optionally upload a hero graphic. This image appears in the top right corner of the PDF or web versions of the datasheet and are automatically sized to fit the space. See the Adding a hero graphic section for details. Upload an image that is at least 1000px on the long side. Format must be JPG.
Tip: A datasheet should always have a hero graphic (ie a focal-point graphic that grabs the reader's eye). If it isn't placed in this hero spot, then there must be one in the body of the datasheet on page 1. There should only be 1 hero graphic.
- Select the languages that this datasheet will translated and published in. Usually all languages are selected, however if a product is only being announced in certain countries, then this might mean that some languages are not to be selected.
Tip 1: English is not a selection - it is assumed that all datasheets will be published in English. However it is possible at publish time, to not publish in English (eg just Chinese).
Tip 2: You can add or remove languages after the initial creation, however removing (unchecking) a language after it has been translated results in that translation being permenantly deleted! Proceed with caution! See also Adding languages to be translated after submission.
- Press Save. The fields are checked an a message will be displayed if an error is detected (eg a mandatory field is not filled in). If no errors, you will see Save Successful.
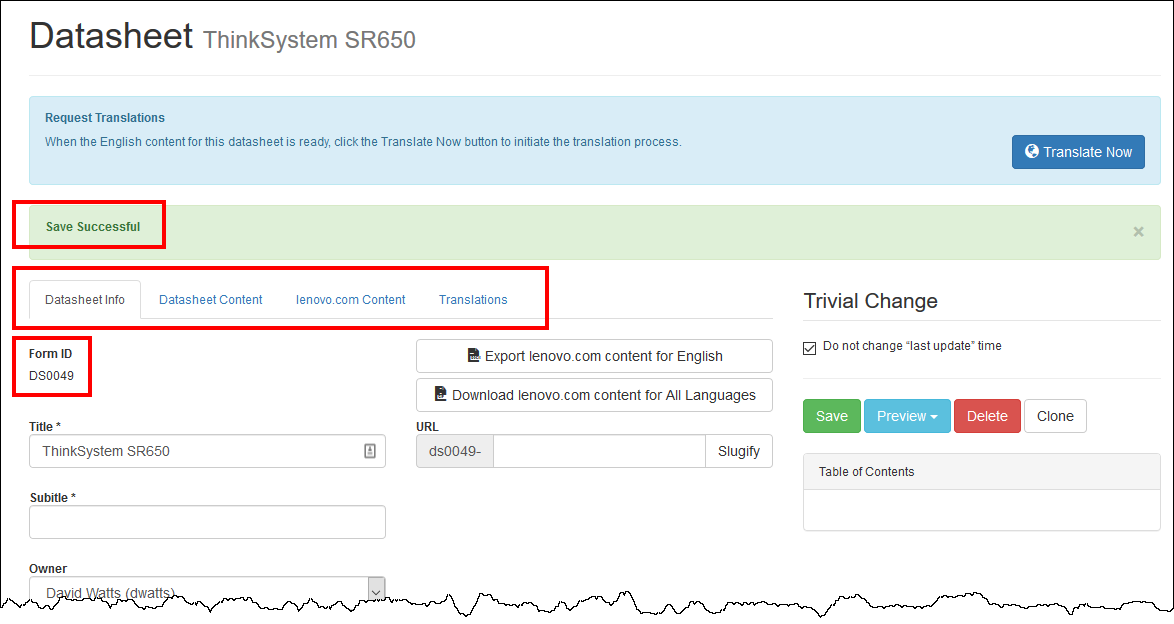
- The datasheet number is assigned and displayed at the top of the page under Form ID. This number is automatically assigned - it is the next available number.
Tip: If you need to share the URL of a future datasheet once published, the URL will be "lenovopress.lenovo.com/dsXXXX" where dsXXXX is the Form ID listed here.
- After Save, you will also see additional tabs: Datasheet Content, lenovo.com Content and Translations. You will also see new buttons: Preview, Delete and Clone.
Now that the datasheet has been created, click the Datasheet Content tab to start adding blocks of content.
Adding a hero graphic
The hero graphic is meant to be the graphic that draws reader's attention when they first view the datasheet. The hero graphic is placed automatically in the top right corner of page 1 of the PDF or in the web version.
The CMS automatically sets the placement and size of the image.
First select the correct image:
- Image of the product being described (ie matches the headline)
- White background (not offwhite)
- Ideally without a shadow
- Can be a landscape image (horizontal orientation) like a rack server, or portrait image (vertical) like a tower server or rack.
- Needs to be high resolution - at least 1000px on the long side
Before uploading the image, crop and resize it:
- Open the image in a graphics editor such as Irfanview, PaintShop Pro, or Photoshop. We'll use Irfanview as the example.
- In Irfanview, draw a box around the photo by clicking from the top left corner and dragging to the bottom right corner.
- However over the box you just drew until the mouse cursor changes to a double arrow (see the image) and click & drag to adjust the position of the selection. Adjust all four sides as needed. Tip: You want to select a small amount of whitespace around the image.
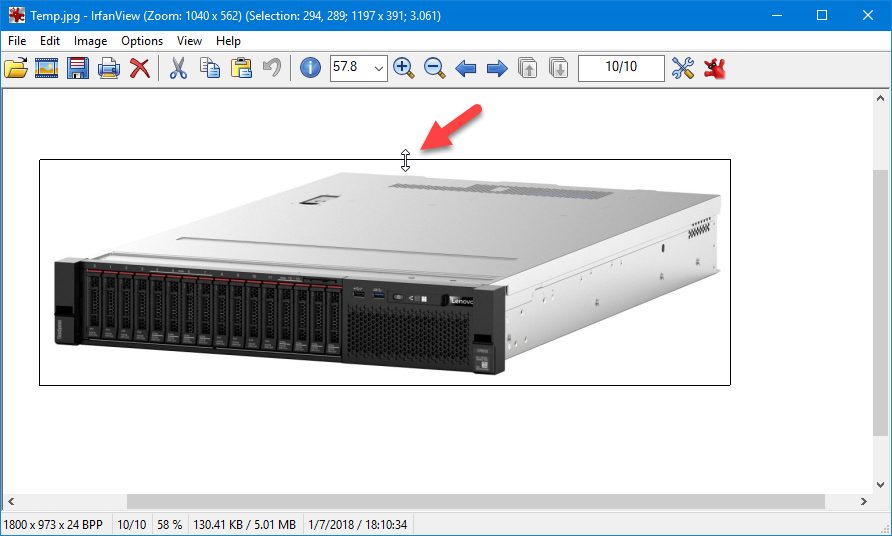
Tip: If the image includes a shadow then you must widen the selection to include the shadow. If the selection only includes part of the the shadow it will look bad once inserted intot the datasheet. - Click Edit > Crop selection or press Ctrl-Y to crop the image to the selection.
- If needed, resize the image so that the longest side (ie the width for a landscape image) is 1500px. Click Image > Resize/Resample or press Ctrl-R. The following dialog appears.
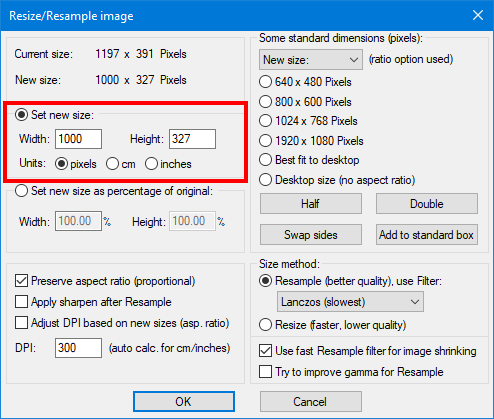
- Click Set new size. If the image is a landscape image (eg a rack server), set the width to 1500 pixels. If the image is portrait, then instead set the height to 1500 pixels. Ensure Preserve aspect ratio is checked. Click OK to perform the crop.
- Click File > Save to modify the existing image, or File > Save As to save the image to a new filename.
Tip: If the original file is not a JPG to begin with, then you will need to use Save As and select JPG as the filetype.
Now that the image is ready, the final step is to upload it.
- Go to the Datasheet Info tab, scroll to the Hero Image portion.
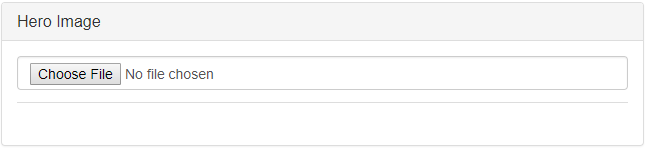
- Click Choose File and select the JPG file you previously cropped and resized and click OK.
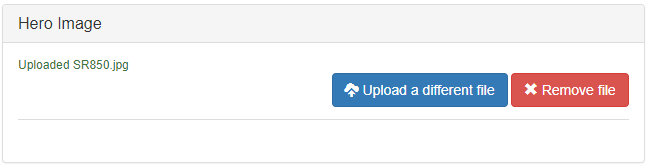
The image is now uploaded.
If you later need to replace or remove the image, you can use the appropriate buttons in the Hero Image section:
Inserting a 2-column block [unfinished]
Content displayed in two columns in the PDF is a standard layout for datasheets.
The steps to insert a 2-column block are as follows:
Inserting a PowerPoint drawing
A PowerPoint drawing needs to be converted into a PNG file before being inserted into the CMS. You will need a screen capture tool such as SnagIt installed. Alternatively, use the Snipping Tool that is part of Windows 10. The image is likely to be inserted as a full-page-width graphic, rather than in a 2-column layout, so the instructions assume that.
- Open the PPT file in PowerPoint
- Remove all spelling error indicators (the squiggly line under words) are removed by either correcting theerrors, adding the words to the dictionary or ignoring the word.
- Zoom the drawing so that the image fills the display. Ideally display the drawing on a large external display. You want to capture the image as large as possible to maximize quality of the finished product.
- Capture the image using Snipping Tool or Snagit. Ensure you do not capture extra content such as a PowerPoint border.
- Save the image as a PNG file.
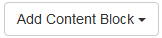
- In the CMS, insert a new block by clicking either the Add Content Block button at the bottom of the Datasheet Content tab, or one of the blue + buttons.
or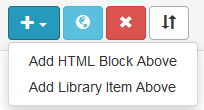
- Enter a name for the block (the name is only used internally in the CMS - it won't be published)
- Put the cursor in the new block and click the Insert Custom Template button
 from the button bar of the block. The Custom Template button appears.
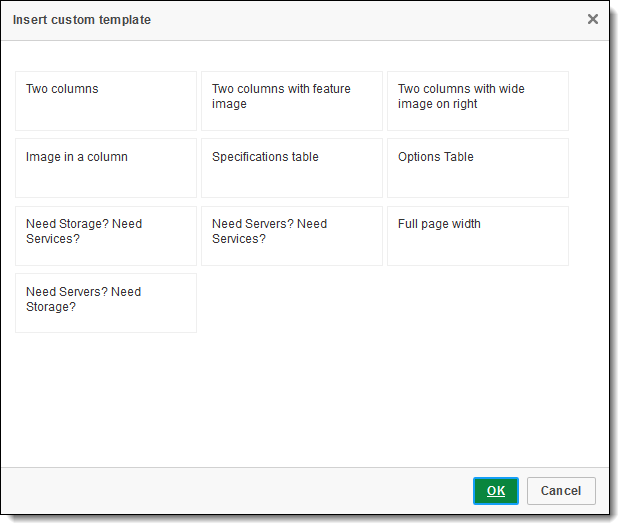
- Click Full page width and click OK to inset the tempate.
- Depending on your browser, an extra blank line is insert at the end (Firefox does this). Press the backspace button to remove it.
- If you click Source, you'll see the HTML inserted is the following. The col-xs-12 is the indicator this is a full-width block:
...content... - If you viewed source, click the Source button again to return to formatted view.
- Put the cursor at the end of the latin and press Enter to insert blank line inside the new block.
- Click the Insert Custom Template button again and this time click Image in a column and click OK. You will then see an "FPO" graphic inserted in the block (FPO = for placement only)
- Click the FPO graphic to select it (you will be replacing this image, so you have to select it first)
- Click the Image button
 and the following dialog appears.
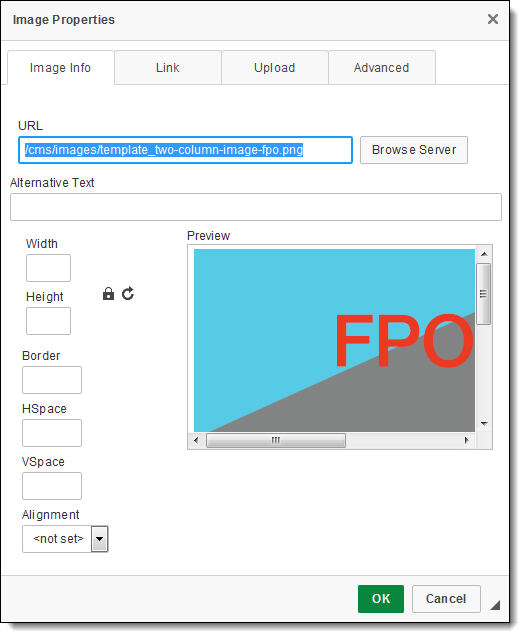
- Click the Browse button and the CKfinder appears.
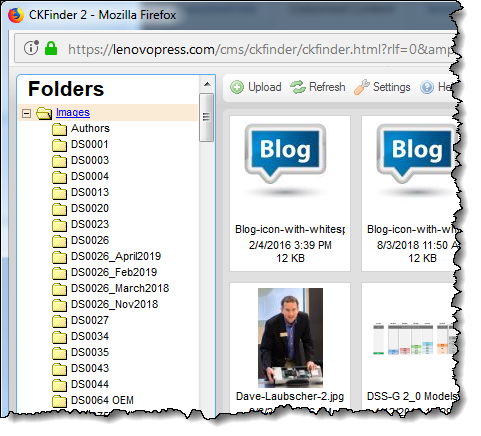
- On the left, navigate to the folder for the document and click the folder name. If a folder doesn't exist, right click on Images and click New folder to create one.
- From the folder, click the Upload button. Then click Browse to navigate to and select the PNG file, then click Upload Selected File.
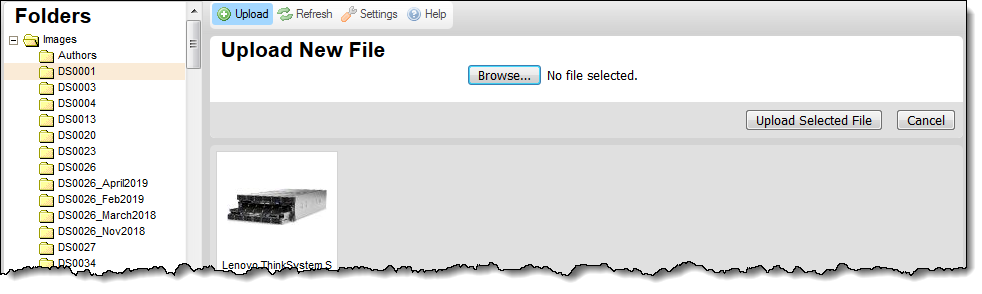
- Double-click the image you just uploaded. The Image Properties dialog will update with the new image.
- Add some text to the Alternative Text field. This text is used by vision-impared peope should it should be descriptive of the image.
- Clear the Width and Height fields
- Click OK to insert the image, replacing the FPO image (if the FPO image is still present, you can select it and delete it)
- Click Source to review the HTML code. The inserted code should look like the following. The key check should be to ensure the class parameter is included as shown.
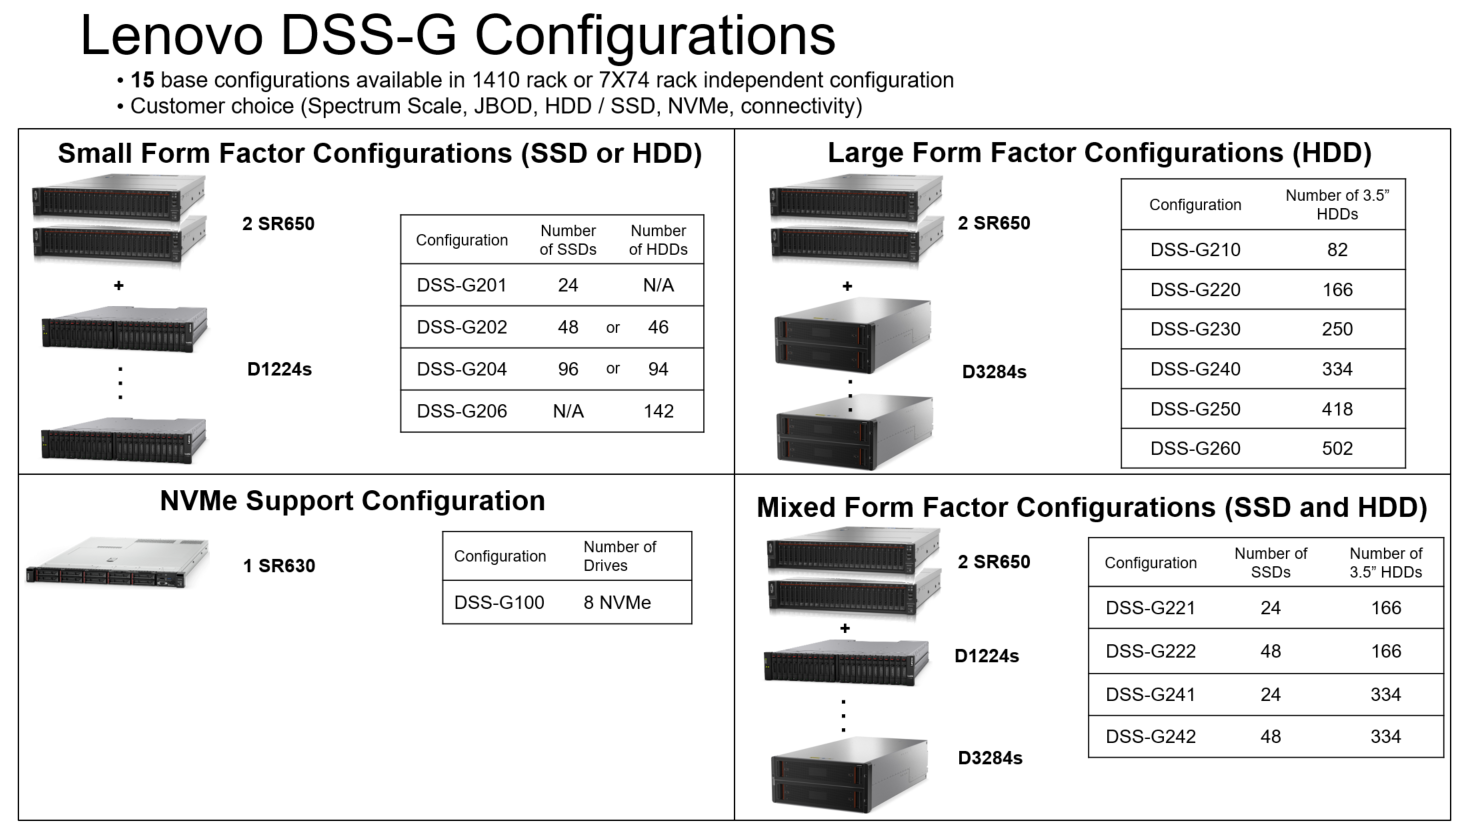
class="ds-img-feature img-responsive" src="/assets/images/DS0026_April2019/DSS-G%20Configurations%20EN.PNG" />
- Do a PDF preview to ensure the placement of the image is correct. The image should be full width in the page.
- If the image is too big in the PDF (eg text too big or the image is too tall for the page), then you can add padding to the left and right of the image to effectively reduce the size of the image in the PDF. The code below addes 10px of white space to each side of the image. This effectively reduces the overall size of the image. Add more space to make the image even smaller.
 style="padding-left:10px; padding-right:10px;"/>
 - Add a width parameter to the img tag. Start with 800 and use the Web preview to see how the image looks. If the text of the image is larger than the text on the page, go back and reduce the width (eg to 600) and see how the web preview looks. Tip: The width parameter only affects the web preview; it has no effect on the PDF.
width="800" />
- If your datasheet requires a heading and/or text, replace the heading & text with the required text or delete the text and heading.
- Don't forget to attach the PPT file to the CMS before submission for translation using the Add a source file to translate button.

- Once translations come back, you'll need to replace English image with each translated image. You'll need to do the screen capture (steps 1-5), then jump to step 15 and, instead of an FPO image, you'll have the English image to replace.
Checklist before submitting to TBW
Check for these items before submitting the English version for translation:
- Check the PDF for overruns into the pink area (30% whitespace)
- In the HTML preview, look for extra blank lines
- Check that columns are balanced and that the page breaks and column breaks are the best they can be (ie no orphaned paragraphs or bullets if possible)
- In the specs table, check for abbreviations such as opt and std. These should be expanded to full English words to aid translation
- If there are any graphic, ensure they are the correct size in both the PDF and the web previews. As a guide, the text in the graphic should be about the same size as the body text.
- Ensure all web addresses are real links. If the addresses are lenovo.com addresses, ensure the URLs in the links start with "www.". The printed address, however, does not need to have the www.
- Use the Check Links button to ensure all URLs are valid
- If there are graphics with English words, ensure the PowerPoint file is attached to that block so that the graphic can be translated. Make sure you uploaded the PPT file and not a PNG or JPG. Attachments must be in an editable format.
- For each block, go into Source mode, and ensure every block starts with a div tag.
- For each block, whenever there is a new
make sure that the previous row div is closed. Similarly, whenever there is a newmake sure that the previous column div is closed. rows should not be embedded inside other rows and columns should not be embedded in other columns.
Tip: use the Toggle WYSIWYG/Source Modes button
 to switch to source mode in every block.
 - Check that no text has weird formatting such as an unexpected indent. This could be a sign that div tags aren't ended properly with /div.
- Make sure there's something in the URL slug field
Translation statuses
On the most datasheets page, an overall Translation status is listed:
![]()
The options are:
- Not Needed - no languages have been selected on the Datasheet Info tab, so no translations are needed
- Preflight - translations haven'been requested yet
- Pending - request to translation has been submitted
- Review - the translation is complete and is waiting on validation
- Complete - the translation & validation is complete
- Local Changes
In addition to the overall status, the translation tab displays two statuses:
![]()
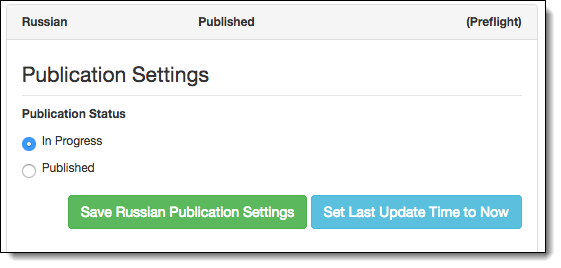
- In the middle of each language section is the Publish status
- In Progress
- Published
- On the right of each language section is the Translation status
- Preflight - translation hasn't been submitted yet
- Pending - translation is in progress
- Review - translation complete, waiting on validation
- Complete - translation & validation complete
- Complete, Missing Translations - some blocks have been translated, others are missing
Colors in the Translation tab
The colors of the language sections in the Translation tab are as follows:
- Grey = preflight - not submitted to translation
- Yellow - Translation status "Pending" (in flight at TBW before review)
- Blue = Translation status "Review" OR translation status "Complete" and publish status "In Progress"
- Green - Translation status "Complete" and publish status "Published"
- Red = local changes since last translation or translation missing
Forcing a page break in a translation
If you have a block in a language translation that you want to push to the top of the next page in the PDF, the easiest way to add the break-before class to the row div tag.
- In the block, click the Source button
- In the first div tag, change it from:
div class="row border"
To this:
div class="row border break-before" - Click Preview > PDF to verify the change produced the desired result. If not, double check the HTML change to made.
- If the page looks good, click the Save button and exit Source mode.
Making this change will force the block of content to start at the top of the next page.
Tip: If you are wanting to do this in a div that is not the first div in a block, then you'll have to uncheck Avoid page breaks inside this block in the English version of the block. You should then check every language to ensure page breaks are as expected.
Getting rid of extra space in a table cell
Two scenarios: a cell with 1 paragraph, or a cell with multiple paragraphs.
In the specs table (or some other table), if you have one paragraph of text, but there seems to be extra space after the paragraph
Alternatively, you may have multiple paragraphs in one cell with extra space after the last paragraph. Having multiple paragraphs means that there will normally be an extra small amount of whitespace after the last paragraph. Here's how to remove this extra space:
- Put the cursor in the beginning of the last paragraph in the cell in question
- Click the Source button
- Change the code from
This is the last paragraph in the cell
tostyle="margin-bottom:0px;">This is the last paragraph in the cell
- Click Preview > Web to verify the change produced the desired result. If not, double check the HTML change to made.
- If the page looks good, click the Save button and exit Source mode.
Adding languages to be translated after submission
Scenario: You have a datasheet with only some languages selected and those have been already submitted for translation. Now you want to add additional languages.
- Open the document
- In the Datasheet Info tab, select the new languages you want to add
- Click Save.
- Go to the Translation tab
- Open each language, click the Translate Language button. (Tip: If you don't see this button, ensure you clicked Save first).
- Repeat for the other languages you want to add
Publishing languages not previously published
Scenario: All languages were originally selected and translated, however some were held back from being published. The datasheet publish status is "Partially published". Now you want these extra languages published.
- Open the datasheet
- Click the Translation tab. The languages that were held back should be "Completed" for translation status, but "In progress" for publication status.
- Open the language.
- Change the status from In progress to Published
- Click the Save Language Publication Settings button.
Tip: If you want to schedule a future publication, click the Schedule checkbox, set a date and time, then click the Save Language Publication Settings button
Unpublishing a language
If you have a need to remove a language that is published, use these steps. For example, you may want to remove Japanese if requested by that geography.
- Open the document and go to the Translations tab
- Expand the language
- Change the Publication Setting from Published to In Progress
- Click Save language Publication Settings
Trademarks
Lenovo and the Lenovo logo are trademarks or registered trademarks of Lenovo in the United States, other countries, or both. A current list of Lenovo trademarks is available on the Web at https://www.lenovo.com/us/en/legal/copytrade/.
The following terms are trademarks of Lenovo in the United States, other countries, or both:
Lenovo®
ThinkSystem®
The following terms are trademarks of other companies:
PowerPoint® and Windows® are trademarks of Microsoft Corporation in the United States, other countries, or both.
Other company, product, or service names may be trademarks or service marks of others.
Configure and Buy
Please select a locale
Full Change History
Course Detail
Employees Only Content
The content in this document with a is only visible to employees who are logged in. Logon using your Lenovo ITcode and password via Lenovo single-signon (SSO).
The author of the document has determined that this content is classified as Lenovo Internal and should not be normally be made available to people who are not employees or contractors. This includes partners, customers, and competitors. The reasons may vary and you should reach out to the authors of the document for clarification, if needed. Be cautious about sharing this content with others as it may contain sensitive information.
Any visitor to the Lenovo Press web site who is not logged on will not be able to see this employee-only content. This content is excluded from search engine indexes and will not appear in any search results.
For all users, including logged-in employees, this employee-only content does not appear in the PDF version of this document.
This functionality is cookie based. The web site will normally remember your login state between browser sessions, however, if you clear cookies at the end of a session or work in an Incognito/Private browser window, then you will need to log in each time.
If you have any questions about this feature of the Lenovo Press web, please email David Watts at dwatts@lenovo.com.


