

Top
Author
Updated
5 Jan 2024Form Number
LP1545PDF size
25 pages, 1.1 MBSubscribed to LP1545.
Thank you for your feedback.
Abstract
AMD Secure Encrypted Virtualization-Encrypted State (SEV-ES) technology is used to protect a guest operating system from attacks on its register state from a malicious hypervisor. SEV-ES encrypts all CPU register contents when a VM stops running, which prevents the leakage of information in CPU registers to components like the hypervisor. It can even detect malicious modifications to a CPU register state.
This paper presents a briefly technical overview of the SEV-ES technology and describes how to configure and use SEV-ES in VMware vSphere on Lenovo® ThinkSystem™ servers. This paper is intended for IT specialists and IT administrators who are familiar with SEV-ES and VMware vSphere products.
Change History
Changes in the January 5, 2024 update:
- Updated the lists of supported servers, processors, and operating system versions
- Added instructions on how to configure UEFI by using Redfish
- Added instructions on how to configure UEFI by using OneCLI
Introduction
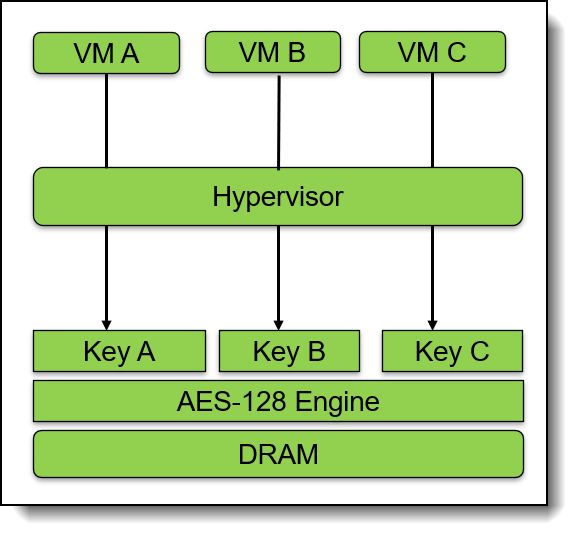
AMD Secure Encrypted Virtualization (SEV) integrates memory encryption capabilities with the existing AMD-V virtualization architecture to support encrypted virtual machines (VMs). Encrypted VMs can help protect not only from physical threats but also from other virtual machines or even the hypervisor itself. SEV provides additional assurances to help protect the guest VM code and data from the attacker.
SEV uses one key per virtual machine to isolate guests and the hypervisor from one another. The keys are managed by the AMD Secure Processor and are hardware isolated.
The following figure shows the brief overview workflow of AMD SEV.
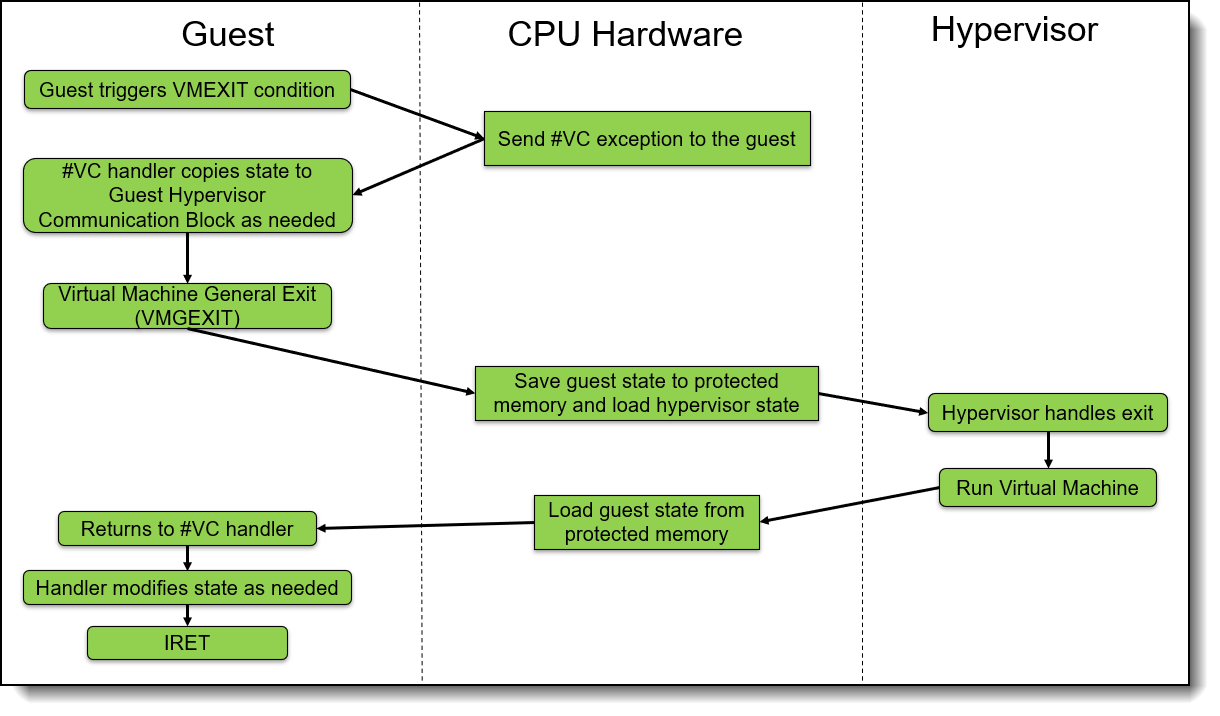
AMD Secure Encrypted Virtualization-Encrypted State (SEV-ES) builds upon AMD SEV to provide an even smaller attack surface and additional protection for a guest operating system (guest OS) from the hypervisor. The AMD SEV-ES feature provides additional hardware-enforced security for isolating guest VMs from the hypervisor. The AMD SEV-ES technology encrypts all CPU register contents when a VM stops running. This prevents the leakage of information in CPU registers to components like the hypervisor and can even detect malicious modifications to a CPU register state.
The AMD SEV-ES architecture is designed to protect guest VM register state by default, and only allow the guest VM itself to grant selective access as required. This additional security protection functionality is accomplished in two ways:
- First, all VM register state is saved and encrypted when a VM exit event occurs. This state is decrypted and restored on a VMRUN only.
- Second, certain types of VM exit events cause a new exception to be taken within the guest VM. This new Communication Exception (#VC) indicates that the guest VM performed some action which requires hypervisor involvement, an example of which would be an IO access by the VM.
The guest #VC handler is responsible for determining what register state is necessary to expose to the hypervisor for the purpose of emulating this operation. The #VC handler also inspects the returned values from the hypervisor and updates the guest state if the output is deemed acceptable.
The following figure shows the overview workflow of SEV-ES.
Server and OS support
AMD SEV-ES supports AMD EPYC 7xx2 (“Rome”) and later processors. The following lists the Lenovo ThinkSystem servers which support AMD SEV-ES and the minimum version of UEFI firmware that supports the AMD SEV-ES.
In vSphere 7.0 Update 1 and later, we can enable AMD SEV-ES on supported AMD EPYC CPUs and guest operating system. SEV-ES requires a supported guest operating system. A virtual machine with SEV-ES enabled won’t work if the guest OS does not support SEV-ES.
The supported VMware host versions that support AMD SEV-ES are as follows:
- VMware vSphere 7.0 Update 1 and later
- VMware vSphere 8.0 and later
The supported Guest OS versions that support AMD SEV-ES are as follows:
- RHEL 8.5 or later
- RHEL 9.0 or later
- SLES 15.3 or later
- Ubuntu 20.04.3 HWE kernel (v5.11)
- Ubuntu 22.04.0 or later
- Photon OS version 3 and later
There are some VM operations unavailable when AMD SEV-ES is enabled. You cannot suspend, migrate with vMotion, or take or restore memory snapshots of such VMs.
The following features are not supported when SEV-ES is enabled:
- UEFI Secure Boot
- Suspend/Resume
- vMotion
- Hot add or remove of CPU or memory
- Powered-on snapshots (however, no-memory snapshots are supported)
- System Management Mode
- VMware Fault Tolerance
- Clones and instant clones
- Guest Integrity
How to configure and use AMD SEV-ES
Starting with vSphere 7.0 U1, PowerCLI can be used to enable and disable SEV-ES on virtual machines. Starting in vSphere 7.0 U2, either the vSphere Client or PowerCLI can be used to enable and disable SEV-ES on virtual machines. New virtual machines can be created with SEV-ES or SEV-ES can be enabled on existing virtual machines.
This section describes how to configure and use AMD SEV-ES in vSphere 7.0 Update 1 and later on Lenovo ThinkSystem servers with detailed steps.
Prerequisites
In order to use AMD SEV-ES, the system must meet the following requirements:
- The system must be installed with an AMD EPYC 7xx2 or later processor.
- Secure Memory Encryption (SME) and SEV-ES must be enabled in UEFI as described in Enabling SEV-ES in UEFI.
- The number of SEV-ES virtual machines per ESXi host is controlled by UEFI. When enabling SEV-ES in the UEFI settings, enter a value for SEV-ES ASID Space Limit.
- The ESXi host running in your host must be at ESXi 7.0 Update 1 or later.
- The vCenter Server must be at vSphere 7.0 Update 2 or later.
- The guest operating system must support SEV-ES. Currently only Linux kernels with specific support for SEV-ES are supported.
- The virtual machine must be at hardware version 18 or later.
- The virtual machine must have the Reserve all guest memory option enabled, otherwise power-on fails.
Enabling SEV-ES in UEFI
There are three ways to enable Secure Memory Encryption (SME) and SEV-ES in UEFI:
- Configure AMD SEV-ES in System Setup
- Configure AMD SEV-ES using Redfish REST API
- Configure AMD SEV-ES using OneCLI
Note: These instructions apply to all ThinkSystem servers with AMD processors except the SR635 and SR655. For these servers, see the Enabling SEV-ES in UEFI on the SR635 and SR655 section.
Configure AMD SEV-ES in System Setup
The following steps describe the process to configure SME and SEV-ES via System Setup on a ThinkSystem server.
- In System Setup, navigate to the System Configuration and Boot Management page.
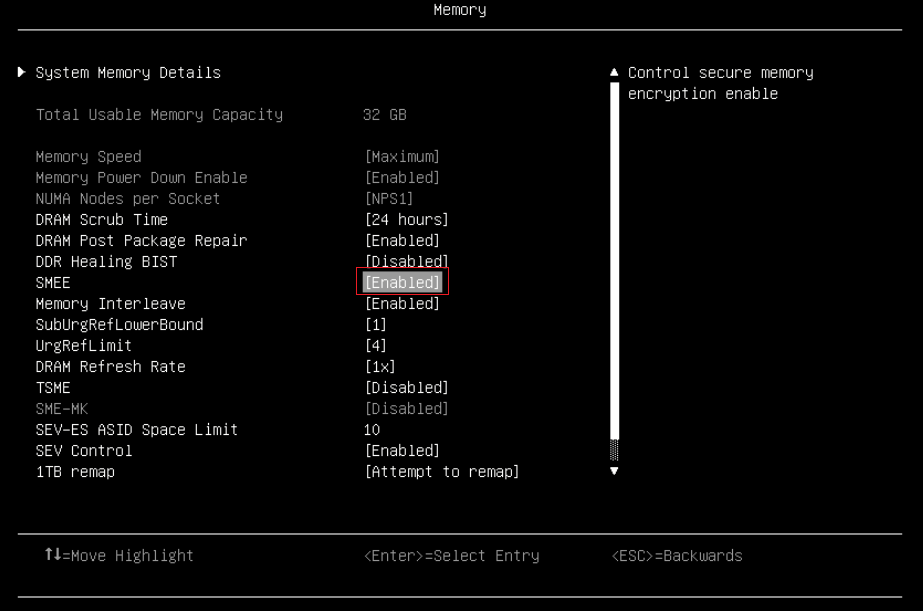
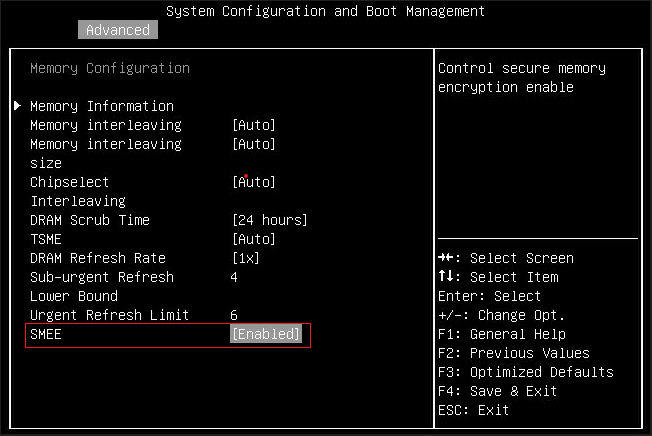
- Enable SME by going to System Settings > Memory and set SMEE to Enabled as shown in the following figure.
- Enable AMD SEV-ES and configure SEV-ES ASID Space Limit Control via UEFI settings. Select System Settings > Memory > SEV Control, enable “SEV Control” and configure “SEV-ES ASID Space Limit” as shown in the following figure:
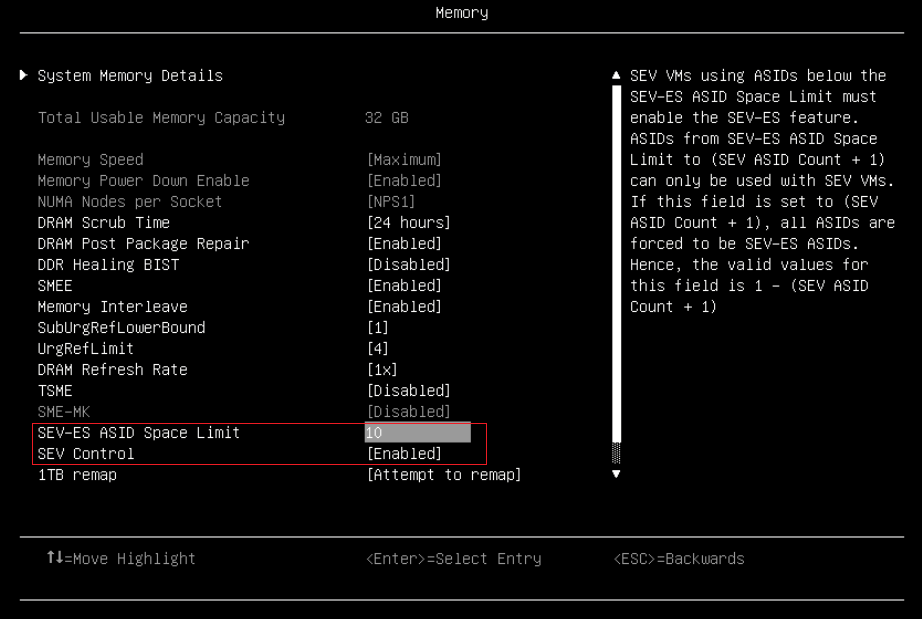
Figure 4. Enable SEV and configure SEV-ES ASID Space Limit via UEFI Settings on SR665 V3 - Press F4 to Save & Exit.
- Reboot host to make configuration take effect.
Configure AMD SEV-ES using Redfish REST API
Redfish is a next-generation systems management interface standard, which enables scalable, secure, and open server management. It is a new interface that uses RESTful interface semantics to access data that is defined in model format to perform out-of-band systems management. We can use Redfish REST API to configure AMD SEV-ES on Lenovo ThinkSystem servers.
Lenovo provides some Python and PowerShell sample scripts to use Redfish. These are available as open source code on Lenovo’s Github page, https://github.com/lenovo/.
- Lenovo Python Redfish Scripts: https://github.com/lenovo/python-redfish-lenovo
- Lenovo PowerShell Redfish Scripts: https://github.com/lenovo/powershell-redfish-lenovo
Since Redfish is a REST API, standard REST clients can be used to interact with the service. Postman is an easy-to-use HTTP REST client tool. The tool is available from https://www.getpostman.com/.
The following steps describe the process to configure AMD SEV-ES via Redfish REST API with Postman tool on ThinkSystem servers with AMD EPYC processors:
- Use the GET method to retrieve properties in BIOS resource for Redfish service with Postman as shown in the following figure.
https://<BMC_IPADDR>/redfish/v1/Systems/1/BiosThe following figure shows the result on the SR655 V3:
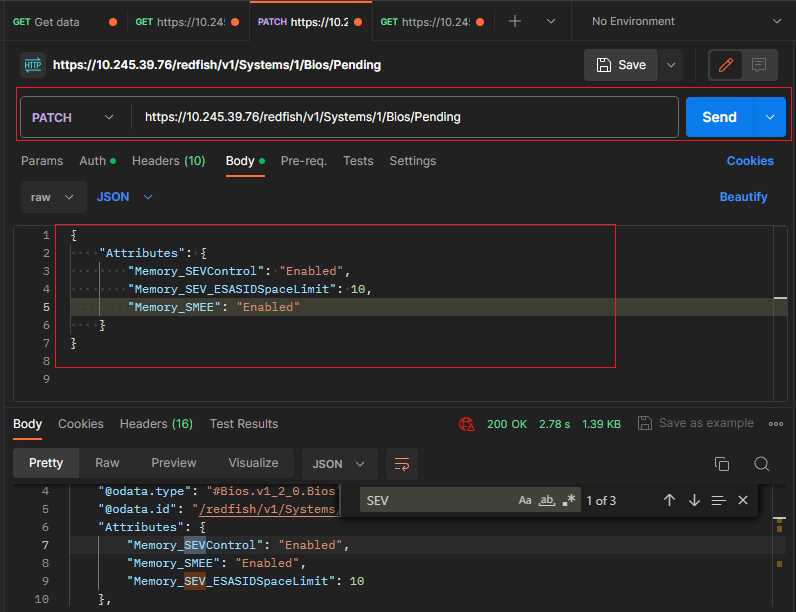
- Use the PATCH method to update AMD SEV-ES properties in BIOS resource for Redfish service with Postman as shown in the following figure.
https://<BMC_IPADDR>/redfish/v1/Systems/1/Bios/PendingThe following figure shows the result on the SR655 V3:
- Reboot host to make SEV-ES configuration take effect.

Configure AMD SEV-ES using OneCLI
Lenovo XClarity Essentials OneCLI is a collection of several command-line applications, which can be used to configure the server, collect service data for the server, update firmware and device drivers, and perform power-management functions on the server. We can use OneCLI to configure AMD SEV-ES on Lenovo ThinkSystem servers.
OneCLI can be downloaded from the following page on the the Lenovo support site:
https://datacentersupport.lenovo.com/us/en/solutions/ht116433
The following steps describe the process to configure AMD SEV-ES via OneCLI on ThinkSystem servers with AMD EPYC processors:
Tip: The commands for ThinkSystem SR635 and SR655 are different to the other AMD-based servers.
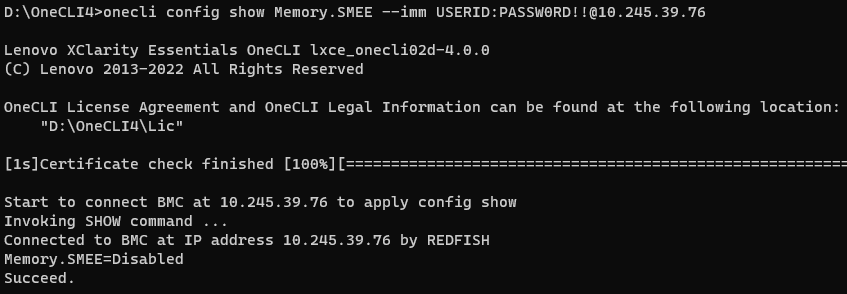
- Run the following OneCLI command to check the status of SME as shown in the following figure:
onecli config show Memory.SMEE --imm <USERID>:<PASSWORD>@<IP> - Run the following OneCLI command to enable the SMEE as shown in the following figure:
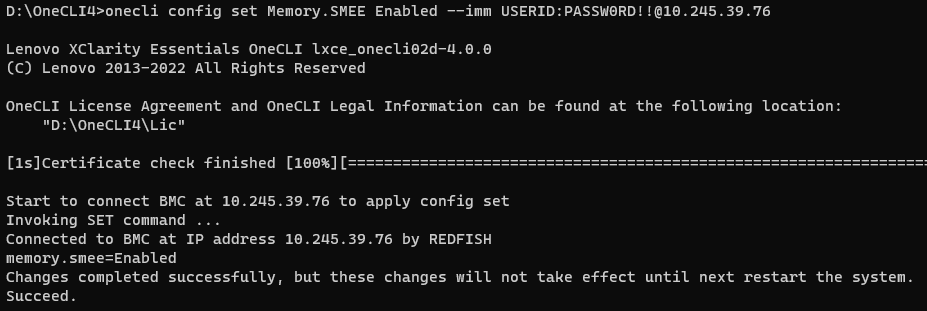
onecli config set Memory.SMEE Enabled --imm <USERID>:<PASSWORD>@<IP> - Reboot host to make SMEE configuration take effect.
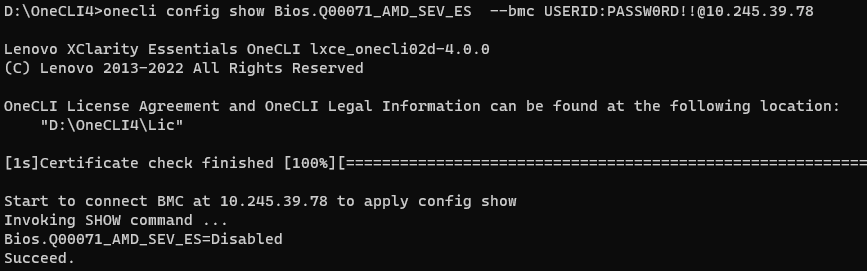
- Run the following OneCLI command to check the SEV Control as shown in the following figure:
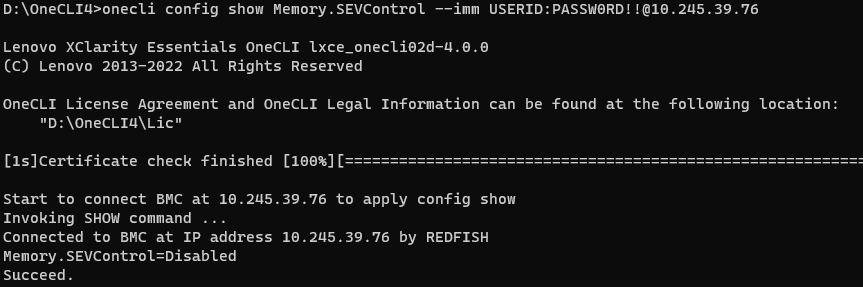
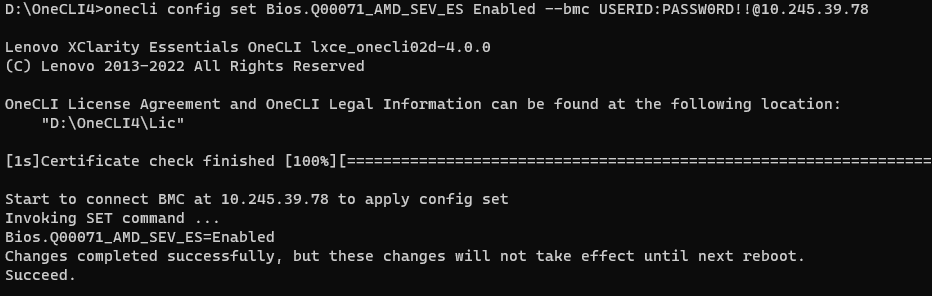
onecli config show Memory.SEVControl --imm <USERID>:<PASSWORD>@<IP> - Run the following OneCLI command to enable the SEV Control as shown in the following figure:
onecli config set Memory.SEVControl Enabled --imm <USERID>:<PASSWORD>@<IP>
Figure 10. Enable SEV Control via OneCLI command on SR655 V3 - Reboot host to make SEV Control configuration take effect.
- Run the following OneCLI command to check the SEV-ES ASID Space Limit as shown in the following figure:
onecli config show Memory.SEV-ESASIDSpaceLimit –imm <USERID>:<PASSWORD>@<IP>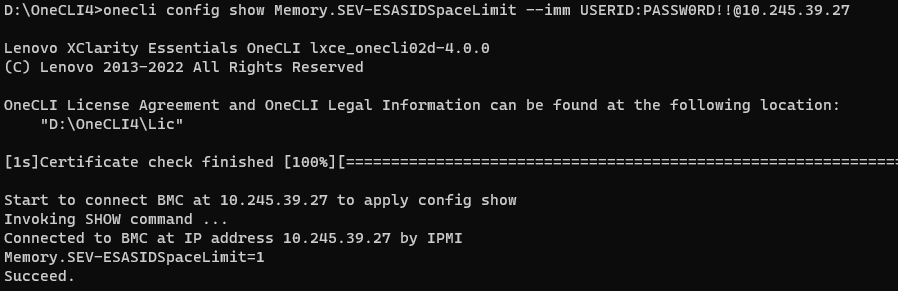
Figure 11. Check SEV-ES ASID Space Limit via OneCLI command on SR655 V3 - Run the following OneCLI command to configure the SEV-ES ASID Space Limit as shown in the following figure:
onecli config set Memory.SEV-ESASIDSpaceLimit number –imm <USERID>:<PASSWORD>@<IP>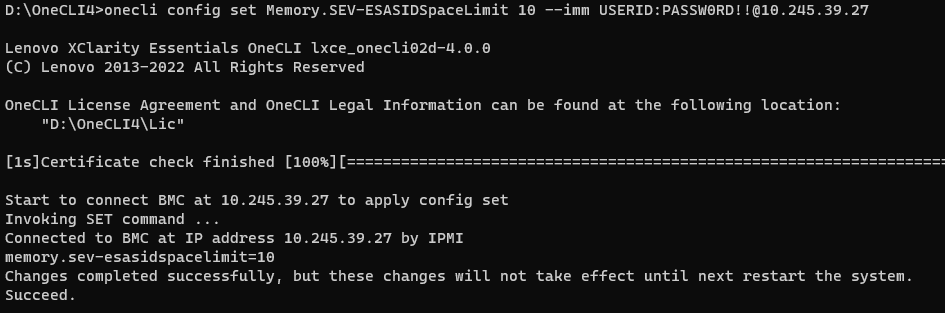
Figure 12. Configure SEV-ES ASID Space Limit via OneCLI command on SR655 V3 - Reboot host to make SEV Control configuration take effect.
Enabling SEV-ES in UEFI on the SR635 and SR655
There are three ways to enable Secure Memory Encryption (SME) and SEV-ES in UEFI on the SR635 and SR655:
Configure AMD SEV-ES in System Setup (SR655 and SR635)
The following steps describe the process to configure SMEE and SEV-ES via System Setup on a ThinkSystem server.
- In System Setup, navigate to the System Configuration and Boot Management page.
- Enable SME by going to System Settings > Memory and set SMEE to Enabled as shown in the following figure.
- Enable AMD SEV-ES and configure SEV-ES ASID Space Limit Control via UEFI settings. Select Advanced > CPU Configuration > AMD SEV-ES, enable “AMD SEV-ES” and configure “SEV-ES ASID Space Limit” as shown in the following figure:
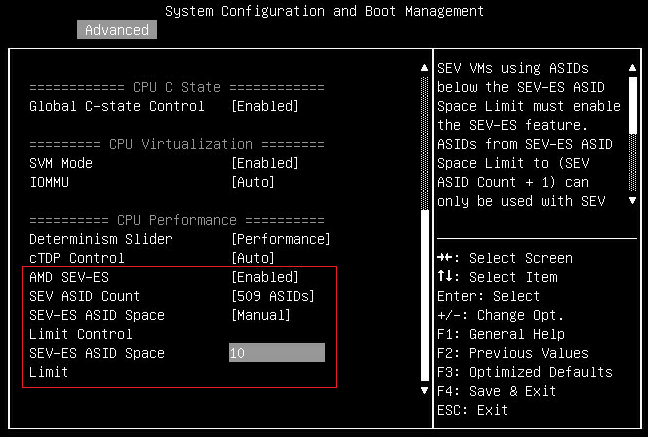
Figure 14. Configure SEV-ES ASID Space Limit via UEFI Settings on SR655 - Press F4 to Save & Exit.
- Reboot host to make configuration take effect.
Configure AMD SEV-ES via Redfish REST API (SR655 and SR635)
Redfish is a next-generation systems management interface standard, which enables scalable, secure, and open server management. It is a new interface that uses RESTful interface semantics to access data that is defined in model format to perform out-of-band systems management. We can use Redfish REST API to configure AMD SEV-ES on Lenovo ThinkSystem servers.
Lenovo provides some Python and PowerShell sample scripts to use Redfish. These are available as open source code on Lenovo’s Github page, https://github.com/lenovo/.
- Lenovo Python Redfish Scripts: https://github.com/lenovo/python-redfish-lenovo
- Lenovo PowerShell Redfish Scripts: https://github.com/lenovo/powershell-redfish-lenovo
Since Redfish is a REST API, standard REST clients can be used to interact with the service. Postman is an easy-to-use HTTP REST client tool. The tool is available from https://www.getpostman.com/.
The following steps describe the process to configure AMD SEV-ES via Redfish REST API with Postman tool on ThinkSystem servers with AMD EPYC processors:
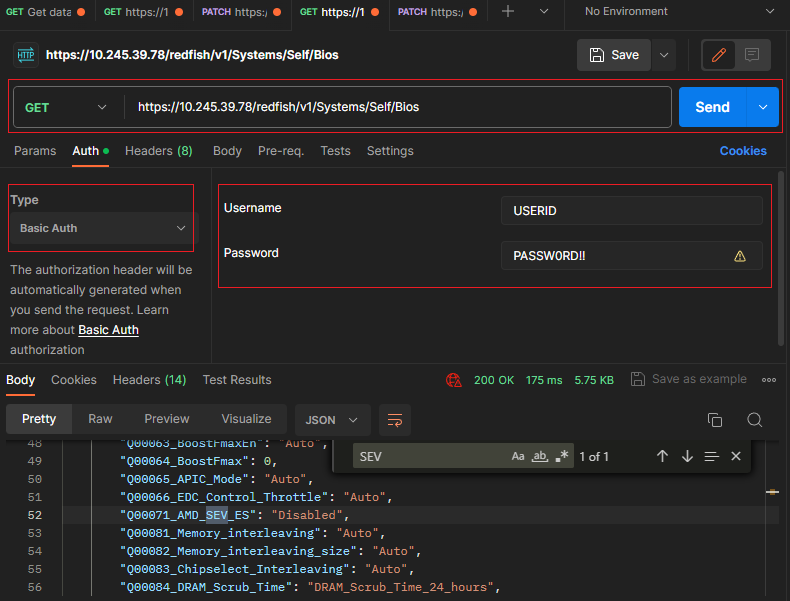
- Use the GET method to retrieve properties in BIOS resource for Redfish service with Postman as shown in the following figure.
https://<BMC_IPADDR>/redfish/v1/Systems/Self/BiosThe following figure shows the result on the SR655:
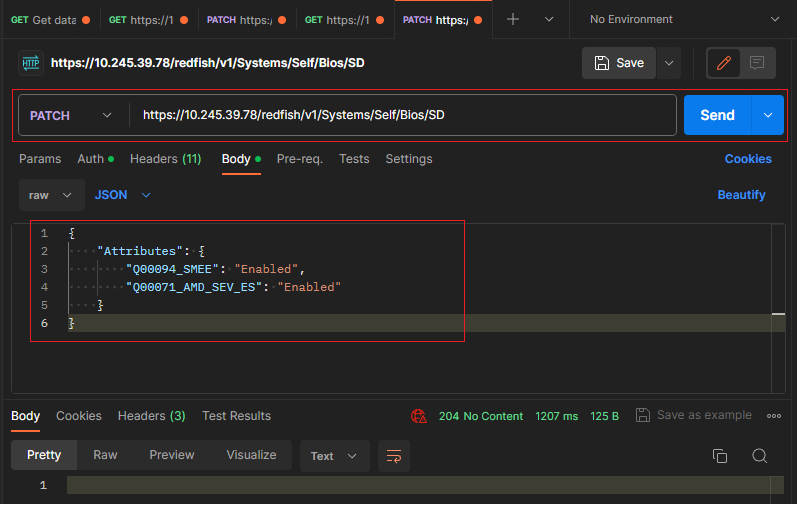
- Use the PATCH method to update AMD SEV-ES properties in BIOS resource for Redfish service with Postman as shown in the following figure.
https://<BMC_IPADDR>/redfish/v1/Systems/Self/Bios/SDThe following figure shows the result on the SR655:
- Reboot host to make SEV-ES configuration take effect.
Note: There are no Redfish method to check or configure the SEV-ES ASID Space Limit on the SR635 and SR655. You will need to use System Setup to perform these steps, as described in the Configure AMD SEV-ES in System Setup (SR655 and SR635) section.
Configure AMD SEV-ES via OneCLI (SR655 and SR635)
Lenovo XClarity Essentials OneCLI is a collection of several command-line applications, which can be used to configure the server, collect service data for the server, update firmware and device drivers, and perform power-management functions on the server. We can use OneCLI to configure AMD SEV-ES on Lenovo ThinkSystem servers.
OneCLI can be downloaded from the following page on the the Lenovo support site:
https://datacentersupport.lenovo.com/us/en/solutions/ht116433
The following steps describe the process to configure AMD SEV-ES via OneCLI on ThinkSystem servers with AMD EPYC processors:
Tip: The commands for ThinkSystem SR635 and SR655 are different to the other AMD-based servers.
- Run the following OneCLI command to check the status of SME as shown in the following figure:
onecli config show Bios.Q00094_SMEE --bmc <USERID>:<PASSWORD>@<IP> - Run the following OneCLI command to enable the SMEE as shown in the following figure:
onecli config set Bios.Q00094_SMEE Enabled --bmc <USERID>:<PASSWORD>@<IP> - Reboot host to make SMEE configuration take effect.
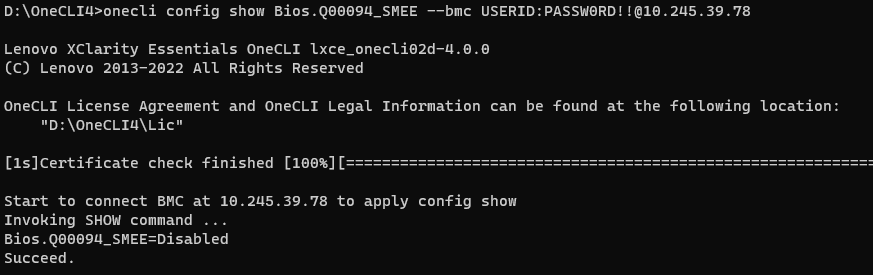
- Run the following OneCLI command to check the SEV Control as shown in the following figure:
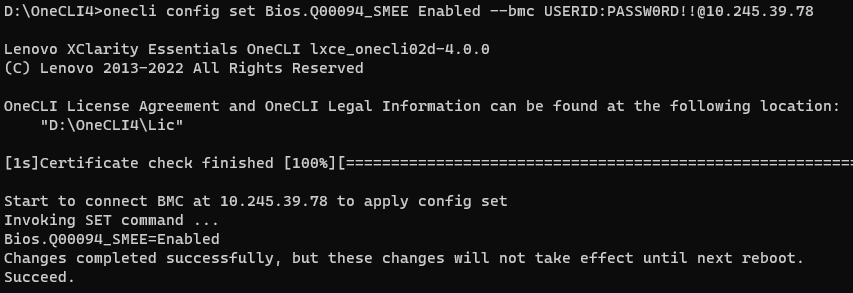
onecli config show Bios.Q00071_AMD_SEV_ES --bmc <USERID>:<PASSWORD>@<IP> - Run the following OneCLI command to enable the SEV Control as shown in the following figure:
onecli config set Q00071_AMD_SEV_ES Enabled --bmc <USERID>:<PASSWORD>@<IP> - Reboot host to make SEV Control configuration take effect.
Note: There are no OneCLI commands to check or configure the SEV-ES ASID Space Limit on the SR635 and SR655. You will need to use System Setup to perform these steps, as described in the Configure AMD SEV-ES in System Setup (SR655 and SR635) section.
Configuring AMD SEV-ES in vSphere
The following steps describe the process to configure and use AMD SEV-ES in VMware vSphere. In our lab, we used vSphere 7.0 U3 and a RHEL 8.5 virtual machine on a ThinkSystem SR635 server.
- Install VMware vSphere 7.0 U3 on the server.
- Connect to vCenter Server by using the vSphere Client.
- Create a virtual machine and install a guest OS (e.g., RHEL 8.5) that supports AMD SEV-ES.
- Enable SEV-ES on virtual machines. Starting in vSphere 7.0 U2, you can use either the vSphere Client or PowerCLI to enable SEV-ES on virtual machines:
To enable SEV-ES on the VMs using the vSphere Client, do the following:
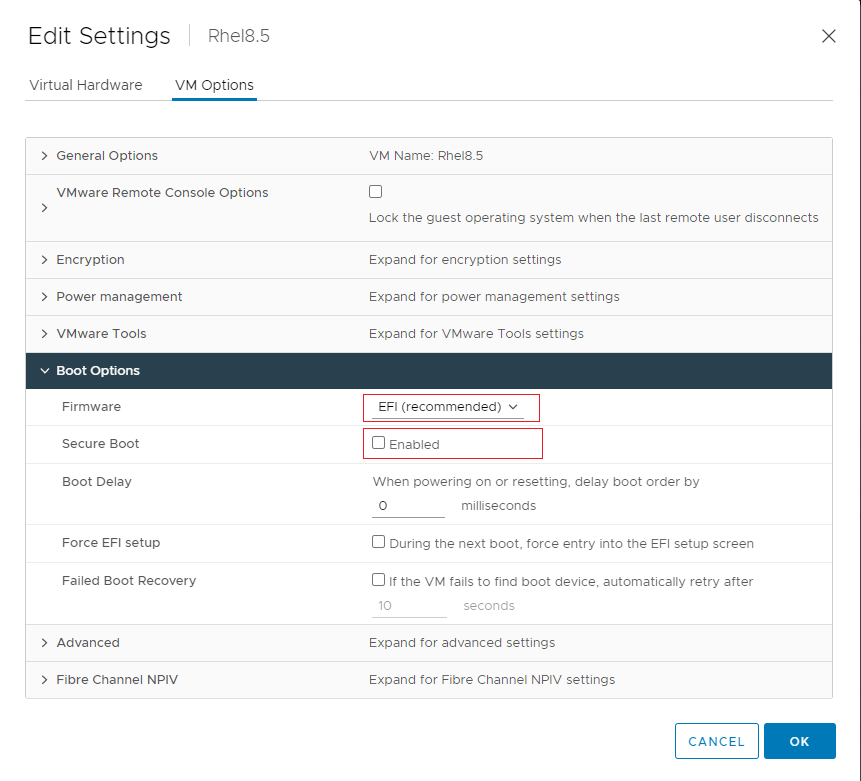
- Right click the virtual machine RHEL8.5 in the inventory and click Edit Settings.
- Under VM Options > Boot Options, ensure that Firmware is set to EFI, and Secure Boot is deselected, as highlighted in the figure below.
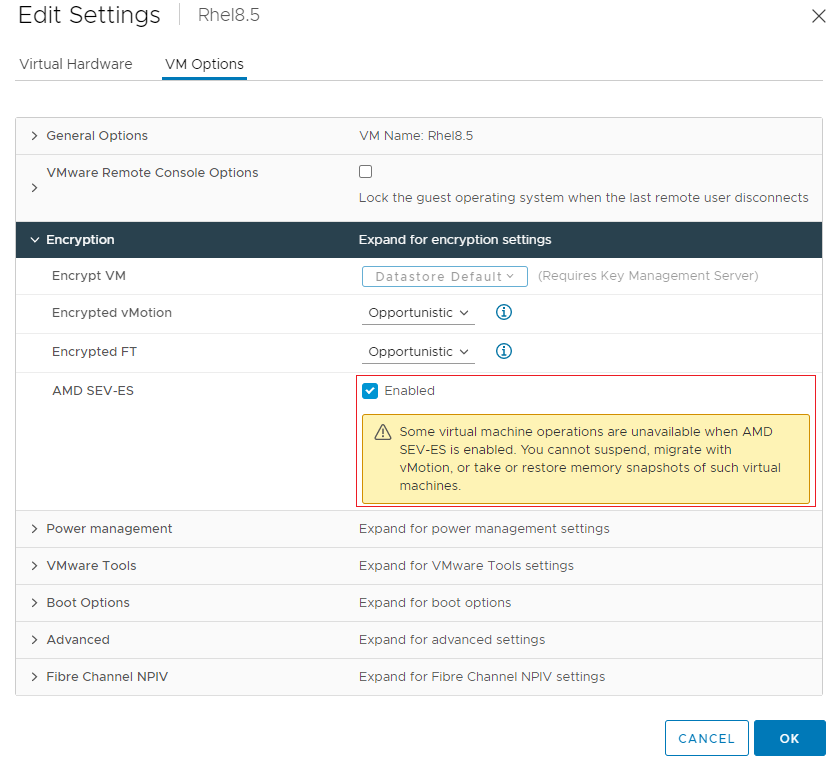
- In the Edit Settings dialog box, go to VM Options > Encryption, click the Enabled check box for AMD SEV-ES, and then click the OK button, as shown in the figure below.
To enable SEV-ES on the VMs using PowerCLI, do the following:
- Download and installed PowerCLI from the PowerCLI home page:
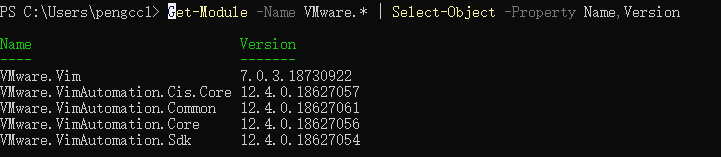
https://developer.vmware.com/web/tool/vmware-powercli/ - Open the PowerCLI console and use the following command to verify that the VMware Power CLI modules is installed successfully, as shown in the figure below.
Get-Module -Name VMware.* | Select-Object -Property Name,Version - In PowerCLI console, run the following command to allow execution of local scripts, as shown in the figure below.
Set-ExecutionPolicy RemoteSigned - In PowerCLI console, run the following Connect-VIServer cmdlet as an administrator to the vCenter server, as shown in the figure below.
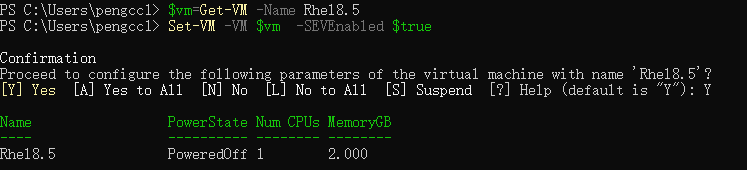
Connect-VIServer -server vCenter_Server_ip_address -User admin_user -Password 'password' - Add SEV-ES to the virtual machine with the following Set-VM cmdlet, as shown in the figure below.
$vm=Get-VM -Name Rhel8.5
Set-VM -VM $vm -SEVEnabled $true
- Power on the virtual machine (we used RHEL 8.5) and use the following command to check the SEV-ES, as shown in the figure below.
dmesg | grep -i sev


References
For additional information, see these resources:
- AMD Secure Encrypted Virtualization developer page:
https://developer.amd.com/sev/
- Protecting VM Register State with SEV-ES:
https://www.amd.com/system/files/TechDocs/Protecting%20VM%20Register%20State%20with%20SEV-ES.pdf
- AMD64 Architecture Programmer’s Manual Volume 2:
https://www.amd.com/system/files/TechDocs/24593.pdf
- VMware vSphere documentation, Securing Virtual Machines with AMD Secure Encrypted Virtualization-Encrypted State:
https://docs.vmware.com/en/VMware-vSphere/7.0/com.vmware.vsphere.vm_admin.doc/GUID-F1F913CB-05F9-4D4F-B8A7-970A43532003.html
Author
Chengcheng Peng is a VMware Engineer in the Lenovo Infrastructure Solutions Group in Beijing, China. As a VMware engineer with 6 years’ experience, she mainly focuses on vSphere security and storage.
Thanks to the following people for their contributions to this project:
- Boyong Li, Lenovo OS Technical Leader
- Alpus Chen, Lenovo VMware Engineer
- David Hsia, Lenovo VMware Engineer
- Chia-Yu Chu, Lenovo Advisory Engineer
- Gary Cudak, OS Architect and WW Technical Lead
- David Watts, Lenovo Press
Trademarks
Lenovo and the Lenovo logo are trademarks or registered trademarks of Lenovo in the United States, other countries, or both. A current list of Lenovo trademarks is available on the Web at https://www.lenovo.com/us/en/legal/copytrade/.
The following terms are trademarks of Lenovo in the United States, other countries, or both:
Lenovo®
ThinkSystem®
XClarity®
The following terms are trademarks of other companies:
AMD, AMD EPYC™, and AMD-V™ are trademarks of Advanced Micro Devices, Inc.
Linux® is the trademark of Linus Torvalds in the U.S. and other countries.
PowerShell is a trademark of Microsoft Corporation in the United States, other countries, or both.
Other company, product, or service names may be trademarks or service marks of others.
Configure and Buy
Please select a locale
Full Change History
Changes in the January 5, 2024 update:
- Updated the lists of supported servers, processors, and operating system versions
- Added instructions on how to configure UEFI by using Redfish
- Added instructions on how to configure UEFI by using OneCLI
First published: January 10, 2022
Course Detail
Employees Only Content
The content in this document with a is only visible to employees who are logged in. Logon using your Lenovo ITcode and password via Lenovo single-signon (SSO).
The author of the document has determined that this content is classified as Lenovo Internal and should not be normally be made available to people who are not employees or contractors. This includes partners, customers, and competitors. The reasons may vary and you should reach out to the authors of the document for clarification, if needed. Be cautious about sharing this content with others as it may contain sensitive information.
Any visitor to the Lenovo Press web site who is not logged on will not be able to see this employee-only content. This content is excluded from search engine indexes and will not appear in any search results.
For all users, including logged-in employees, this employee-only content does not appear in the PDF version of this document.
This functionality is cookie based. The web site will normally remember your login state between browser sessions, however, if you clear cookies at the end of a session or work in an Incognito/Private browser window, then you will need to log in each time.
If you have any questions about this feature of the Lenovo Press web, please email David Watts at dwatts@lenovo.com.


