

Top
Author
Published
9 Apr 2024Form Number
LP1923PDF size
38 pages, 1.0 MBSubscribed to LP1923.
Thank you for your feedback.
Table of Contents
Abstract
Intel® QuickAssist Technology (QAT) is a feature of Intel Xeon Scalable processors that is typically used to offload tasks from the server CPU, such as bulk crypto, compression, decompression and public key encryption.
For virtualization customers, QAT provides exclusive access to virtual machines using a method known as PCI device passthrough. This allows the PCIe QAT devices to be removed from the host and be assigned to individual guests.
Intel QuickAssist Technology 2.0 now also supports Scalable I/O Virtualization (SIOV) and Single Root I/O Virtualization (SR-IOV) and to offer support for more guest operating systems. Starting with 4th Gen Intel Xeon Scalable processors, it is possible to divide a physical QAT device into multiple virtual devices and assign the virtual devices to multiple guest OSes. Conceptually, the guest OSes share the performance of a single physical QAT.
This paper provides guidance on enabling QAT Scalable I/O Virtualization (SIOV) and passing through the virtual device (vQAT) to a VM running in a Kernel Virtual Machine (KVM)-based OS. The paper is for Linux administrators who want to use a QAT in a ThinkSystem server to pass to a VM. All the setups are based on RHEL 9.0 (both host OS and guest OS) and Intel CPU with QAT.
SR-IOV implementation: For details on how to enable QAT SR-IOV, see the paper "Configuring Intel QuickAssist Technology with SR-IOV in a Linux VM on Lenovo ThinkSystem Servers", available from https://lenovopress.lenovo.com/lp1709-configuring-intel-quickassist-technology-sriov-in-a-linux-vm
Introduction
Intel® QuickAssist Technology (QAT) is a feature of Intel Xeon Scalable processors that is typically used to offload tasks from the server CPU, such as bulk crypto, compression, decompression and public key encryption.
For virtualization customers, QAT provides exclusive access to virtual machines using a method known as PCI device passthrough. This allows the PCIe QAT devices to be removed from the host and be assigned to individual guests.
However, with the large-scale deployment of virtual machines, cloud computing environment needs more and more QAT resources. Intel QuickAssist Technology 2.0 supports Single Root I/O Virtualization (SR-IOV) and Scalable I/O Virtualization (SIOV) to offer support for more guest operating systems. Starting with 4th Gen Intel Xeon Scalable processors, it is possible to divide a physical QAT device into multiple virtual devices and assign the virtual devices to multiple guest OSes. Conceptually, the guest OSes share the performance of a single physical QAT.
Hardware Architecture
The QAT hardware architecture in the Intel Xeon Scalable processor is illustrated in the figure below. The processor is comprised of multiple IO interfaces and CHA/core modules, and the modules are connected to a mesh interconnect. The mesh consists of horizontal and vertical interconnects. Each interconnect represents a bi-directional channel.
The 4th Gen Intel Xeon ("Sapphire Rapids") processors have 0, 1, 2 or 4 QAT accelerators, depending on the processor SKU. For the specifics, see the Processor features table in the SR630 V3 product guide:
https://lenovopress.lenovo.com/lp1600-thinksystem-sr630-v3-server#processor-features
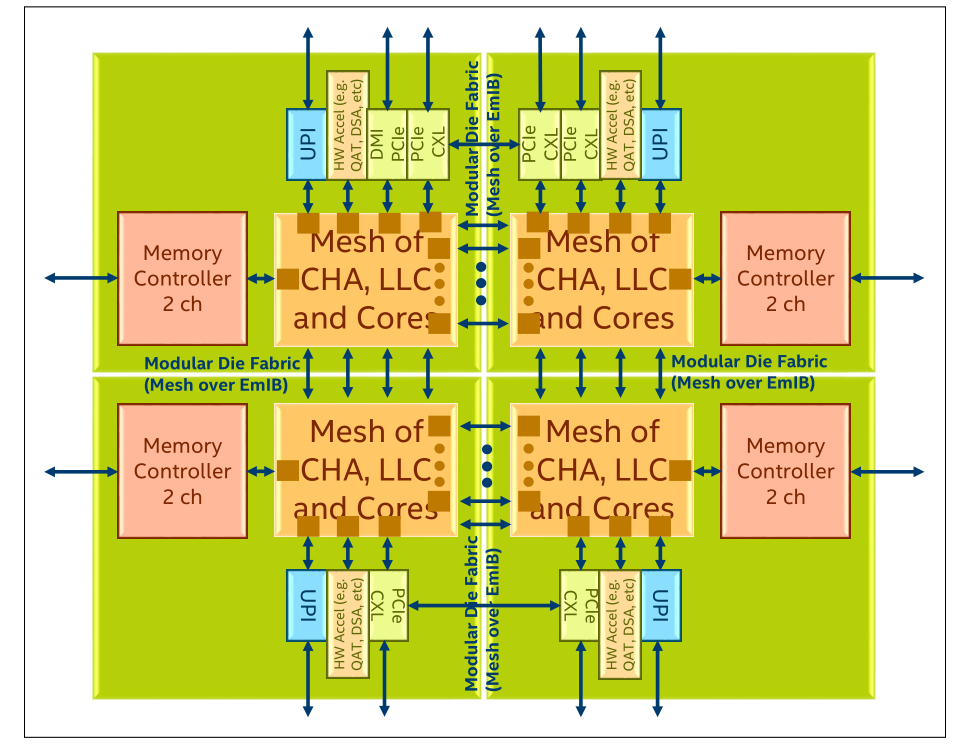
Figure 1. Intel QAT in Sapphire Rapids System Architecture (from Intel Document ID #611488: Sapphire Rapids Processor External Design Specification, Volume One: Architecture)
In the 4th Gen Intel Xeon Scalable processors ("Sapphire Rapids"), QAT is an accelerator integrated in root complex that is seen as a RCiEP (Root Complex Integrated Endpoint), which means the QAT is a PCIe device as well. For Intel QAT 2.0 devices, there are 4xxx, 401xx, 402xx and 420xx device so far, the corresponding Physical Function (PF) device ID is 0x4940, 0x4942, 0x4944 and 0x4946 and their Virtual Function (VF) device ID is 0x4941, 0x4943, 0x4945 and 0x4947. As QAT evolves, more device IDs will appear.
Specifically for the 4th Gen processors, each processor has up to four QAT PCIe Endpoints in a single CPU package, and the hardware exposes one Physical Function (PF) per QAT PCIe Endpoint to the host. When SR-IOV is enabled, each Physical Function (PF) supports up to 16 Virtual Functions (VFs), one or more VFs can be passed to different guests/VMs and one or more PFs may be passed to a single virtual machine. When S-IOV is enabled, each PF supports up to 64 Assignable Device Interfaces (ADIs), each ADI is a vQAT device, and one or more vQAT can be passed to different guests/VMs.
Note: Intel QAT supports both SR-IOV and S-IOV. However, it only supports each mode exclusively.
Virtualization Mode
Three different methods of virtualization are supported as shown in the following figure, Physical Device direct assignment, Single Root IOV (SR-IOV) and Scalable IOV.
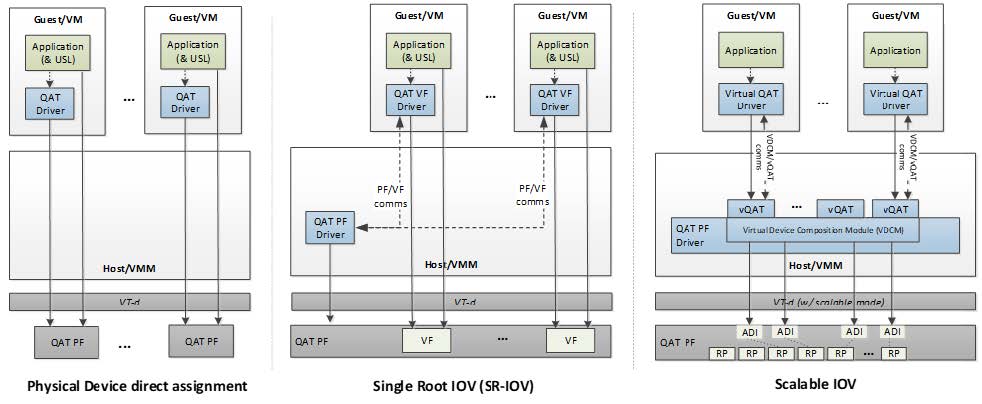
Figure 2. Virtualization Deployment Model for Intel® QAT 2.0 (from Intel Document ID #743912: Programmer’s Guide Intel QuickAssist Technology Hardware Version 2.0)
With Physical Device direct assignment, shown in the left of Figure 2, QAT as PCIE device expose as Physical Function (PF), each QAT only has one PF, each PF can only be passed to one guest OS, one or more PFs may be passed to a single guest OS.
With Single Root IOV (SR-IOV), shown in the middle of Figure 2, each QAT device can exposes one PF and multiple Virtual Functions (VFs), the maximum VFs number is 16 in 4th Gen Intel Xeon Scalable processors. One or more VFs can be passed through to different guest OS.
Scalable IOV (SIOV), on the right, is an approach to hardware-assisted I/O virtualization that enables highly scalable and high-performance sharing of I/O devices across isolated domains. SIOV enables flexible composition of Virtual Functions by software from native hardware interfaces, rather than implementing a complete SR-IOV virtual function (VF) interface. SIOV devices expose light weight Assignable Device Interfaces (ADIs) that are optimized for fast-path (data-path) operations from the guest. S-IOV defines an approach to assigning these device interfaces to isolated domains at a fine granularity.
The architecture defines the granularity of sharing of a device as an Assignable Device Interface (ADI). Each ADI instance on the device encompasses the set of resources on the devices that are allocated by software to support the fast-path operations for a virtual device. SIOV uses Process Address Space Identifiers (PASID) rather than Bus/Device/Function (BDF) to identify unique address spaces, which supports better scalability.
All ADIs on a device function use the same PCIe BDF number corresponding to the device’s PCIe Function. PASID are used to distinguish upstream memory transactions performed for different ADIs and to convey the address space targeted by the transaction. S-IOV enables a unique address translation function for upstream requests for each PASID. 4th Gen Intel Xeon Scalable processors have up to 64 ADIs per socket.
Note: S-IOV is disabled in Linux Kernel after v5.16. Effort is underway to reenable in future kernel version. This paper will use the Intel out-of-tree (OOT) package in both host OS (RHEL 9.0) and guest OS (RHEL 9.0) to illustrate the vQAT works well. However, for SR-IOV, since the QAT inbox driver has been supported on host OS (RHEL 9.1) and guest OS (RHEL 9.1), so the section of SR-IOV in this paper just use inbox driver to demonstrate QAT SR-IOV function.
Software Architecture
The Intel QAT APIs establish the interface to access the QAT hardware. Thanks to the QAT APIs, the details of the hardware and software architecture are transparent to user applications. However, some knowledge of the underlying hardware and software is helpful for performance optimization and debugging purposes.
The brief view of software stack is shown in the figure below.
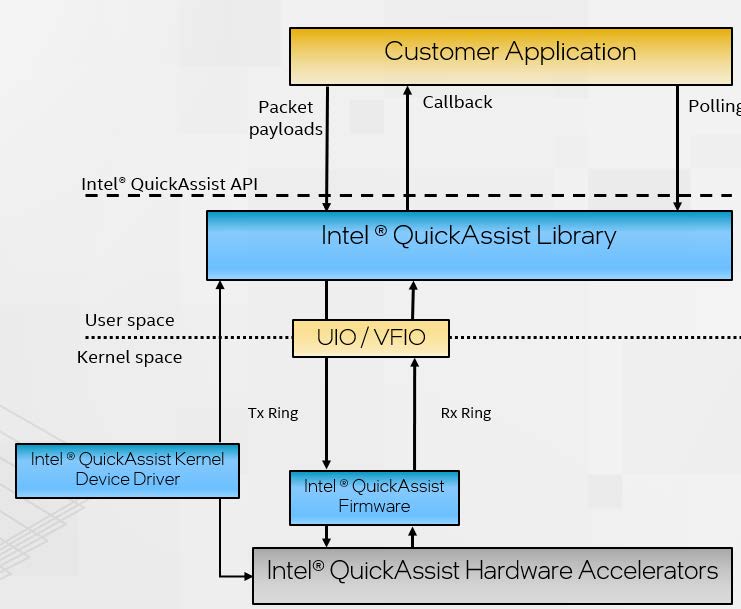
Figure 3. Intel QAT Software Architecture (from Intel Document ID #743912: Programmer’s Guide Intel QuickAssist Technology Hardware Version 2.0)
In a nutshell, there are three processes to handle requests.
- Applications submit payloads by the QuickAssist API as the part of the request. The QuickAssist Library in the user space helps convert these requests into descriptors and place them in the Tx Ring (Transmit Ring, also referred to as the hardware-assisted queue) for communication between CPU and QAT hardware.
- QAT firmware parses the descriptors and configures the accelerators accordingly. Upon a job is completed, the QAT firmware returns the processed payload (encrypted or compressed, or both) and generates a response message that is inserted into the Rx Ring (Receive Ring).
- There are two ways for an application to get results:
- Application polls to query the Rx Ring via Intel QAT library
- [Non-blocking application] Intel QAT library issues a callback to applications to inform that the operation is finished.
Setup QAT in UEFI
If you are using Virtual Function (VF) based on Intel QAT Physical Function (PF) device, make sure that the following BIOS settings are enabled on your server platform.
- Enable QAT devices in BIOS setting.
- Enable I/O Memory Management Unit (IOMMU) in BIOS setting
- For SR-IOV, enable Single Root I/O Virtualization in BIOS setting. The QAT supports SR-IOV residing in a PF, perform the following command to make sure the QAT supports SR-IOV.
lspci -vn -d :4940|grep -i SR-IOV - For S-IOV, enable Process Address Space ID (PASID). S-IOV uses PASID to identify a vQAT device. Run the following command to make sure the QAT supports S-IOV.
lspci -vn -d :4940|grep PASID
IOMMU and SRIOV and QAT settings
I/O Memory Management Unit (IOMMU) is the generic name for Intel Virtualization Technology for Directed I/O (Intel VT-d). Intel QAT VFs and vQATs are only available on hardware platforms supporting Intel VT-d. The Intel VT-d allows QAT VF to directly be assigned to a VM. The IOMMU must be enabled in the host UEFI.
Tip: Intel VT-d should not be confused with VT-x Intel Virtualization Technology. VT-x allows one hardware platform to function as multiple “virtual” platforms. However, VT-d improves security and reliability of the systems and improves performance of I/O devices in virtualized environments.
The steps to activate IOMMU are as follows:
- In System Setup (F1 at boot), enter the UEFI System Configuration and Boot Management to enable the Intel VT for Directed I/O (VT-d).
- From the BIOS setup menu path, select System Settings → Devices and I/O ports → Intel VT for Directed I/O (VT-d) to enable the IOMMU and SRIOV as shown in the following two figures.
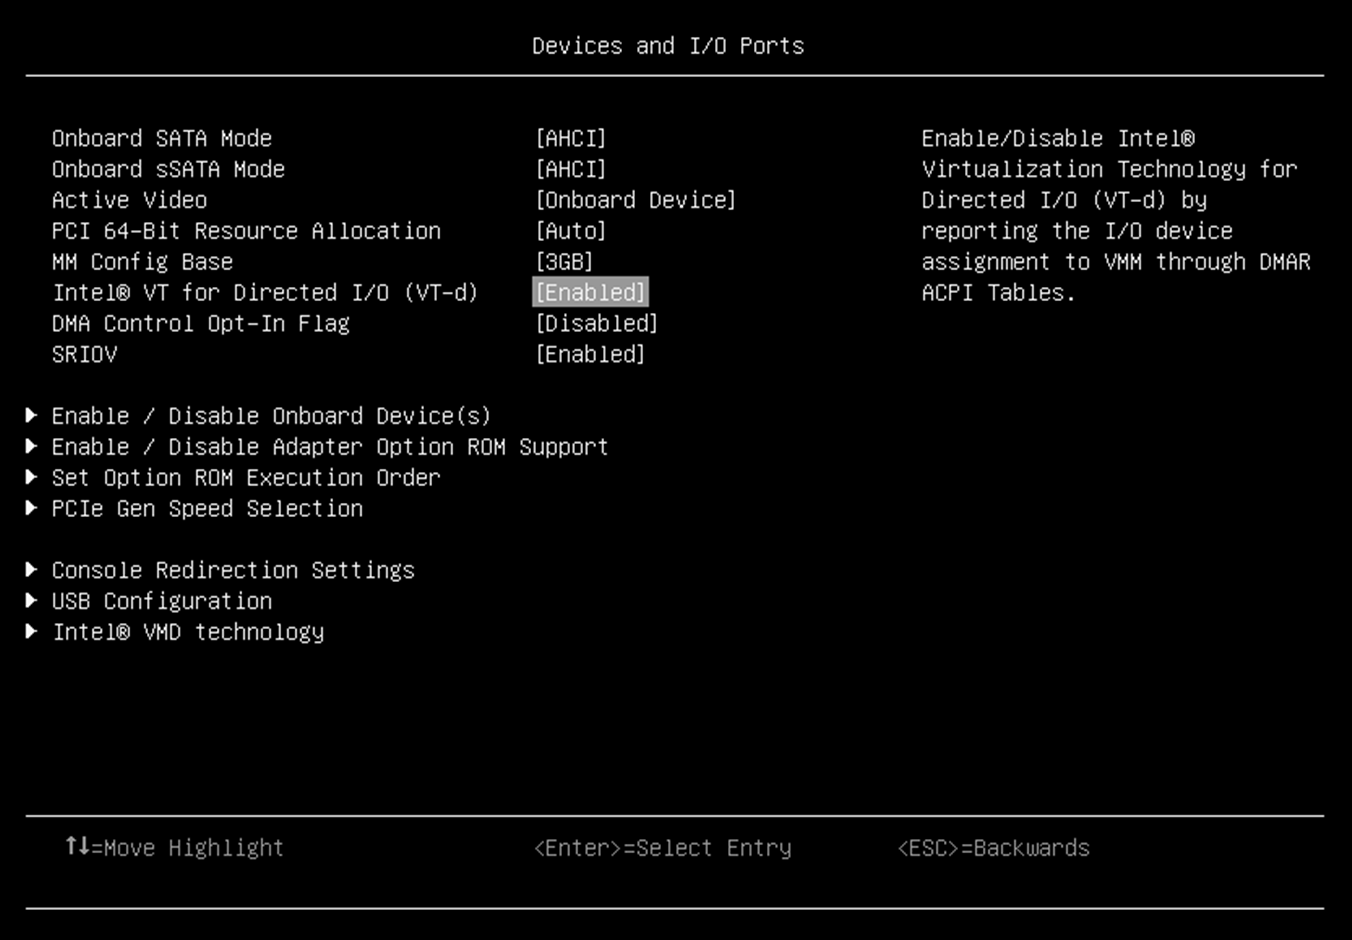
Figure 4. IOMMU in Devices and I/O Ports in System Setup (UEFI)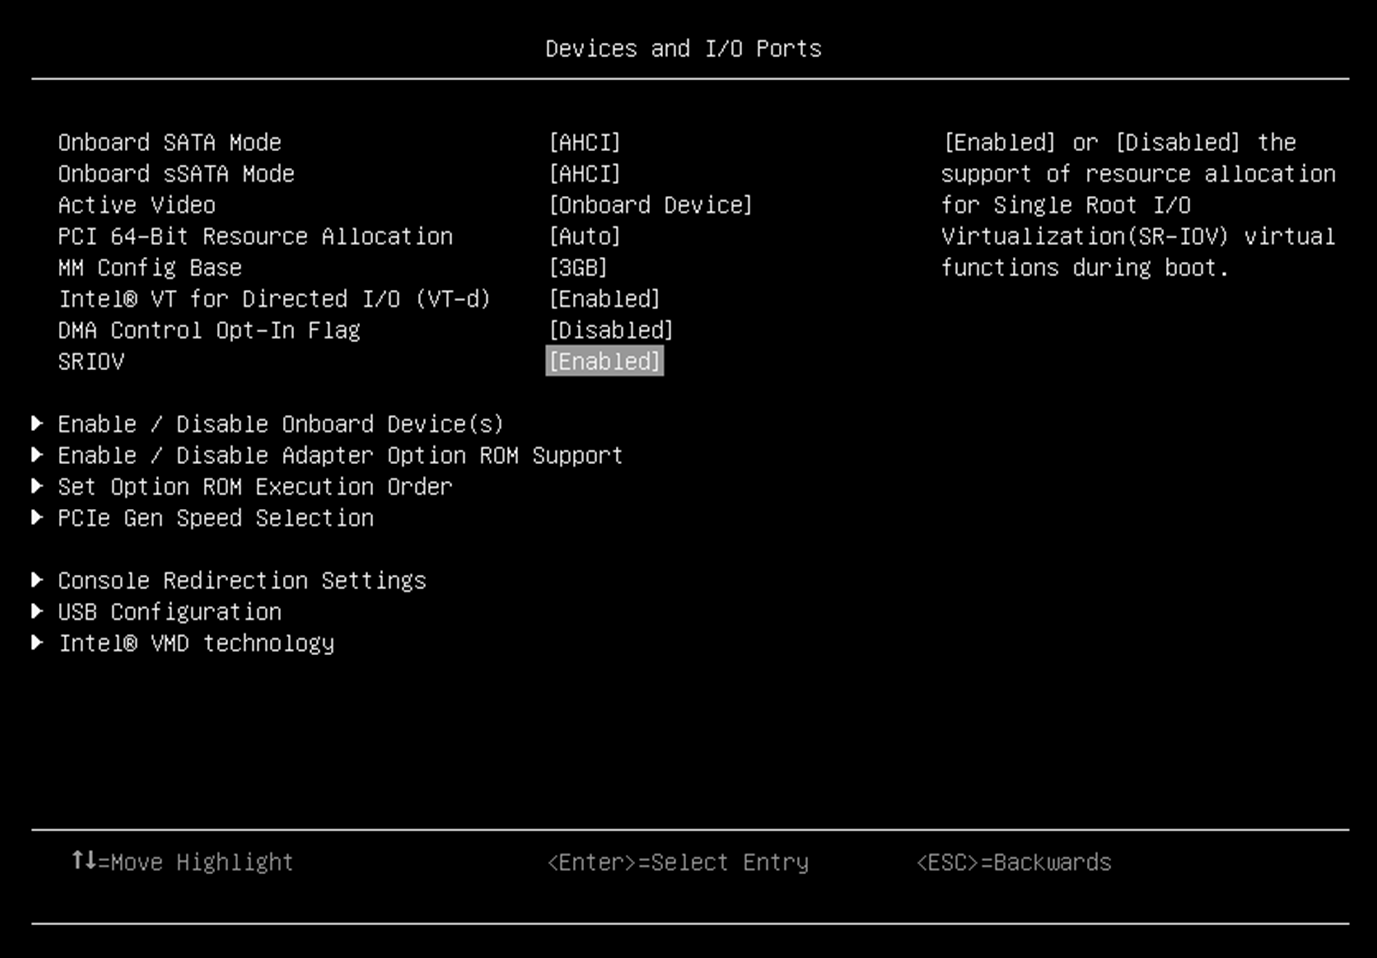
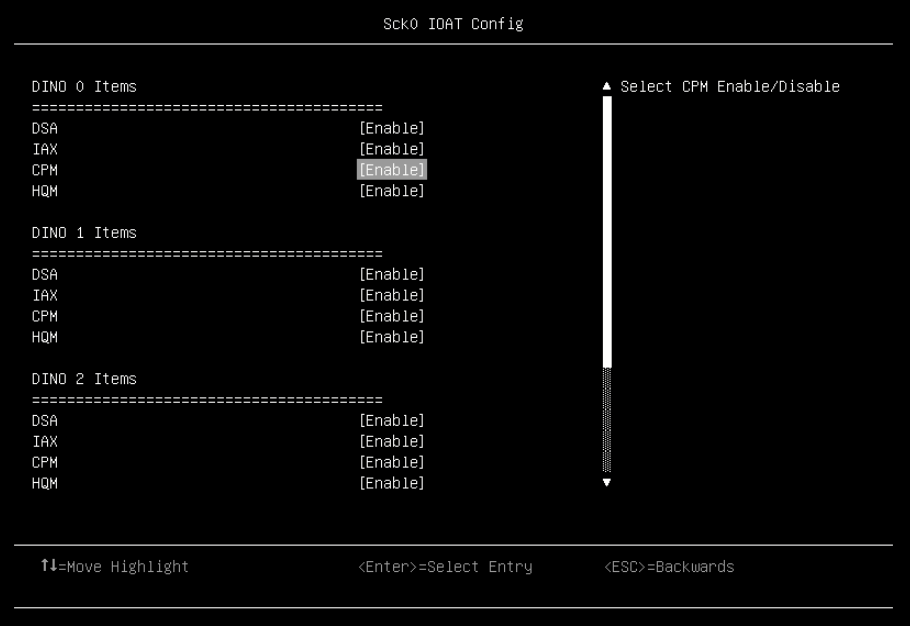
Figure 5. SRIOV in Devices and I/O Ports in System Setup (UEFI) - Enable QAT device in UEFI by navigating the following menu path in System Setup: System Configuration and Boot Management > System Information > Socket Configuration > IIO Configuration > IOAT Configuration > Sock0 IOAT Config > CPM as shown in the following figure.
- After enabling Intel IOMMU, SRIOV, QAT, save and exit System Setup menu, and then boot the Linux OS.
- Check that IOMMU is enabled. Boot up to OS and ensure that the IOMMU is enabled by the following command
dmesg|grep DMARIf the output includes DMAR: IOMMU enabled, it means that system has enabled VT-d (Intel Virtualization Technology for Direct I/O) by reporting the I/O device assignment to VM through DMAR (DMA Remapping) ACPI table.
- Check if system has QAT PF device using the following command (Device ID 4940 and 4942 belong to QAT PF device):
lspci -nn|egrep -e '8086:4940|8086:4942' - Verify SR-IOV hardware capabilities. The QAT supports SR-IOV residing in a PF. Perform the following command to make sure the QAT supports SR-IOV capability:
lspci -vn -d :4940|grep -i SR-IOVFor the 4th Gen Intel Xeon Scalable processors (Sapphire Rapids), then QAT PF device ID is 0x4940 or or 0x4942, the VF device ID is 0x4941 or 0x4943. The command should display one of the capabilities as shown below:
# lspci -vn -d :4940|grep -i SR-IOV Capabilities: [150] Single Root I/O Virtualization (SR-IOV) Capabilities: [150] Single Root I/O Virtualization (SR-IOV) Capabilities: [150] Single Root I/O Virtualization (SR-IOV) Capabilities: [150] Single Root I/O Virtualization (SR-IOV) Capabilities: [150] Single Root I/O Virtualization (SR-IOV) Capabilities: [150] Single Root I/O Virtualization (SR-IOV) Capabilities: [150] Single Root I/O Virtualization (SR-IOV) Capabilities: [150] Single Root I/O Virtualization (SR-IOV) - Verify S-IOV hardware capabilities. The QAT supports vQATs residing in a PF. Run the following command to check if the QAT supports S-IOV capability:
lspci -vn -d :4940|grep PASID4th Gen Intel Xeon Scalable Processor (Sapphire Rapids) QAT PF device ID is 0x4940 or 0x4942, and the VF device ID is 0x4941 or 0x4943. The command should display the capabilities as:
# lspci -vn -d :4940|grep PASID
        Capabilities: [1d0] Process Address Space ID (PASID)
        Capabilities: [1d0] Process Address Space ID (PASID)
        Capabilities: [1d0] Process Address Space ID (PASID)
        Capabilities: [1d0] Process Address Space ID (PASID)
        Capabilities: [1d0] Process Address Space ID (PASID)
        Capabilities: [1d0] Process Address Space ID (PASID)
        Capabilities: [1d0] Process Address Space ID (PASID)
        Capabilities: [1d0] Process Address Space ID (PASID)
Enable IOMMU host kernel support
Currently, most released operating systems, such as RHEL/SLES OSes, set IOMMU default to off (CONFIG_INTEL_IOMMU_DEFAULT_ON is not set). You will need to append the kernel parameter intel_iommu=on to the affected OSes.
To enable the I/O Memory Management Unit (IOMMU) on the host OS, follow these procedures:
-
Edit the host kernel boot command line
For SR-IOV on an Intel VT-d system, IOMMU is activated by adding the intel_iommu=on parameters to the kernel command line.
Qemu parameter aw-bit determines the address width of IOVA address space. The address space has 39 bits width for 3-level IOMMU page tables, and 48 bits for 4-level IOMMU page tables, thus we also need to add aw-bit=48 to kernel boot parameters.
To enable these options, edit or add the GRUB_CMDLINX_LINUX line to the /etc/default/grub configuration file as follows:
# cat /etc/default/grub
GRUB_TIMEOUT=5
GRUB_DISTRIBUTOR="$(sed 's, release .*$,,g' /etc/system-release)"
GRUB_DEFAULT=saved
GRUB_DISABLE_SUBMENU=true
GRUB_TERMINAL_OUTPUT="console"
GRUB_CMDLINE_LINUX="crashkernel=auto resume=/dev/mapper/rhel-swap rd.lvm.lv=rhel/root rd.lvm.lv=rhel/swap rhgb quiet intel_iommu=on aw-bits=48"
GRUB_DISABLE_RECOVERY="true"
GRUB_ENABLE_BLSCFG=true
For S-IOV, IOMMU is activated by adding the intel_iommu=on,sm_on parameters to the kernel command line. The sm_on parameter enables the Intel IOMMU scalable mode if the hardware advertises that it has support for the scalable mode translation.
To enable these options, edit or add the GRUB_CMDLINX_LINUX line to the /etc/default/grub configuration file as follows:
# cat /etc/default/grub GRUB_TIMEOUT=5 GRUB_DISTRIBUTOR="$(sed 's, release .*$,,g' /etc/system-release)" GRUB_DEFAULT=saved GRUB_DISABLE_SUBMENU=true GRUB_TERMINAL_OUTPUT="console" GRUB_CMDLINE_LINUX="crashkernel=auto resume=/dev/mapper/rhel-swap rd.lvm.lv=rhel/root rd.lvm.lv=rhel/swap rhgb quiet intel_iommu=on,sm_on" GRUB_DISABLE_RECOVERY="true" GRUB_ENABLE_BLSCFG=true - Regenerate the grub2 config file To apply changes to the kernel command line, regenerate the boot loader configuration using the following command:
grub2-mkconfig
Check whether the changes are effective by using the following command:
grubby --info=0
- Reboot the host OS For the changes to take effect to kernel driver, reboot the host machine
- Use the following command to confirm that IOMMU is enabled:
dmesg|grep iommu
If successful, you should see one of the following messages:
Adding to iommu group 0
iommu: Default domain type: Translated (set via kernel command line)
Download and install QAT firmware
In order to use QAT Virtual Function (VF) on a VM, make sure that the following are running in your host and guest OS:
- QAT Firmware (qat_4xxx.bin, qat_4xxx_mmp.bin )
- QAT kernel modules (intel_qat, 4xxx)
- User space library (qatlib)
For QAT SR-IOV, kernel modules (intel_qat, 4xxx) should be loaded and QAT Firmware should be installed as well. For QAT S-IOV, except above kernel module intel_qat and 4xxx modules, kernel modules qat_4xxxvf, qat_4xxx, uio, mdev, vfio, and vfio_iommu_type1 are also needed.
For verification of QAT SR-IOV feature, a user space library (qatlib) should be running in host OS and guest OS, and qatlib could be downloaded at https://github.com/intel/qatlib. However, for S-IOV, we can only use Intel out-of-tree (OOT) pkg (QAT20.L.1.0.50-00003.tar.gz) to verify the vQAT feature at this point of time, since currently only available through early-access agreement with Intel. This package includes the needed kernel driver, qat frimware and the test sample applications. Obtain the official released Intel QAT package at https://www.intel.com/content/www/us/en/download/765501.
If your OS vendor’s repositories couldn’t integrate QAT Firmware (qat_4xxx.bin, qat_4xxx_mmp.bin). you should download QAT Firmware and copy it (qat_4xxx.bin, qat_4xxx_mmp.bin) to /lib/firmware/ in host OS and guest OS. The two firmware had been released at https://git.kernel.org/pub/scm/linux/kernel/git/firmware/linux-firmware.git/tree/. And RHEL 9.2 and later has been including them in a package named “linux-firmware”.
After all firmware, kernel modules, and qat services run well in host OS, the QAT VFs or vQATs could be created to assign them to VMs.
Note: For Intel QAT 2.0 devices, there are 4xxx, 401xx, 402xx and 420xx device so far. And for QAT 402xx device in intel Birch stream platform, the firmware should be qat_402xx.bin and qat_402xx_mmp.bin. For QAT 420xx device, the firmware name are qat_420xx.bin and qat_420xx_mmp.bin.
The steps to download and install QAT firmware are as follows:
-
Download the firmware as described above.
- On the host, copy the two firmware files to the /lib/firmware/ directory:
- qat_4xxx.bin
- qat_4xxx_mmp.bin
- Reboot the system
- Confirm the operation by running the following command
lspci -d :4940 -k
It should show the kernel module “qat_4xxx” is loaded and driver name “4xxx” is in use as following.
# lspci -d :4940 -k
6b:00.0 Co-processor: Intel Corporation Device 4940 (rev 40)
        Subsystem: Intel Corporation Device 0000
        Kernel driver in use: 4xxx
        Kernel modules: qat_4xxx
70:00.0 Co-processor: Intel Corporation Device 4940 (rev 40)
        Subsystem: Intel Corporation Device 0000
        Kernel driver in use: 4xxx
        Kernel modules: qat_4xxx
75:00.0 Co-processor: Intel Corporation Device 4940 (rev 40)
        Subsystem: Intel Corporation Device 0000
If the qat firmware is incorrect and if there isn’t the qat fireware in /lib/firmware, you might see the error messages like below.
[   17.392133] 4xxx 0000:70:00.0: enabling device (0140 -> 0142)
[   17.401416] 4xxx 0000:70:00.0: Direct firmware load for qat_4xxx_mmp.bin failed with error -2
[   17.401429] 4xxx 0000:70:00.0: Failed to load MMP firmware qat_4xxx_mmp.bin
[   17.401439] 4xxx 0000:70:00.0: Failed to load acceleration FW
[   17.402572] 4xxx 0000:70:00.0: Resetting device qat_dev0
[   17.511707] 4xxx: probe of 0000:70:00.0 failed with error -14
Using QAT out-of-tree package to activate QAT device
The following sections detail the steps to use the virsh command line interface (CLI). The approach of libvirt Virtual Machine Manager GUI has the similar steps to achieve it.
Installing Intel Out-of-tree package on Host OS
Since upstream kernel and upstream acceleration software QuickAssist Technology Library (QATlib) does not yet support vQAT so far, these instructions are intended to be used with the out-of-tree acceleration driver. Intel QAT software for the Hardware Version 2.0 package can help enable vQAT on QAT PF device in your system.
Prerequisites for building qat out-of-tree package
The Intel QAT out-of-tree package depends on a number of libraries that must be installed first on the system. Building intel out-of-tree package might lead to error due to the missing packages, so you have to install the necessary dependancy packages including these tool package:
- gcc
- make
- automake
- autoconf
- libtool
- systemd-devel
- yasm
- boost-devel
- libudev-devel
Running the following shell script is a good way to check which package is not installed on your OS.
#echo -e "gcc\nmake\nautomake\nautoconf\nlibtool\nsystemd-devel\nyasm\nboost-devel\nlibudev-devel"|grep -vE `rpm -qa|grep -Eowi "make|gcc|automake|autoconf|libtool|systemd-devel|boost-devel |libudev-devel" |xargs |sed "s/ /|/g"`
RHEL 9.0 does not include the ‘yasm’ package, so manual installation is required:
# wget http://www.tortall.net/projects/yasm/releases/yasm-1.3.0.tar.gz
# tar -zxvf yasm-1.3.0.tar.gz
# cd yasm-1.3.0/
# ./configure
# make && make install
Build out-of-tree package
Download the latest out-of-tree package source code from Intel® QuickAssist Technology Driver for Linux* - HW Version 2.0
- Copy it to your host OS.
- Use super user privilege (root account) uncompress package QAT20.L.1.0.50-00003.tar.gz and go into the working directory. The working directory is assumed /QAT in our steps.
Note: The QAT20.L.1.0.50-00003.tar.gz was developed based on 5.14 kernel, so we are using RHEL9.0 as Host OS and Guest OS in the illustrations; otherwise, you cannot build the source code successfully.
- Finish configuration, build, and installation as below.
#mkdir /QAT && tar -xvf QAT20.L.1.0.50-00003.tar.gz -C /QAT
# ./configure --enable-icp-sriov=host
# make -j4
# make install
The following two commands guarantee the services is activated automatically for each boot.
# sudo systemctl enable qat # sudo systemctl start qatNote: The ./configure script handles many options that may be of interest. For instance, there is a wide range of possible configurations, including build or install virtualization support (host or guest) or no virtualization support. Some build options may need to be passed as a parameter to the ./configure script before proceeding with the installation. A complete list of configuration options is available by executing the “./configure --help” command in a shell. For the host OS, the issue command “./configure --enable-icp-sriov=host” is required for both SR-IOV an S-IOV.
If you configure the QAT source code successfully, the message like below will be displayed.
checking for kernel sources... yes
checking that generated files are newer than configure... done
configure: creating ./config.status
config.status: creating Makefile
config.status: creating config.h
config.status: executing depfiles commands

============================================================================
Type make followed by make install to build QAT with the following options
============================================================================
    ICP_ROOT [/QAT]
    USE_HARD_CODED_PRIMES [0]
    ICP_ARCH_USER [x86_64]
    ICP_BUILDSYSTEM_PATH [/QAT/quickassist/build_system]
    ICP_BUILD_OUTPUT [/QAT/build]
    ICP_ENV_DIR [/QAT/quickassist/build_system/build_files/env_files]
    ICP_TOOLS_TARGET [accelcomp]
    MAX_MR [50]
    KERNEL_SOURCE_ROOT [/lib/modules/5.14.0-70.22.1.el9_0.x86_64/build]
    ICP_DEBUG [false]
    ICP_PARAM_CHECK [false]
    ICP_DC_DYN_NOT_SUPPORTED [false]
    DISABLE_STATS [false]
    ICP_LOG_SYSLOG [false]
    ICP_NONBLOCKING_PARTIALS_PERFORM [false]
    ICP_TRACE [false]
    ICP_ASYM_ONLY [false]
    ICP_SYM_ONLY [false]
    ICP_DC_ONLY [false]
    ICP_DC_RETURN_COUNTERS_ON_ERROR [false]
    KPT_ENABLED [false]
============================================================================
[root@localhost QAT]#
If you successfully build and install the QAT out-of-tree package, you’ll see the message listed as below. The QAT PFs devices and VF devices are available, the PFs are derived by kernel module ‘4xxx’ that is provided by Intel QAT out-of-tree package software, and the VFs are derived by kernel module 4xxxvf.
There is 136 QAT acceleration device(s) in the system:
 qat_dev0 - type: 4xxx,  inst_id: 0,  node_id: 0,  bsf: 0000:6b:00.0,  #accel: 1 #engines: 9 state: up
 qat_dev1 - type: 4xxx,  inst_id: 1,  node_id: 0,  bsf: 0000:70:00.0,  #accel: 1 #engines: 9 state: up
 qat_dev2 - type: 4xxx,  inst_id: 2,  node_id: 0,  bsf: 0000:75:00.0,  #accel: 1 #engines: 9 state: up
 qat_dev3 - type: 4xxx,  inst_id: 3,  node_id: 0,  bsf: 0000:7a:00.0,  #accel: 1 #engines: 9 state: up
 qat_dev4 - type: 4xxx,  inst_id: 4,  node_id: 1,  bsf: 0000:e8:00.0,  #accel: 1 #engines: 9 state: up
 qat_dev5 - type: 4xxx,  inst_id: 5,  node_id: 1,  bsf: 0000:ed:00.0,  #accel: 1 #engines: 9 state: up
 qat_dev6 - type: 4xxx,  inst_id: 6,  node_id: 1,  bsf: 0000:f2:00.0,  #accel: 1 #engines: 9 state: up
 qat_dev7 - type: 4xxx,  inst_id: 7,  node_id: 1,  bsf: 0000:f7:00.0,  #accel: 1 #engines: 9 state: up
 qat_dev8 - type: 4xxxvf,  inst_id: 0,  node_id: 0,  bsf: 0000:6b:00.1,  #accel: 1 #engines: 1 state: up
 qat_dev9 - type: 4xxxvf,  inst_id: 1,  node_id: 0,  bsf: 0000:6b:00.2,  #accel: 1 #engines: 1 state: up
…
 qat_dev131 - type: 4xxxvf,  inst_id: 123,  node_id: 1,  bsf: 0000:f7:01.4,  #accel: 1 #engines: 1 state: up
 qat_dev132 - type: 4xxxvf,  inst_id: 124,  node_id: 1,  bsf: 0000:f7:01.5,  #accel: 1 #engines: 1 state: up
 qat_dev133 - type: 4xxxvf,  inst_id: 125,  node_id: 1,  bsf: 0000:f7:01.6,  #accel: 1 #engines: 1 state: up
 qat_dev134 - type: 4xxxvf,  inst_id: 126,  node_id: 1,  bsf: 0000:f7:01.7,  #accel: 1 #engines: 1 state: up
 qat_dev135 - type: 4xxxvf,  inst_id: 127,  node_id: 1,  bsf: 0000:f7:02.0,  #accel: 1 #engines: 1 state: up
make[1]: Nothing to be done for 'install-data-am'.
make[1]: Leaving directory '/QAT'
[root@localhost QAT]#
Note: Intel QAT out-of-tree software also offers a driver name same as in-box driver name “4xxx” which is used for driving QAT PF devices. To check whether the driver comes from Intel QAT out-of-tree software or comes from in-box driver, you can run the following modinfo command:
It shows as follows if PFs are using qat in-box driver:
# modinfo qat_4xxx|grep filename
filename:      /lib/modules/5.14.0-70.22.1.el9_0.x86_64/kernel/drivers/crypto/qat/qat_4xxx/qat_4xxx.ko.xz
it shows as follows if PFs are using qat out-of-tree software:
# modinfo qat_4xxx|grep filename
filename: /lib/modules/5.14.0-70.22.1.el9_0.x86_64/updates/drivers/crypto/qat/qat_4xxx/qat_4xxx.ko - Check “qat.service” as follows to see if it is activated. If the service is started, the keyword "Active (running)" is displayed; otherwise, it is down or inactive. Use the “systemctl enable qat” command and “systemctl start qat” command to enable qat service and make persistent after reboot.
[root@localhost QAT]# systemctl status qat
○ qat.service - QAT service
     Loaded: loaded (/usr/lib/systemd/system/qat.service; static)
     Active: inactive (dead)
TriggeredBy: ○ qat.timer
[root@localhost QAT]#

[root@localhost QAT]# systemctl start qat.service
[root@localhost QAT]#
[root@localhost QAT]# systemctl status qat.service
● qat.service - QAT service
     Loaded: loaded (/usr/lib/systemd/system/qat.service; static)
     Active: active (exited) since Tue 2024-02-06 16:37:24 CST; 5min ago
TriggeredBy: ○ qat.timer
    Process: 21465 ExecStart=/etc/init.d/qat_service start (code=exited, status=0/SUCCESS)
   Main PID: 21465 (code=exited, status=0/SUCCESS)
        CPU: 4.668s

Feb 06 16:37:24 localhost.localdomain qat_service[22147]:  qat_dev111 - type: 4xxxvf,  inst_id: 103,  node_id: 1,  bsf: 0000:f7:01.0,  #accel: 1 #engines: 1 state: up
Feb 06 16:37:24 localhost.localdomain qat_service[22147]:  qat_dev112 - type: 4xxxvf,  inst_id: 104,  node_id: 1,  bsf: 0000:f7:01.1,  #accel: 1 #engines: 1 state: up
Feb 06 16:37:24 localhost.localdomain systemd[1]: Finished QAT service.
Feb 06 16:37:24 localhost.localdomain qat_service[22147]:  qat_dev113 - type: 4xxxvf,  inst_id: 105,  node_id: 1,  bsf: 0000:f7:01.2,  #accel: 1 #engines: 1 state: up
Feb 06 16:37:24 localhost.localdomain qat_service[22147]:  qat_dev114 - type: 4xxxvf,  inst_id: 106,  node_id: 1,  bsf: 0000:f7:01.3,  #accel: 1 #engines: 1 state: up
Feb 06 16:37:24 localhost.localdomain qat_service[22147]:  qat_dev115 - type: 4xxxvf,  inst_id: 107,  node_id: 1,  bsf: 0000:f7:01.4,  #accel: 1 #engines: 1 state: up
Feb 06 16:37:24 localhost.localdomain qat_service[22147]:  qat_dev116 - type: 4xxxvf,  inst_id: 108,  node_id: 1,  bsf: 0000:f7:01.5,  #accel: 1 #engines: 1 state: up
Feb 06 16:37:24 localhost.localdomain qat_service[22147]:  qat_dev117 - type: 4xxxvf,  inst_id: 109,  node_id: 1,  bsf: 0000:f7:01.6,  #accel: 1 #engines: 1 state: up
Feb 06 16:37:24 localhost.localdomain qat_service[22147]:  qat_dev118 - type: 4xxxvf,  inst_id: 110,  node_id: 1,  bsf: 0000:f7:01.7,  #accel: 1 #engines: 1 state: up
Feb 06 16:37:24 localhost.localdomain qat_service[22147]:  qat_dev119 - type: 4xxxvf,  inst_id: 111,  node_id: 1,  bsf: 0000:f7:02.0,  #accel: 1 #engines: 1 state: up
[root@localhost QAT]#
Note: After installing Intel qat out-of-tree package, the VF will be enabled and they are driving by driver named “4xxxvf” instead of in box driver “vfio-pci”. Since we’re focusing on S-IOV for QAT device instead of SR-IOV, we don’t care about the VFs. This means that it is fine to disable VF function for QAT S-IOV feature. However, SR-IOV and S-IOV virtualization methods cannot be used simultaneously on the same Physical Function (PF).
Enabling and verifying vQAT on Host
QAT service creates VFs for all the QAT PFs and automatically binds vfio-pci driver to all VFs, whereas creating vQAT need to modify QAT PF configuration file under folder /etc/. Detailed steps are listed below.
- Verify the “4xxx” driver in use by PFs.
Issue command “lspci -kd:4940” in the host OS shell to check which driver is in use for QAT PFs. The system is Intel® 4th Gen Intel® Xeon® Scalable Processor (Sapphire Rapids), and the output will have 2 or 4 QAT PF devices on one socket (two sockets in our example system), as shown below, with 4940 being the PF device ID.
[root@localhost QAT]# lspci -kd:4940 6b:00.0 Co-processor: Intel Corporation Device 4940 (rev 40) Subsystem: Intel Corporation Device 0000 Kernel driver in use: 4xxx Kernel modules: qat_4xxx 70:00.0 Co-processor: Intel Corporation Device 4940 (rev 40) Subsystem: Intel Corporation Device 0000 Kernel driver in use: 4xxx Kernel modules: qat_4xxx 75:00.0 Co-processor: Intel Corporation Device 4940 (rev 40) Subsystem: Intel Corporation Device 0000 Kernel driver in use: 4xxx Kernel modules: qat_4xxx 7a:00.0 Co-processor: Intel Corporation Device 4940 (rev 40) Subsystem: Intel Corporation Device 0000 Kernel driver in use: 4xxx Kernel modules: qat_4xxx e8:00.0 Co-processor: Intel Corporation Device 4940 (rev 40) Subsystem: Intel Corporation Device 0000 Kernel driver in use: 4xxx Kernel modules: qat_4xxx ed:00.0 Co-processor: Intel Corporation Device 4940 (rev 40) Subsystem: Intel Corporation Device 0000 Kernel driver in use: 4xxx Kernel modules: qat_4xxx f2:00.0 Co-processor: Intel Corporation Device 4940 (rev 40) Subsystem: Intel Corporation Device 0000 Kernel driver in use: 4xxx Kernel modules: qat_4xxx f7:00.0 Co-processor: Intel Corporation Device 4940 (rev 40) Subsystem: Intel Corporation Device 0000 Kernel driver in use: 4xxx Kernel modules: qat_4xxx [root@localhost QAT]#Note: We also should run the “lsmod|grep qat” command to check if the relevance kernel drivers are loaded in OS. Depending on the specific hardware present, this command will return an output similar to the following:
[root@localhost QAT]# lsmod |grep qat qat_4xxxvf 24576 0 qat_4xxx 69632 0 intel_qat 684032 3 qat_4xxx,usdm_drv,qat_4xxxvf uio 24576 1 intel_qat mdev 28672 1 intel_qat vfio 49152 3 intel_qat,vfio_iommu_type1,mdev irqbypass 16384 2 intel_qat,kvm [root@localhost QAT]# - Modify the QAT config file for assigning ADIs to qat services.
When the acceleration software loads, it is configured based on the settings in the platform-specific configuration files. The configuration files are in the /etc/ directory and be created when install QAT out-of-tree software. For example, the name format for the first configuration file for Intel® QuickAssist Technology Hardware Version 2.0 device is 4xxx_dev<x>.conf, where x is the device number. For the first QAT PF device is 4xxx_dev0.conf, if more than one device of a given type is present, its name includes 4xxx_dev1, 4xxx_dev2, etc.
- Edit /etc/4xxx_dev0.conf and locate section “[SIOV]” under “ADI Section for Scalable IOV”. Change item NumberAdis to an integer number that indicates the amount of vQAT devices you wanted to create. For example
############################################## # ADI Section for Scalable IOV ############################################## [SIOV] NumberAdis = 8Note:Enabling S-IOV and SR-IOV on a per device basis is mutually exclusive. By setting different values of NumberAdis in the device configuration file, you can enable S-IOV on qat_dev0 and enable SR-IOV on other devices at same time.
- The files are processed when the system boots. If changes are made to the configuration file, the acceleration software must be stopped and restarted for the changes to take effect by executing the “systemctl restart qat.service” instruction.
For a system with multiple Intel® QAT Endpoints, you can start, stop or restart each individual device by passing the Intel® QAT Endpoint to be restarted or stopped as a parameter qat_dev<N>. The command looks like “service qat_service start||stop||status||restart||shutdown qat_dev<N>”, for example:
[root@localhost QAT]# service qat_service stop qat_dev110
Stopping device qat_dev110
[root@localhost QAT]#

[root@localhost QAT]# service qat_service start qat_dev110
Restarting device qat_dev110
Processing /etc/4xxxvf_dev102.conf
Checking status of device qat_dev110
 qat_dev110 - type: 4xxxvf,  inst_id: 102,  node_id: 1,  bsf: 0000:f7:00.7,  #accel: 1 #engines: 1 state: up
[root@localhost QAT]#
The shutdown qualifier enables the user to bring down all Intel® QAT Endpoints and unload driver modules from the kernel. This contrasts with the stop qualifier, which brings down one or more Intel® QAT Endpoints, but does not unload kernel modules, so other Intel® QAT Endpoints can still run.
- After qat.service restarts successfully, the QAT PF device was added to mdev bus. Check it as follows. A QAT PF device (0000:6b:00.0) appeared under folder /sys/class/mdev_bus/.
[root@localhost ~]# ll /sys/class/mdev_bus/ total 0 lrwxrwxrwx. 1 root root 0 Feb 6 17:23 0000:6b:00.0 -> ../../devices/pci0000:6b/0000:6b:00.0 [root@localhost ~]# - Check the available qat accelerate service.
The vqat_ctl utility returns the available ADI resources of the qat accelerate service, including sym, asym and dc service on the PFs. The vqat_ctl utility is located in the out-of-tree QAT package that was extracted from the build folder. In our example, the vqat_ctl is under /QAT/build directory.
If S-IOV is not enabled, available sym, asym or dc will return 0. For devices that have already enabled S-IOV, you can create the required vdev/vqat devices and you can see there are ADIs bound to the qat accelerate service, such as asymmetric crypto and data compression services. Check the services are using the vqat_ctl tool provided by the out-of-tree package as below, and asym and dc get four ADIs each.
[root@localhost QAT]# ./build/vqat_ctl show BDF: 0000:6b:00.0 Available sym : 0 Available asym : 4 Available dc : 4 Active VQATs: -------------------------------------------------------------- INDEX TYPE UUID STATUS -------------------------------------------------------------- Missing MDEV entry: 0000:70:00.0 Missing MDEV entry: 0000:75:00.0 Missing MDEV entry: 0000:7a:00.0 Missing MDEV entry: 0000:e8:00.0 Missing MDEV entry: 0000:ed:00.0 Missing MDEV entry: 0000:f2:00.0 Missing MDEV entry: 0000:f7:00.0 [root@localhost QAT]#Note: In the example output above, NumberAdis is set to 4 and ServicesEnabled is set to asym and dc by default in the /etc/4xxx_dev0.conf configuration file.
- Default Configuration Files
By default, the QAT configuration files enable asymmetric crypto and data compression services. If symmetric crypto is desired, the service must be enabled in the QAT configuration file. As mentioned above, the QAT configuration files are included in the /etc/ folder, such as 4xxx_dev0.conf. In this file, replace the line:
ServicesEnabled = asym;dc
with:
ServicesEnabled = asym;sym;dc
- Edit /etc/4xxx_dev0.conf and locate section “[SIOV]” under “ADI Section for Scalable IOV”. Change item NumberAdis to an integer number that indicates the amount of vQAT devices you wanted to create. For example
- Create vQATs on Host
- Using vqat_ctl utility to create vQATs for the relevance qat accelerate services, the utility will help to generate a UUID and bond to an ADI.
When using libvirt, both S-IOV vQATs or SR-IOV VFs are attached to a guest OS using a xml configuration file. However, the addressing schemes of them are different because vQATs are identified using UUIDs, while VFs use PCIe BDF (Bus:Device:Function) numbering.
For example, if you create an asym type vQAT device as below.
[root@localhost QAT]# ./build/vqat_ctl create 0000:6b:00.0 asym
VQAT-asym created successfully, device name = 6951a02d-8559-44ac-9652-9e115e9de7d5
[root@localhost QAT]#
If the output indicates that the device is created successfully, you can check the created vQAT device with utlility ‘vqat_ctl’ with parameter ‘show’ listed as below.
Compared to the last same command (./build/vqat_ctl show) you had run, one entry for a created vQAT appeared under the item ‘Active VQATs’. The type and UUID here match the one you specified. And the number of Available asym services decreases by one.
[root@localhost QAT]# ./build/vqat_ctl show BDF: 0000:6b:00.0 Available sym : 0 Available asym : 3 Available dc : 4 Active VQATs: -------------------------------------------------------------- INDEX TYPE UUID STATUS 1 asym 6951a02d-8559-44ac-9652-9e115e9de7d5 active -------------------------------------------------------------- Missing MDEV entry: 0000:70:00.0 Missing MDEV entry: 0000:75:00.0 Missing MDEV entry: 0000:7a:00.0 Missing MDEV entry: 0000:e8:00.0 Missing MDEV entry: 0000:ed:00.0 Missing MDEV entry: 0000:f2:00.0 Missing MDEV entry: 0000:f7:00.0 [root@localhost QAT]# - Create and show another type of dc vQAT device as below. There is a type dc vQAT added under the item “Active VQATs” and the number of “Available dc” decreases from 4 to 3 as below.
[root@localhost QAT]# ./build/vqat_ctl create 0000:6b:00.0 dc VQAT-dc created successfully, device name = 6dc7e426-038b-42e7-9a1a-68002e272de3 [root@localhost QAT]# [root@localhost QAT]# ./build/vqat_ctl show BDF: 0000:6b:00.0 Available sym : 0 Available asym : 3 Available dc : 3 Active VQATs: -------------------------------------------------------------- INDEX TYPE UUID STATUS 1 asym 6951a02d-8559-44ac-9652-9e115e9de7d5 active 2 dc 6dc7e426-038b-42e7-9a1a-68002e272de3 active -------------------------------------------------------------- Missing MDEV entry: 0000:70:00.0 Missing MDEV entry: 0000:75:00.0 Missing MDEV entry: 0000:7a:00.0 Missing MDEV entry: 0000:e8:00.0 Missing MDEV entry: 0000:ed:00.0 Missing MDEV entry: 0000:f2:00.0 Missing MDEV entry: 0000:f7:00.0 [root@localhost QAT]# - After creating two vQAT devices, check dmesg log, and the message below will be seen. Two mdev device types asym and dc were created and added to the IOMMU group. The mdev is also called Mediated Device. It developed from the need to build upon the existing vfio infrastructure in order to support more fine grained management of resources. Some of the initial use cases included GPUs. When using the mediated device (mdev) API, common tasks are performed in the mdev core driver (like device management), while device-specific tasks are done in a vendor driver. Current in-kernel examples of vendor drivers are the Intel vGPU driver.
kernel: mdev 6951a02d-8559-44ac-9652-9e115e9de7d5: Create mdev 00000000a57c9cea for 4xxx-vqat_asym
kernel: mdev 6951a02d-8559-44ac-9652-9e115e9de7d5: Created vQAT using ADI 0, config size 160, bar0(size 8192, addr 0x0, attr f),bar1(size 131072, addr 0x0, attr f)
kernel: vfio_mdev 6951a02d-8559-44ac-9652-9e115e9de7d5: Adding to iommu group 458
kernel: vfio_mdev 6951a02d-8559-44ac-9652-9e115e9de7d5: MDEV: group_id = 458
kernel: mdev 6dc7e426-038b-42e7-9a1a-68002e272de3: Create mdev 00000000e661e428 for 4xxx-vqat_dc
kernel: mdev 6dc7e426-038b-42e7-9a1a-68002e272de3: Created vQAT using ADI 2, config size 160, bar0(size 8192, addr 0x0, attr f),bar1(size 131072, addr 0x0, attr f)
kernel: vfio_mdev 6dc7e426-038b-42e7-9a1a-68002e272de3: Adding to iommu group 459
kernel: vfio_mdev 6dc7e426-038b-42e7-9a1a-68002e272de3: MDEV: group_id = 459
You can also run the “virsh nodedev-list –cap mdev” command to check the mdev capability vdev devices that you created on the host OS. It shows the vQAT device UUID and its PF BDF number as below.
[root@localhost QAT]# virsh nodedev-list --cap mdev
mdev_6951a02d_8559_44ac_9652_9e115e9de7d5_0000_6b_00_0
mdev_6dc7e426_038b_42e7_9a1a_68002e272de3_0000_6b_00_0
Note: Failure of creating vQAT reasons.
Intel QAT out-of-tree software package source code has a hardcoding limitation for RHEL release, and it will be supported in its future release. Just modify the RHEL_RELEASE_CODE to 0 in file /usr/src/kernels/`uname -r`/include/generated/uapi/linux/version.h to support it on RHEL. Re-make the source code and install it again, and the following errors will disappear.
[root@localhost QAT]# ./build/vqat_ctl create 0000:6b:00.0 asym ./build/vqat_ctl: line 150: echo: write error: No space left on device Failed to create VQAT-asym [root@localhost QAT]# - Using vqat_ctl utility to create vQATs for the relevance qat accelerate services, the utility will help to generate a UUID and bond to an ADI.
Attach vQAT Device to guest OS
QAT supports the assignment of multiple vQATs to a single VM. For those CPU-intensive workloads, it is recommended to add multiple vQATs to a single VM for better performance.
Before adding a vQAT to a VM, make sure that the guest OS to which you want to add vQAT is shut down. Use the “virsh list –all” command to check the domain status and the “virsh start/shutdown <domain name>” command to start/shutdown a domain.
# virsh list --all
 Id   Name      State
--------------------------
 -    rhel9.0   shut off
# virsh shutdown rhel9.0
In order to attach vQATs to a guest OS, please follow the virsh instructions below.
- Create the vQAT device file needed. You can also use the “virtsh edit <domain name>” command to edit the domain XML configuration file directly. But you are advised to create a separate configuration file for the vQAT you want to attach to the guest OS.
- Create a new xml file as below.
# touch vdev1.xml - Edit the xml file and add the contents in the file like the following. The uuid used below is created by utility “vqat_ctl”. The “vqat_ctl show” command can be used to return the VQATs and their UUIDs. The type must be mdev and the model is vfio-pci. Different from VF devices that use the hexadecimal digits of BDF as the address, S-IOV devices use the UUID instead of BDF as the address.
[root@localhost QAT]# cat vdev1.xml <hostdev mode='subsystem' type='mdev' model='vfio-pci'> <source> <address uuid='6951a02d-8559-44ac-9652-9e115e9de7d5'/> </source> </hostdev> [root@localhost QAT]# - Repeat above two steps for creating more vQATs. This can be done in the same file or a separated file. Another vQAT device configuration file for type ‘dc’ looks like the following.
[root@localhost QAT]# cat vdev2.xml
<hostdev mode='subsystem' type='mdev' model='vfio-pci'>
   <source>
     <address uuid='6dc7e426-038b-42e7-9a1a-68002e272de3'/>
   </source>
</hostdev>

[root@localhost QAT]#
- Create a new xml file as below.
- Currently, vQAT doesn’t support hot plugging so when the VM configuration file changes, the guest OS needs to be turned off. Shut down the guest OS using the “virsh shutdown <domain name>” command as below. The domain name can be retrieved from the “virsh list --all” command, and the column name shows the domain name of your guest OS, for example, shut down domain rhel9.0 as below.
[root@localhost QAT]# virsh shutdown rhel9.0 Domain 'rhel9.0' is being shutdown - Attach the Created vQATs to the guest OS.
Using the below command “virsh attach-device rhel9.0 vdev1.xml –config” to attach the specify vQATs to a guest OS. The vdev1.xml and vdev2.xml are the files created in step 1.
[root@localhost QAT]# virsh attach-device rhel9.0 vdev1.xml --config
Device attached successfully
[root@localhost QAT]# virsh attach-device rhel9.0 vdev2.xml --config
Device attached successfully
After successfully attaching the vQATs to the guest OS, we can check the guest OS config file to confirm the capability of mdev type using the following command. The “virsh nodedev-list --cap mdev_types” command shows which PF device has the capability of mdev type, and the “virsh nodedev-list --cap mdev_types” command shows the quantity of each unoccupied specifical instance type (sym, asym, dc) on each mdev device.
[root@localhost QAT]# virsh nodedev-list --cap mdev_types pci_0000_6b_00_0 [root@localhost QAT]# virsh nodedev-dumpxml pci_0000_6b_00_0 <device> <name>pci_0000_6b_00_0</name> <path>/sys/devices/pci0000:6b/0000:6b:00.0</path> <parent>computer</parent> <driver> <name>4xxx</name> </driver> <capability type='pci'> <class>0x0b4000</class> <domain>0</domain> <bus>107</bus> <slot>0</slot> <function>0</function> <product id='0x4940'/> <vendor id='0x8086'>Intel Corporation</vendor> <capability type='virt_functions' maxCount='16'/> <capability type='mdev_types'> <type id='4xxx-vqat_sym'> <name>4xxx-vqat_sym</name> <deviceAPI>vfio-pci</deviceAPI> <availableInstances>0</availableInstances> </type> <type id='4xxx-vqat_dc'> <name>4xxx-vqat_dc</name> <deviceAPI>vfio-pci</deviceAPI> <availableInstances>3</availableInstances> </type> <type id='4xxx-vqat_asym'> <name>4xxx-vqat_asym</name> <deviceAPI>vfio-pci</deviceAPI> <availableInstances>3</availableInstances> </type> </capability> <iommuGroup number='48'> <address domain='0x0000' bus='0x6b' slot='0x00' function='0x0'/> </iommuGroup> <numa node='0'/> <pci-express/> </capability> </device> [root@localhost QAT]# - Boot up the guest OS via running the “virsh start <domain name>” command, for example, boot rhel9.0 domain as below.
[root@localhost QAT]# virsh start rhel9.0 Domain 'rhel9.0' started - After the guest OS boots up again, check the vQAT devices were attached using the “lspci -d:0da5” command and the output will show up as below. There are two devices having the ID 0da5 and no driver is in use. The next section will introduce how to install the out-of-tree package in the guest OS, drive the devices, and run the sample code to check if they work properly.
[root@localhost ~]# lspci -kd:0da5
09:00.0 Co-processor: Intel Corporation Device 0da5 (rev 02)
        Subsystem: Intel Corporation Device 0001
0a:00.0 Co-processor: Intel Corporation Device 0da5 (rev 02)
        Subsystem: Intel Corporation Device 0002
[root@localhost ~]#
The above output line “Subsystem: Intel Corporation Device 0001” and “Subsystem: Intel Corporation Device 0002” show the sub device ID of vQAT:
- 0000 indicates the vQAT device has symmetric type accelerate service.
- 0001 means the device supports asymmetric type accelerate service
- 0002 means it provides type data compression accelerate service.
You can also run the “lspci -v -d 8086:0da5 -vmm” command to check out which vQAT service has been provided in the guest OS. The output of the command running in the guest OS is as follows. The item of SDevice shows the sub device ID of vQAT.
[root@localhost ~]# lspci -v -d 8086:0da5 -vmm Slot: 09:00.0 Class: Co-processor Vendor: Intel Corporation Device: Device 0da5 SVendor: Intel Corporation SDevice: Device 0001 PhySlot: 0-8 Rev: 02 Slot: 0a:00.0 Class: Co-processor Vendor: Intel Corporation Device: Device 0da5 SVendor: Intel Corporation SDevice: Device 0002 PhySlot: 0-9 Rev: 02 [root@localhost ~]# - Remove the vQAT devices from the guest OS. If you don’t use the vQAT devices in the guest OS anymore, remove them using the following commands to detach the specified vQAT device from the guest named rhel9.0 and restart the guest OS.
# virsh detach-device rhel9.0 dev1.xml --config
# virsh shutdown rhel9.0
# virsh start rhel9.0
Installing QAT out-of-tree package on guest OS
Installation of the out-of-tree package on a guest is similar to that on a host. Refer to the Installing Intel Out-of-tree package on Host OS section for detailed steps. There are, however, some differences in performing some of the steps, as listed below:
- The parameter of running “./configure” in the uncompressed QAT source code should be “enable-icp-sriov=guest” instead of “enable-icp-sriov=host”, which is the parameter for running ‘./configure’ in the host OS.
#./configure --enable-icp-sriov=host
Replace with:
#./configure --enable-icp-sriov=guest
- Added steps to install sample code by running “make samples-install” after finishing building intel out-of-tree package source code. The command could build and install the sample code to the guest OS.
[root@localhost QAT]# make samples-install
After installing qat out-of-package in your guest OS and starting qat service, you can run “lspci -kd 8086:0da5” to check if the driver is used by vQATs, and the output should be similar to the following. The kernel module qat_vqat is loaded and the vqat-adi kernel driver is in use. The command output is as follows.
[root@localhost QAT]# lspci -kd 8086:0da5
09:00.0 Co-processor: Intel Corporation Device 0da5 (rev 02)
        Subsystem: Intel Corporation Device 0001
        Kernel driver in use: vqat-adi
        Kernel modules: qat_vqat
0a:00.0 Co-processor: Intel Corporation Device 0da5 (rev 02)
        Subsystem: Intel Corporation Device 0002
        Kernel driver in use: vqat-adi
        Kernel modules: qat_vqat
[root@localhost QAT]#
Run sample code in guest OS
The following two examples show that compress/decompress tasks will be dispatched to the vQAT that has the compress/decompress (dc) capability, namely sub device ID 0002 of the vQAT device. In our example, the supported compress/decompress vQAT device is 0A:00.0. Partial output by running sample test as following.
[root@localhost ~]# cpa_sample_code signOfLife=1 runTests=32
qaeMemInit started
icp_sal_userStartMultiProcess("SSL") started
*** QA version information ***
device ID               = 0
software                = 1.0.50
*** END QA version information ***
*** QA version information ***
device ID               = 1
software                = 1.0.50
*** END QA version information ***
Inst 0, Affin: 1, Dev: 1, Accel 0, EE 0, BDF 0A:00:00
---------------------------------------
API                    Traditional
Session State          STATELESS
Algorithm              DEFLATE
Huffman Type           STATIC
Mode                   ASYNCHRONOUS
CNV Enabled            YES
Direction              COMPRESS
Packet Size            8192
Compression Level      1
Corpus                 SIGN_OF_LIFE_CORPUS
Corpus Filename        calgary32
CNV Recovery Enabled   YES
Number of threads      1
Total Responses        4
Total Retries          0
Clock Cycles Start     27295014648364
Clock Cycles End       27295015029124
---------------------------------------
…
Sample code completed successfully.
[root@localhost ~]#
And the asymmetric operations will be dispatched to vQAT sub device 0001. It is 09:00.0 in our example shown as below.
[root@localhost ~]# cpa_sample_code signOfLife=1 runTests=2
qaeMemInit started
icp_sal_userStartMultiProcess("SSL") started
*** QA version information ***
device ID               = 0
software                = 1.0.50
*** END QA version information ***
*** QA version information ***
device ID               = 1
software                = 1.0.50
*** END QA version information ***
Inst 0, Affin: 1, Dev: 0, Accel 0, EE 0, BDF 09:00:00
---------------------------------------
RSA CRT DECRYPT
Modulus Size                1024
Number of Threads     1
Total Submissions     20
Total Responses       20
Total Retries         0
---------------------------------------

Sample code completed successfully.
[root@localhost ~]#
Since we don’t attach a vQAT device that supports the symmetric capability in our example, performing the “cpa_sample_code signOfLife=1 runTests=1” command with parameter “runTests=1” will show a warning message like below.
[root@localhost QAT]# cpa_sample_code signOfLife=1 runTests=1
qaeMemInit started
icp_sal_userStartMultiProcess("SSL") started
*** QA version information ***
device ID               = 0
software                = 1.0.50
*** END QA version information ***
Warning! Skipping SYMMETRIC tests as they are not supported on Instance
runTests=0
*** QA version information ***
device ID               = 1
software                = 1.0.50
*** END QA version information ***
Sample code completed successfully.
[root@localhost QAT]#
The above sample command parameter “signOfLife=1” indicates shorter test run that verifies the acceleration software is working, and the parameter executes a subset of sample tests. The available values of parameter “runTests” are 1, 2, 4, 8, 16, 32, 63, and 128. If “runTests=1”, symmetric code tests will run; if “runTests=2”, the RSA test code of asymmetric will run; if “runTests=32”, compression code tests will run. Running all tests except the chained hash and compression tests is default setting, which is equivalent to “runTests=32”.
For more details of these parameters, please refer to the file README.txt under the Intel out-of-tree package source code /QAT/quickassist/lookaside/access_layer/src/sample_code/.
For more information
For more information, see the following resources:
- Intel QAT Virtualization Deployment Guide
https://intel.github.io/quickassist/VIRT/index.html - Intel Document Order Number: D51397-015 Rev 4.0 Intel VirtualizationTechnology for Directed I/O Architecture Specification
- Intel Document ID #611488: Sapphire Rapids Processor External Design Specification, Volume One: Architecture (login required):
https://edc.intel.com/content/www/us/en/secure/design/confidential/products-and-solutions/processors-and-chipsets/eagle-stream/sapphire-rapids-server-processor-external-design-specification-volume-one-arch/2.0/overview-features-and-topologies/ - Intel Document ID #743912: Programmer’s Guide Intel QuickAssist Technology Hardware Version 2.0
https://www.intel.com/content/www/us/en/content-details/743912/intel-quickassist-technology-intel-qat-software-for-linux-programmers-guide-hardware-version-2-0.html?wapkw=743912 - Intel Document Order Number: 337679-002, Rev 1.1 INTEL SCALABLE I/O VIRTUALIZATION Technical Specification
Author
Xiaochun Li is a Linux engineer at the Lenovo Infrastructure Solution Group in Beijing, China. He specializes in the development of Linux kernel storage and memory management, as well as virtualization. Before joining Lenovo, he worked in INSPUR as an OS engineer for several years. With ten years of industry experience, he now focuses on Linux kernel RAS, storage, security, and virtualization.
Trademarks
Lenovo and the Lenovo logo are trademarks or registered trademarks of Lenovo in the United States, other countries, or both. A current list of Lenovo trademarks is available on the Web at https://www.lenovo.com/us/en/legal/copytrade/.
The following terms are trademarks of Lenovo in the United States, other countries, or both:
Lenovo®
ThinkSystem®
The following terms are trademarks of other companies:
Intel, the Intel logo and Xeon are trademarks of Intel Corporation or its subsidiaries.
Linux® is the trademark of Linus Torvalds in the U.S. and other countries.
Other company, product, or service names may be trademarks or service marks of others.
Configure and Buy
Please select a locale
Full Change History
Course Detail
Employees Only Content
The content in this document with a is only visible to employees who are logged in. Logon using your Lenovo ITcode and password via Lenovo single-signon (SSO).
The author of the document has determined that this content is classified as Lenovo Internal and should not be normally be made available to people who are not employees or contractors. This includes partners, customers, and competitors. The reasons may vary and you should reach out to the authors of the document for clarification, if needed. Be cautious about sharing this content with others as it may contain sensitive information.
Any visitor to the Lenovo Press web site who is not logged on will not be able to see this employee-only content. This content is excluded from search engine indexes and will not appear in any search results.
For all users, including logged-in employees, this employee-only content does not appear in the PDF version of this document.
This functionality is cookie based. The web site will normally remember your login state between browser sessions, however, if you clear cookies at the end of a session or work in an Incognito/Private browser window, then you will need to log in each time.
If you have any questions about this feature of the Lenovo Press web, please email David Watts at dwatts@lenovo.com.


