

Top
Author
Published
23 Feb 2025Form Number
LP2155PDF size
18 pages, 705 KBSubscribed to LP2155.
Thank you for your feedback.
Abstract
SUSE Edge provides a comprehensive solution for edge devices. In terms of OS deployment details, SUSE Edge products offer EIB (Edge Image Builder) based on the default SUSE Linux Enterprise Micro OS to meet the customization needs of client-edge devices. For edge device management, SUSE provides SUSE Rancher, enabling central administrators to efficiently manage devices deployed across various locations.
Currently, the portfolios of Lenovo ThinkEdge system include ThinkEdge SE450, SE350 V2, SE360 V2, and SE455 V3. The support plan for SLE Micro OS is also actively being developed.
This document uses the ThinkEdge SE360 V2 as an example to demonstrate how to deploy a customized SLE Micro OS and manage it using SUSE Rancher. It details the step-by-step process, from initial setup to ongoing management, ensuring a smooth and efficient implementation of the SUSE Edge solution on Lenovo ThinkEdge systems.
Introduction
In this guide, we will be using SUSE Edge solutions for deployment and management. SUSE provides several key components to help manage and deploy edge devices, including Edge Image Builder (EIB), SUSE Linux Enterprise Micro (SLE Micro) operating system, and SUSE Rancher services. These key components are introduces below:
- SUSE Edge solution
For the SUSE Edge solution, the primary components include Edge Image Builder (EIB), SLE Micro OS, and Rancher services. EIB allows for the creation of customized images tailored to specific environmental needs, including addressing the requirements of the ThinkEdge SE360 V2 system. These images can be deployed using Lenovo's XClarity and managed via the Rancher server for comprehensive server management. For detailed reference documents on SUSE Edge, please refer to SUSE Documentation.
- Edge Image Builder (EIB)
Edge Image Builder (EIB) is a tool designed by SUSE to streamline and accelerate the process of generating Customized, Ready-to-Boot (CRB) disk images. These images can bootstrap machines and are effective even in fully isolated environments. When using Lenovo Edge systems, the EIB tool can generate SLE Micro images tailored to your needs for deployment. For detailed usage instructions, please refer to the SUSE documentation and GitHub resources.
- SUSE Linux Enterprise Micro (SLE Micro)
SUSE Linux Enterprise Micro OS is a product designed by SUSE specifically for edge devices. It is a lightweight and secure edge operating system that combines the enterprise-hardened components of SUSE Linux with the features of a modern, immutable operating system, providing a simple and reliable infrastructure platform. For detailed usage instructions, please refer to the SUSE documentation
- SUSE Rancher
Rancher is a Kubernetes management tool from SUSE that deploys and runs clusters anywhere and on any provider. Rancher can provision Kubernetes from a hosted provider, configure compute nodes, and then install Kubernetes onto them or import existing Kubernetes clusters running anywhere. For detailed information, please refer to the SUSE Edge Rancher documentation.
In this paper, we will demonstrate how to utilize SUSE Edge components, including the Edge Image Builder (EIB), to create a customized SLE Micro 6.1, and use its customized image to simplify the bootstrapping process of machines. Additionally, we will use the Lenovo XClarity Controller to further deploy customized ISO images for remote machine deployment. Using SUSE Rancher, we will import the already deployed Lenovo Edge System SE360 V2 for resource management.
To create a boot image supporting SE360 V2 based on SLE Micro OS, the following are required:
- One host machine with SUSE Edge Image Builder installed
- One edge system to be deployed
Installing SUSE Edge Image Builder
This example installs on openSUSE Tumbleweed. The steps are as follows:


Creating a Custom Image for Boot Installation
We will proceed with the following steps to create a Custom Image for Boot Installation:
Creating an Image Configuration Directory
Since EIB runs as a container, we need to set up a directory on the host to specify the required configurations and allow EIB to access necessary files and supporting items during the build process. This directory must follow a specific structure. We create this directory in the home directory and name it "eib":
# export CONFIG_DIR=$HOME/eib
# mkdir -p $CONFIG_DIR/base-images
In the previous step, we created the "base-images" directory to host the SLE Micro 6.1 ISO files. Now, we ensure that the downloaded ISO files are copied to the configuration directory:
# cp SL-Micro.x86_64-6.1-Default-SelfInstall-GM.install.iso /root/eib/base-images/
At this point, the configuration directory should look like this:
├── eib
│   └── base-images
│       └── SL-Micro.x86_64-6.1-Default-SelfInstall-GM.install.iso
Creating an Image Definition File
The definition file describes the configurable options supported by Edge Image Builder. We can find a complete example of the options here and refer to the upstream image-building guide provided by SUSE for more flexible environment settings.
Below, we will build a custom image with SE360 V2 as the endpoint device.
Setting the Objectives
- Create a customized SLE Micro OS 6.1.
- Install the OS on a VROC RAID1 disk.
- Configure SE360 V2 to use a fixed IP so that Rancher can obtain the information for import. If there are other network ports, use the DHCP IP address.
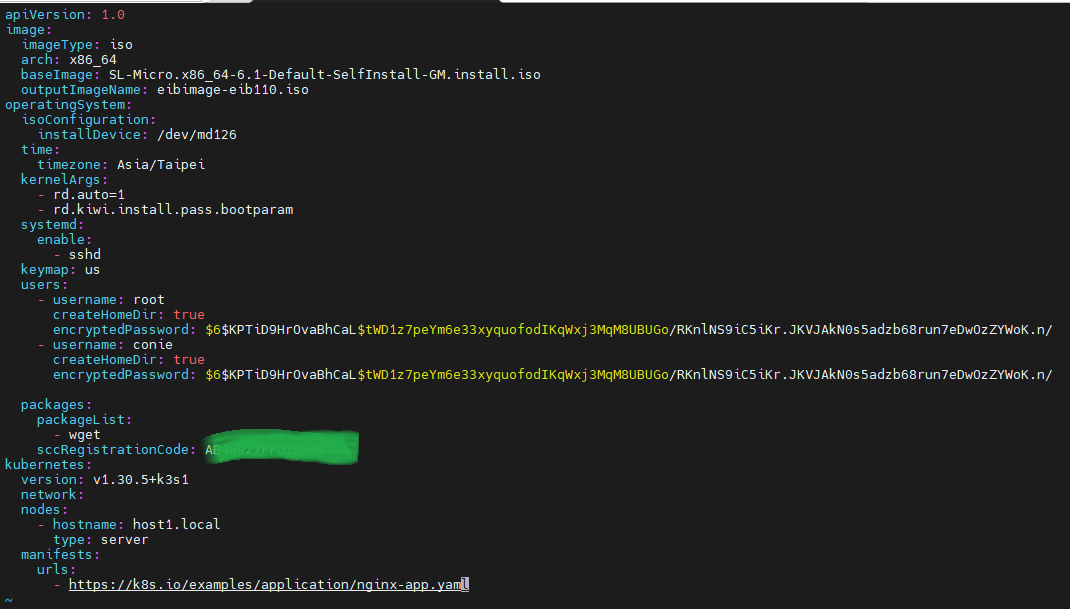
Creating the Definition File
- Create a main definition file.
- Generate an x86_64 image file.
- Output the image file as eibimage-eib110.iso.
- Define kernel parameters "auto=1" and "rd.kiwi.install.pass.bootparam," in kernelArgs.
- Specify the services to be started: sshd.
- Create the root and a regular user "conie", defining their home directories and passwords.
- Install additional software, wget.
- Enter the SUSE registration code to add additional software packages, wget, to the image ISO. For SUSE registration code, please contact SUSE.
- Configure the Kubernetes version.
The main definition file should look like this:
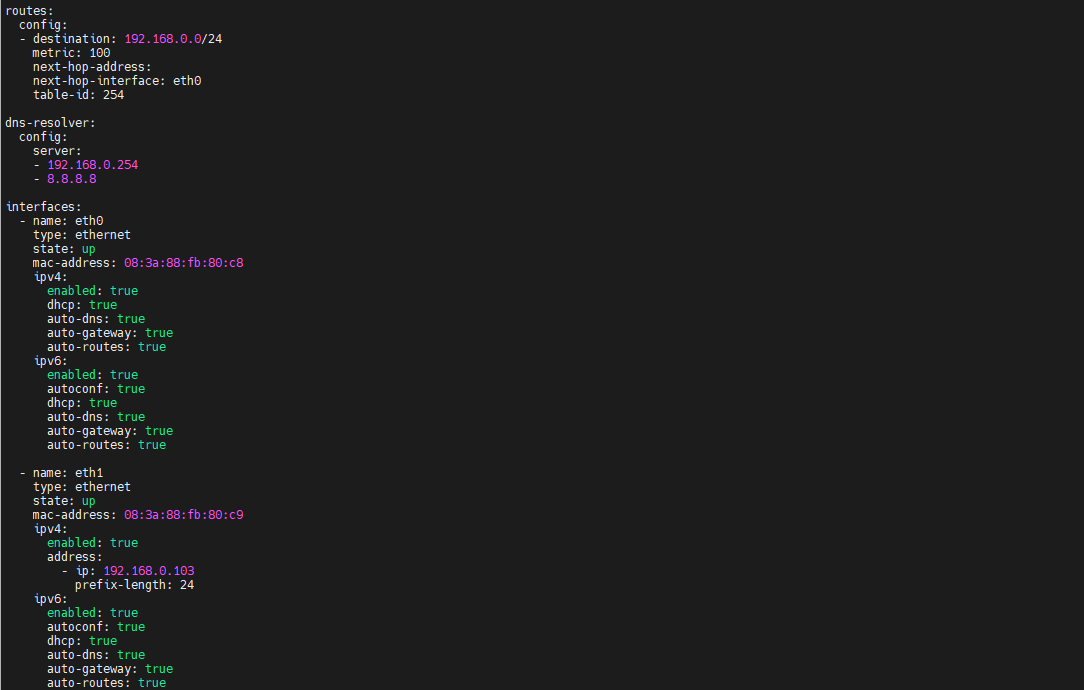
- Create a network directory and a network definition file, “local.yaml”, in the eib/network/ folder.
- Set a fixed IP address for the SE360 V2 specific MAC address.
- Define other networks as DHCP.
The network definition file should look like this:
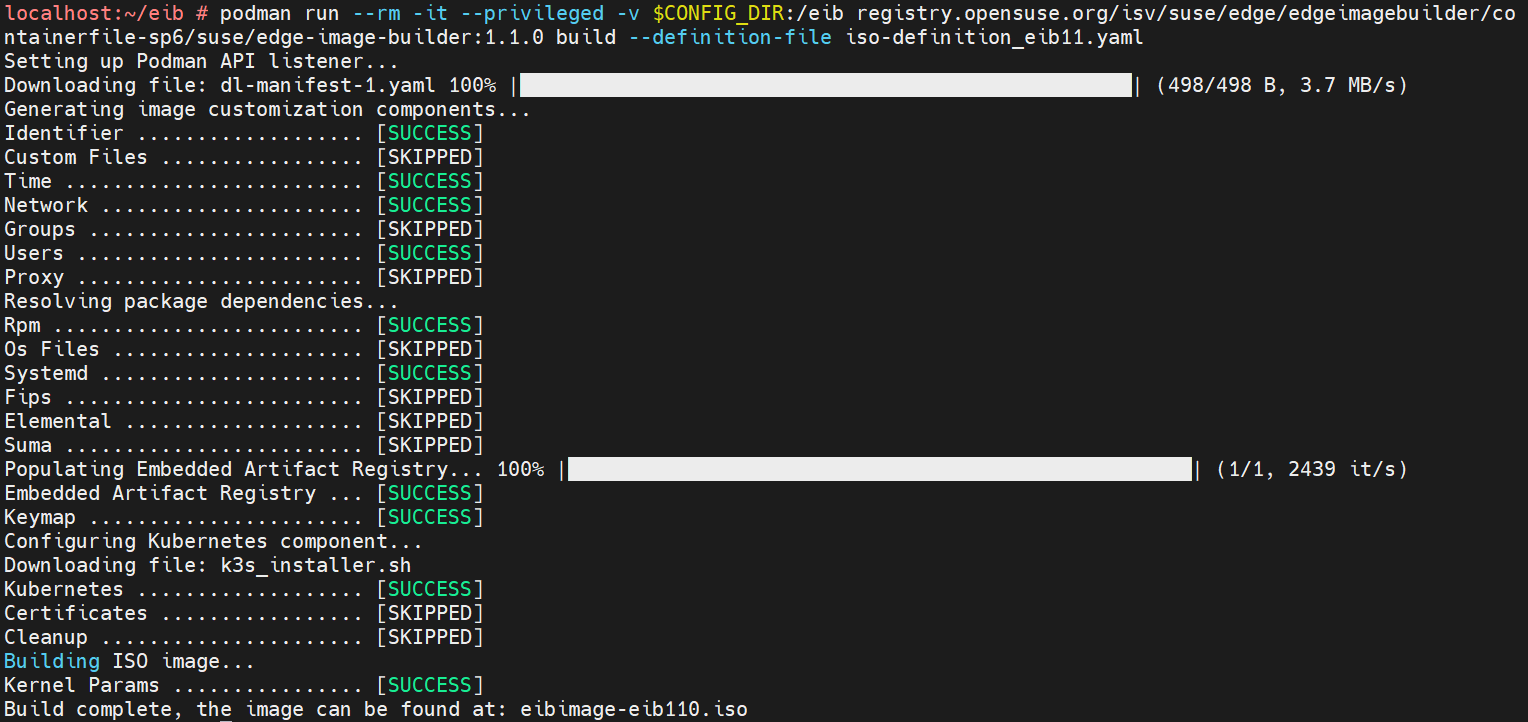
Generating a Custom Image File
Execute the podman command with the configuration file to generate a custom image.
# podman run --rm -it --privileged -v $CONFIG_DIR:/eib registry.opensuse.org/isv/suse/edge/edgeimagebuilder/containerfile-sp6/suse/edge-image-builder:
1.1.0 build --definition-file iso-definition_eib11.yaml
Deploying Custom SLE Micro 6.1 to remote ThinkEdge SE360 V2
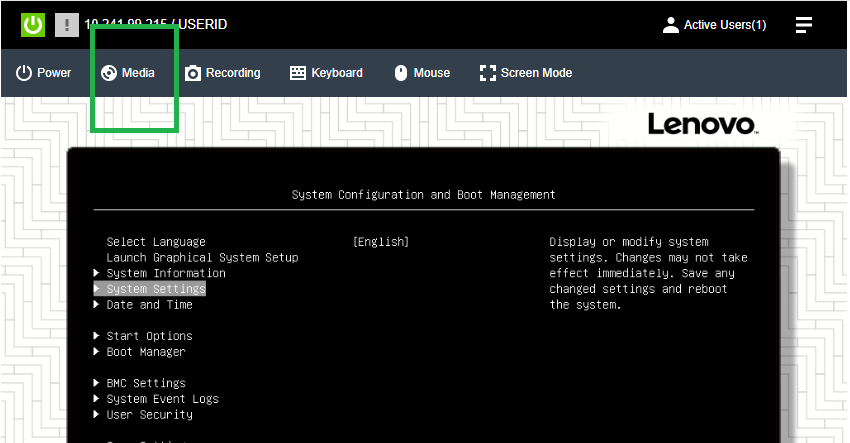
In this section, we will be using the XClarity Controller in the ThinkEdge SE360 V2 to perform the deployment. The following steps will guide you through the process of connecting to the XClarity Controller Web and remotely mounting the custom ISO for installation and deployment.
Connecting to ThinkEdge SE360 V2 XClarity Controller Web and Remotely Mounting Custom ISO
Notes: For more information about the Lenovo XClarity Controller, please refer to this link. https://pubs.lenovo.com/xcc/
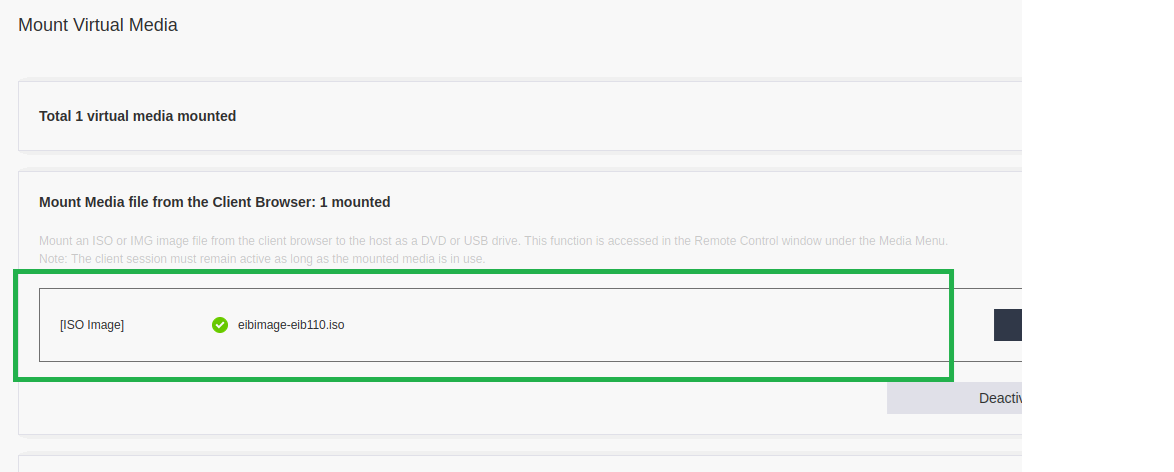
- Connect to the remote ThinkEdge SE360 V2 and remotely mount the customized ISO.
- Ensure the customized ISO is mounted.
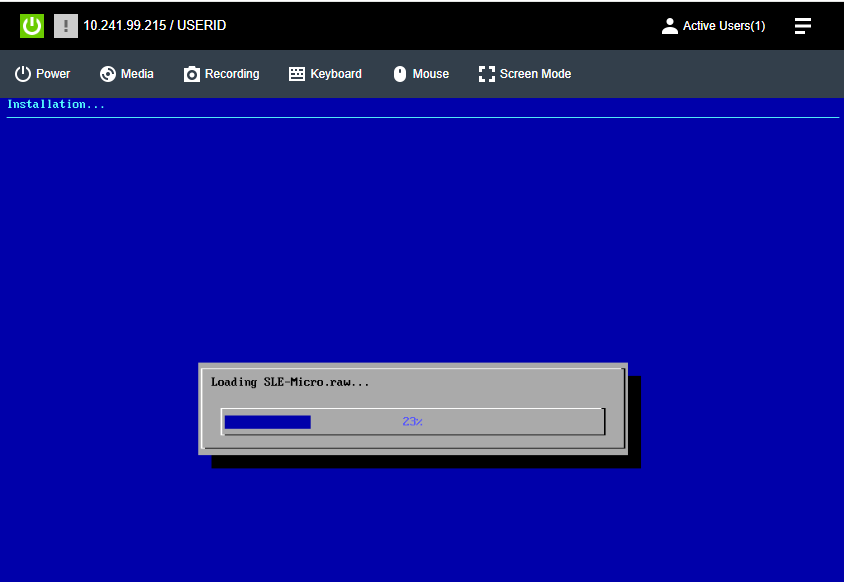
- Perform the customized ISO installation, automating any interactive modes until the installation is complete.
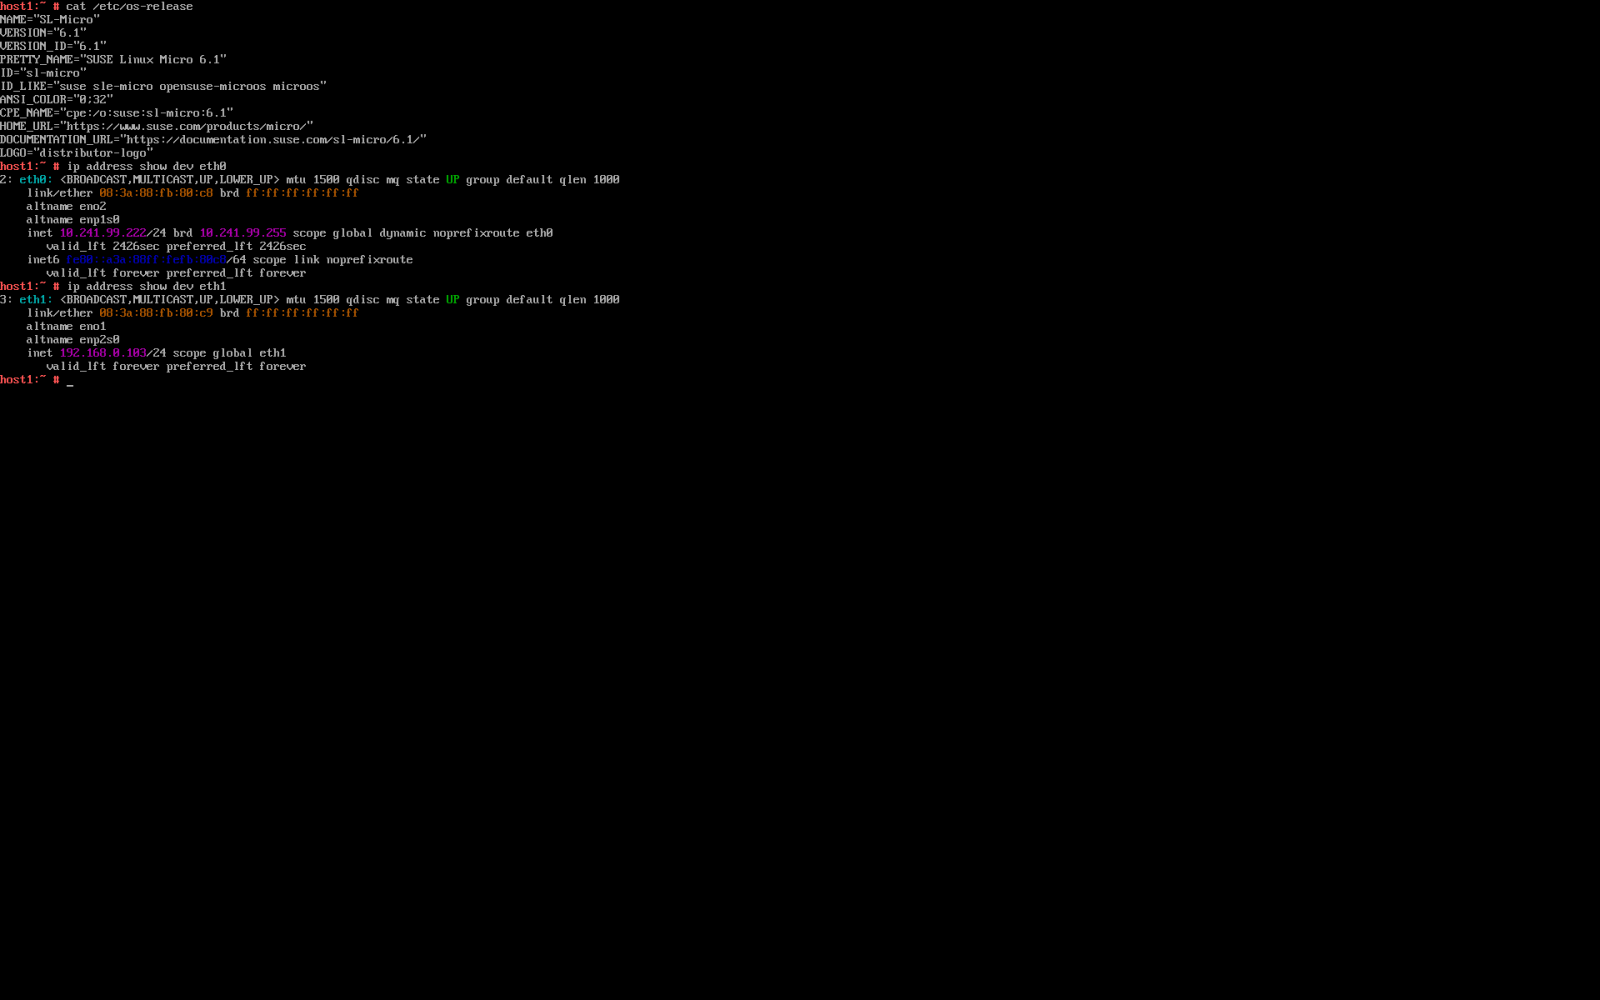
- Confirm the OS is fully installed on the ThinkEdge SE360 V2.
Installing Rancher
This example will use SUSE OS for installation. If you want to use other operating systems to install Rancher software, you can refer to the SUSE Rancher documentation.
- Install Docker:
#zypper install docker #systemctl enable docker - Install the Rancher container. Once the installation is complete, you can access the Rancher interface.
# docker run --privileged -d --restart=unless-stopped -p 80:80 -p 443:443 rancher/rancher
Access the Rancher interface and import the node host1
After installing SUSE Rancher, if you are unsure about the login password, you can use the following command to query it:
- Obtain the Rancher container ID.
- Retrieve the initial password.
# docker ps
CONTAINER ID   IMAGE             COMMAND           CREATED         STATUS         PORTS
           NAMES
e7932b12c399   rancher/rancher   "entrypoint.sh"   8 minutes ago   Up 8 minutes   0.0.0.0:80->80/tcp, :::80->80/tcp, 0.0.0.0:443->443/tcp, :::443-
>443/tcp   relaxed_chatterjee
# docker logs e7932b12c399 2>&1 | grep "Bootstrap Password:"
2025/01/13 07:48:25 [INFO] Bootstrap Password: 5h9t6kfgbft5qqnh9fk9wvdjkcvtkn2nt7v8qxdwr2s5sswch62cx6
If the Rancher password is forgotten, reset the password as follows:
- Ensure Rancher is running properly: Open the main node shell and run `docker ps` to confirm the Rancher container is running.
# docker ps CONTAINER ID IMAGE COMMAND CREATED STATUS PORTS NAMES e7932b12c399 rancher/rancher "entrypoint.sh" 20 hours ago Up 20 hours 0.0.0.0:80->80/tcp, :::80->80/tcp, 0.0.0.0:443->443/tcp, :::443->443/tcp relaxed_chatterjee - Reset the password.
# docker exec -ti e7932b12c399 reset-password
New password for default admin user (user-ws6vx):
OfBZdkPvc6WKdyCL2ldq
import the node host1:
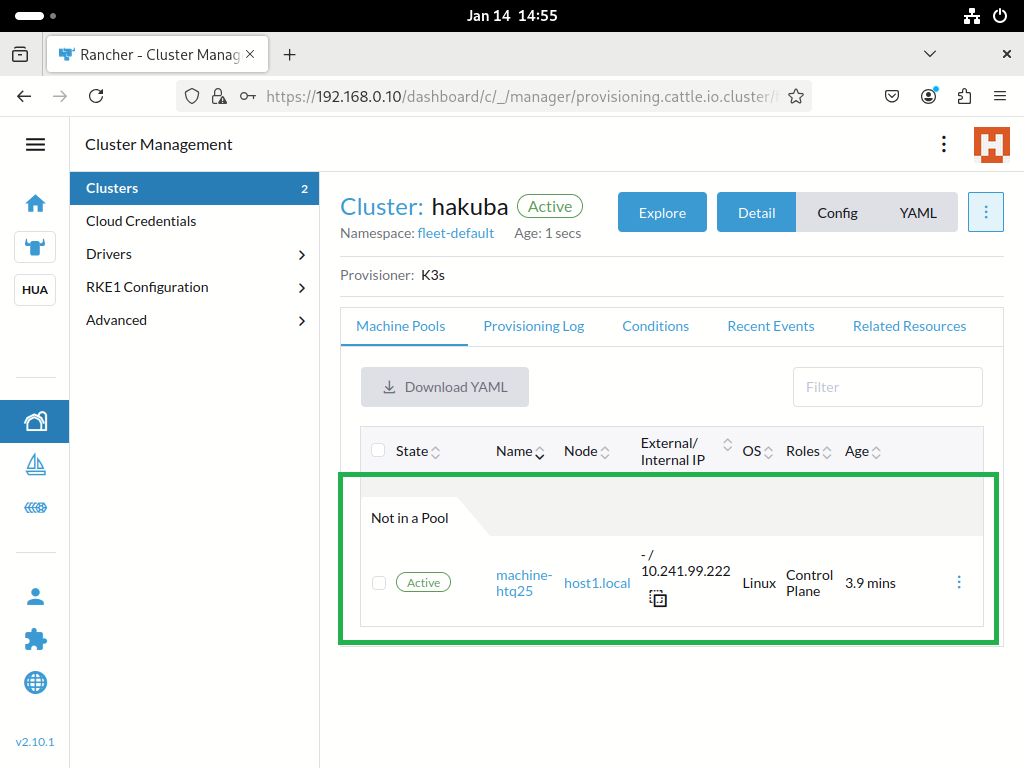
- Access the Rancher web interface and log in: The default username is admin.
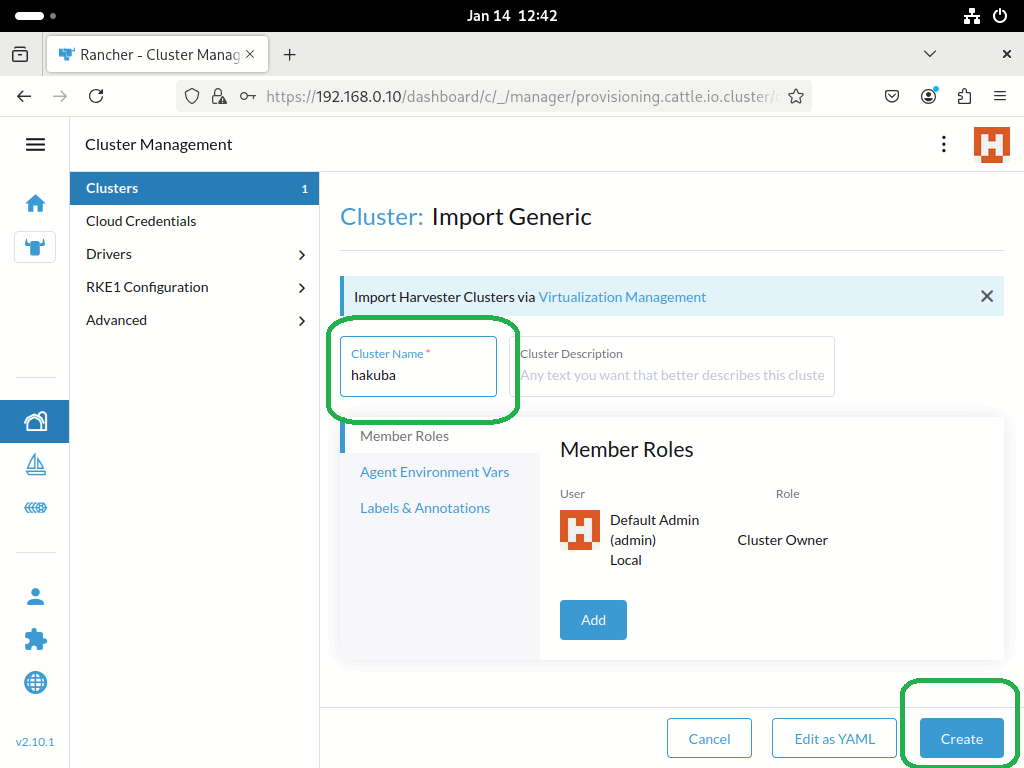
- During login, import the SE360 V2 and follow the prompts to enter the information. At this point, the added node, with a cluster name as hakuba.
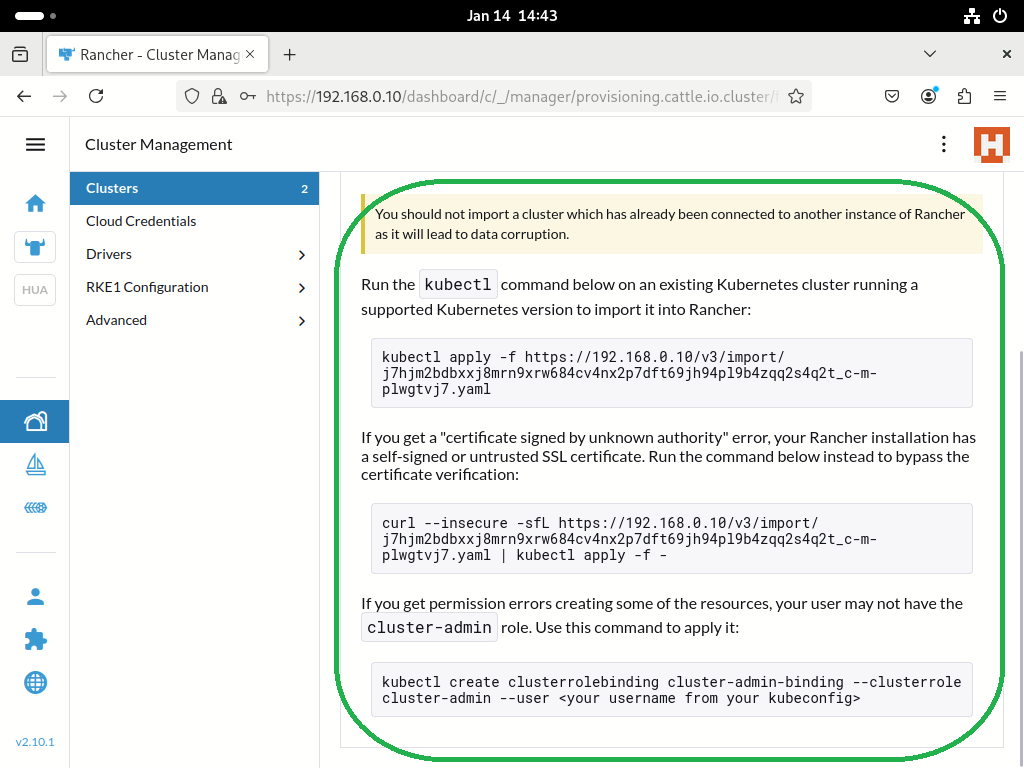
- Execute the commands sequentially on host1 as instructed by Rancher.
- Move to the node that needs to be added and follow Rancher's instructions to execute the commands.
# curl --insecure -sfL https://192.168.0.10/V3/import/j7hjm2bdbxxj8mrn9xrw684cv4nx2p7dft69jh94pl9b4zqq2s4q2t_c-m-plwgtvj7.yaml | kubectl apply -f - clusterrole.rbac.authorization.k8s.io/proxy-clusterrole-kubeapiserver unchanged clusterrolebinding.rbac.authorization.k8s.io/proxy-role-binding-kubernetes-master unchanged namespace/cattle-system created serviceaccount/cattle created clusterrolebinding.rbac.authorization.k8s.io/cattle-admin-binding created secret/cattle-credentials-e97d362 created clusterrole.rbac.authorization.k8s.io/cattle-admin created Warning: spec.template.spec.affinity.nodeAffinity.requiredDuringSchedulingIgnoredDuringExecution.nodeSelectorTerms[0].matchExpressions[0].key: beta.kubernetes.io/os is deprecated since v1.14; use "kubernetes.io/os" instead deployment.apps/cattle-cluster-agent created service/cattle-cluster-agent created - Moving to Rancher confirms that the node has been successfully imported. Then you can use Rancher to manage the node's resources.

References
For more information, see these resources:
- Lenovo XClarity Controller
https://pubs.lenovo.com/lxcc-overview/ - Lenovo ThinkEdge SE360 V2 Server
https://lenovopress.lenovo.com/lp1677-thinkedge-se360-V2-server - SUSE Edge Documentation
https://documentation.suse.com/suse-edge/3.1/html/edge/index.html - The upstream building images guide
https://github.com/suse-edge/edge-image-builder/blob/release-1.1/docs/building-images.md - SUSE Rancher
https://www.suse.com/products/rancher/
Author
Conie Chang is a Linux Engineer in the Lenovo Infrastructure Solutions Group, based in Taipei, Taiwan. She has experience in Red Hat and SUSE Linux OS.
Thanks to the following people for their assistance:
- Adrian Huang, Senior Linux Kernel Engineer
- David Watts, Lenovo Press
Trademarks
Lenovo and the Lenovo logo are trademarks or registered trademarks of Lenovo in the United States, other countries, or both. A current list of Lenovo trademarks is available on the Web at https://www.lenovo.com/us/en/legal/copytrade/.
The following terms are trademarks of Lenovo in the United States, other countries, or both:
Lenovo®
ThinkEdge®
XClarity®
The following terms are trademarks of other companies:
Linux® is the trademark of Linus Torvalds in the U.S. and other countries.
Other company, product, or service names may be trademarks or service marks of others.
Configure and Buy
Please select a locale
Full Change History
Course Detail
Employees Only Content
The content in this document with a is only visible to employees who are logged in. Logon using your Lenovo ITcode and password via Lenovo single-signon (SSO).
The author of the document has determined that this content is classified as Lenovo Internal and should not be normally be made available to people who are not employees or contractors. This includes partners, customers, and competitors. The reasons may vary and you should reach out to the authors of the document for clarification, if needed. Be cautious about sharing this content with others as it may contain sensitive information.
Any visitor to the Lenovo Press web site who is not logged on will not be able to see this employee-only content. This content is excluded from search engine indexes and will not appear in any search results.
For all users, including logged-in employees, this employee-only content does not appear in the PDF version of this document.
This functionality is cookie based. The web site will normally remember your login state between browser sessions, however, if you clear cookies at the end of a session or work in an Incognito/Private browser window, then you will need to log in each time.
If you have any questions about this feature of the Lenovo Press web, please email David Watts at dwatts@lenovo.com.


