

Top
Author
Published
28 Feb 2025Form Number
LP2166PDF size
18 pages, 3.1 MBSubscribed to LP2166.
Thank you for your feedback.
Abstract
With the rapid advancement of artificial intelligence (AI), major chip manufacturers have introduced a variety of accelerators to meet the demand for high-performance computing. However, as computational power increases, the importance of I/O virtualization has also become more pronounced. Efficient I/O virtualization technologies, such as SR-IOV and SIOV, ensure that accelerators perform at their best in virtualized environments. This technological progress not only enhances the overall performance of AI applications but also provides a solid foundation for the efficient operation of cloud computing and data centers.
Lenovo ThinkSystem servers and VMware vSphere generally support SR-IOV and SIOV, provided that the hardware components (such as network cards) are compatible, and the feature is enabled in the system UEFI and OS.
This document introduces how to configure SR-IOV or SIOV in a VMware vSphere environment on a Lenovo ThinkSystem server. This document is intended for technical specialists and IT administrators who are familiar with SR-IOV/SIOV and vSphere products.
Introduction
With the rapid development of cloud computing and virtualization technology, the computing environment for businesses has started to use virtual machines to improve resource utilization and flexibility. It creates the need for efficient I/O virtualization technologies. Traditional approaches to I/O virtualization usually rely on the software layer to manage the sharing of I/O devices, which can lead to low performance and high latency. Single Root I/O Virtualization and Sharing (SR-IOV) and Intel Scalable I/O Virtualization (SIOV) are two approaches to address these challenges by hardware-assisted I/O virtualization.
Single Root I/O Virtualization and Sharing (SR-IOV) is an optional feature of the PCIe standard that enables hardware-assisted I/O virtualization, allowing physical I/O devices to be shared across multiple VMs or containers. An SR-IOV capable device has a Physical Function (PF) and multiple Virtual Functions (VFs). Device sharing is achieved by assigning VFs to different VMs or containers. The PF is responsible for managing and configuring VFs by the driver running in the hypervisor.
Intel Scalable I/O Virtualization (SIOV) is also an approach to hardware-assisted I/O virtualization developed by Intel. SIOV enables high scalability and high-performance sharing of I/O devices across VMs or containers by further granulating I/O devices.
The difference between SR-IOV and SIOV
A Single Root I/O Virtualization and Sharing (SR-IOV) device comprises a Physical Function (PF) and multiple Virtual Functions (VFs). As illustrated in the following figure, the PF manages and configures the device, while VFs provide I/O functionality without configuration or management capabilities. The number of VFs of SR-IOV devices is limited and the allocated resources are fixed. It is preset at device design time; users can only enable a specific number of VFs within this predefined range.
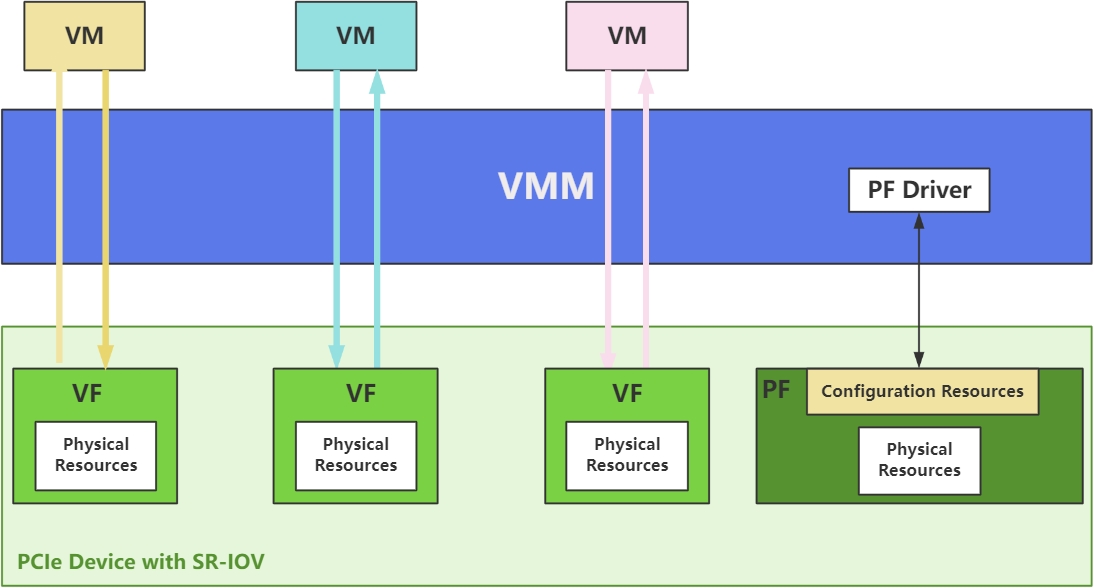
Figure 1. Single Root I/O Virtualization
Intel Scalable I/O Virtualization (SIOV) is a new hardware-assisted IO virtualization solution, the structure is shown in the figure below. The resources of SIOV devices are divided into finer granularities, with the type and number of backend resources grouped to compose an Assignable Device Interface (ADI). An ADI refers to the set of device backend resources that are allocated, configured, and organized as an isolated unit, forming the unit of device sharing. ADI composing a virtual device (VDEV) is assigned to the VM. Each VDEV may be backed by one or more ADIs. A VDEV may be composed of a static number of ADIs that are pre-allocated at the time of VDEV instantiation or composed dynamically in response to guest driver requests to allocate/free resources.
SR-IOV is a mature standard that is widely supported, and easy to configure and use. While SIOV offers higher flexibility and scalability, SIOV is relatively new and less standardized.
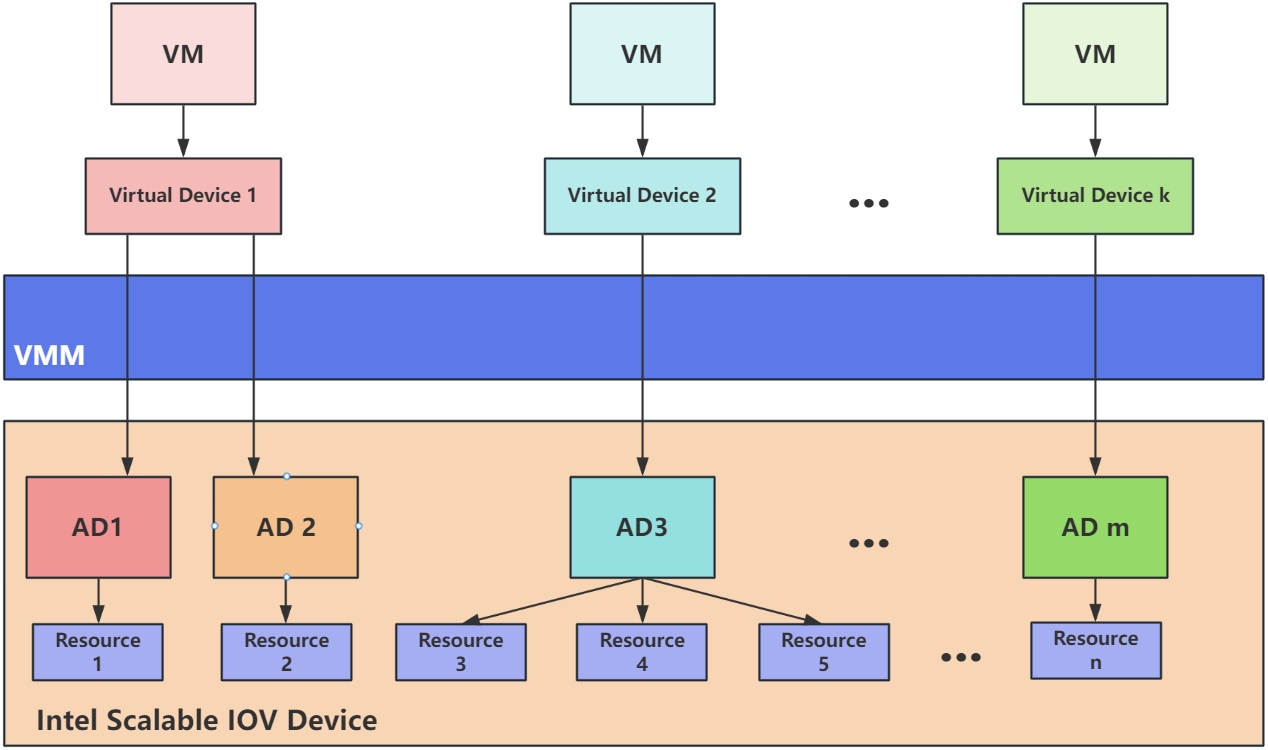
Figure 2. Intel Scalable I/O Virtualization
All in all, SR-IOV and SIOV have their own benefits and limitations, and their differences are summarized in the table below.
Implementing SR-IOV
This section describes the steps to configure and enable SR-IOV in VMware ESXi 8.0 U3 on the Lenovo ThinkSystem Server. In our lab tests, we are using the Broadcom 57454 10GBASE-T 4-port PCIe Ethernet Adapter as an example. This adapter has its own SR-IOV switch in the BIOS, so it it is well-suited as an example.
The test configuration of ThinkSystem SR650 V3 is listed in the following table.
Prerequisites for SR-IOV
To use SR-IOV, the system must meet the following requirements:
- Supported System: Intel VT for Directed I/O (VT-d) or AMD Virtualization (AMD-V).
- The device must be supported SR-IOV by ESXi: To check supported devices, see the VMware Compatibility Guide and select SR-IOV under Features as a search option.
- The vSphere ESXi host supports a limited number of VFs and VMDirectPath PCI/PCIe devices. Refer to the configuration maximum guide for more information: https://kb.vmware.com/s/article/1003497.
Enabling SR-IOV in UEFI
The process to enable SR-IOV in UEFI is as follows.
- Power on the Lenovo ThinkSystem server, then press F1 to enter System Setup.
- For the Intel platform: Enable Intel VT-d and SR-IOV, and reboot. Select System Settings > Devices and I/O Ports, ensure that Intel VT for Directed I/O (VT-d) and SRIOV options are enabled as shown in the following figure.
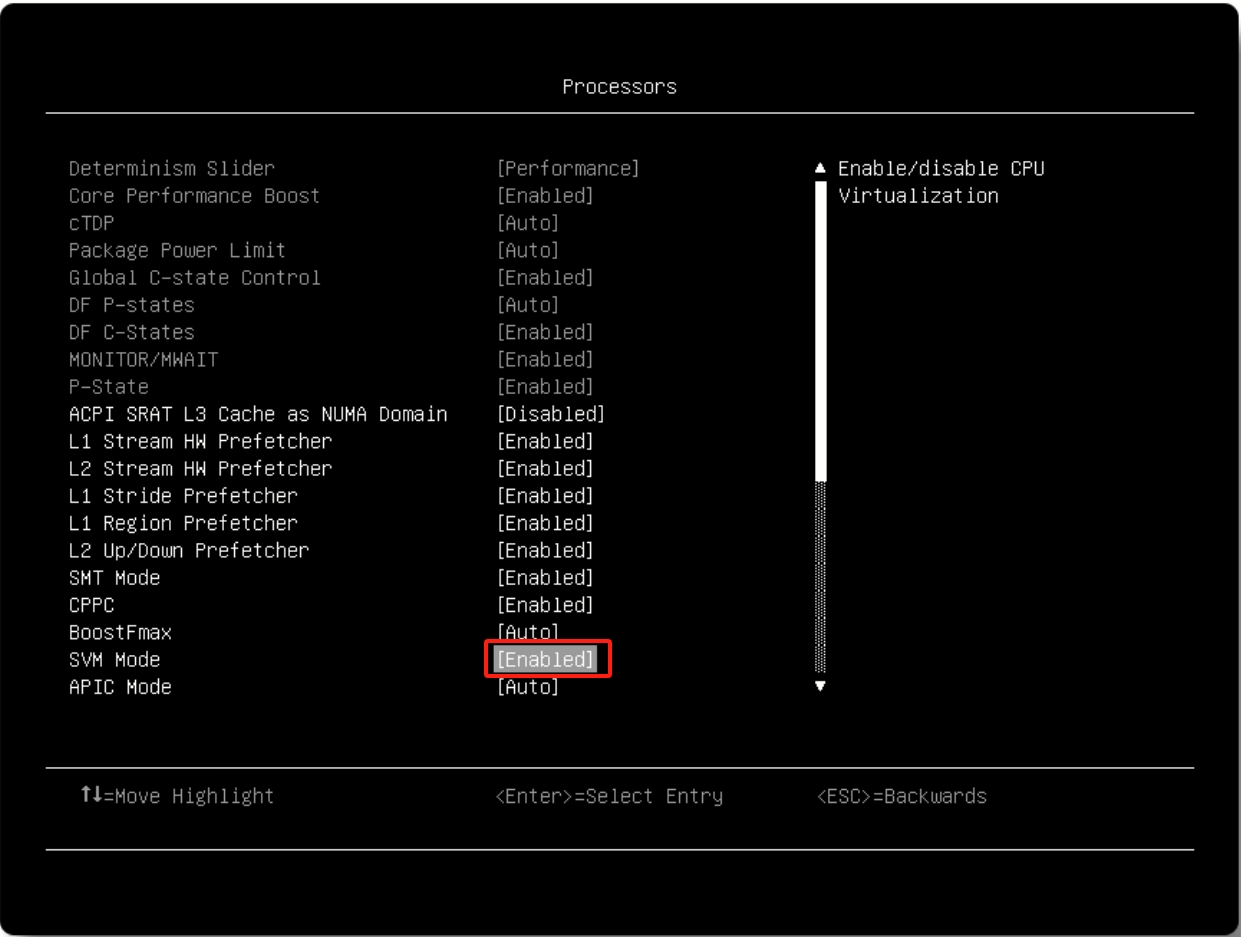
- For the AMD platform: Enable SVM Mode, SR-IOV, IOMMU, and reboot. Select System Settings > Devices and I/O Ports and ensure that IOMMU and SRIOV options are enabled as shown in the following figure.
- Select System Settings > Processors and ensure that the SVM Mode option is enabled as shown in the following figure.
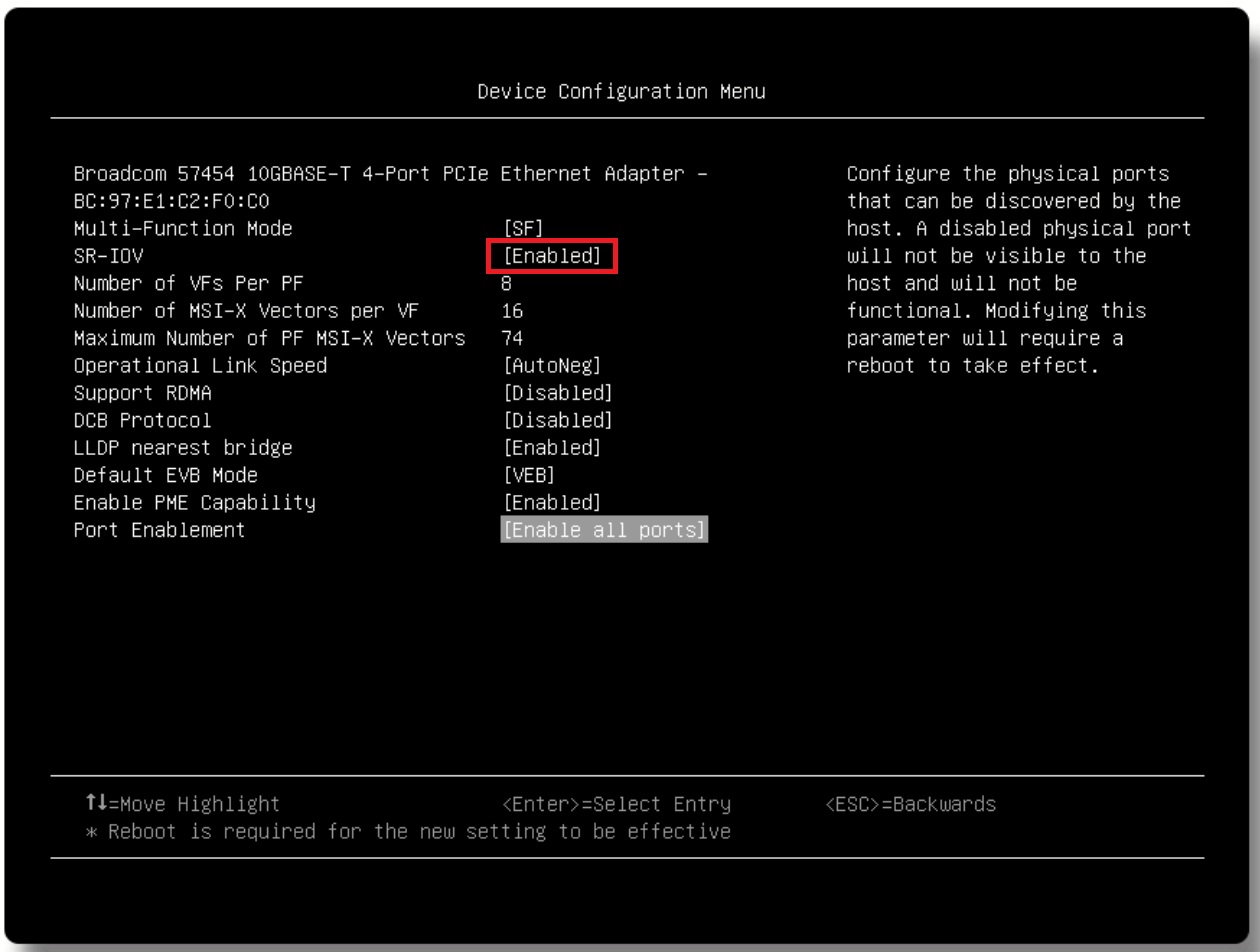
- Some devices have a separate SR-IOV option in UEFI, make sure it is enabled. For example, the device Broadcom 57454 10GBASE-T 4-Port PCIe Ethernet Adapter. You can enter in System Settings > Network > Broadcom 57454 10GBASE-T 4-Port PCIe Ethernet Adapter > Device Configuration Menu to find its SR-IOV Settings, and ensure it is enabled.
- Save settings and reboot.


Configuring SR-IOV in ESXi
After enabling SR-IOV in UEFI Settings, boot into ESXi and enable SR-IOV according to the following steps.
- Log in to the vSphere client.
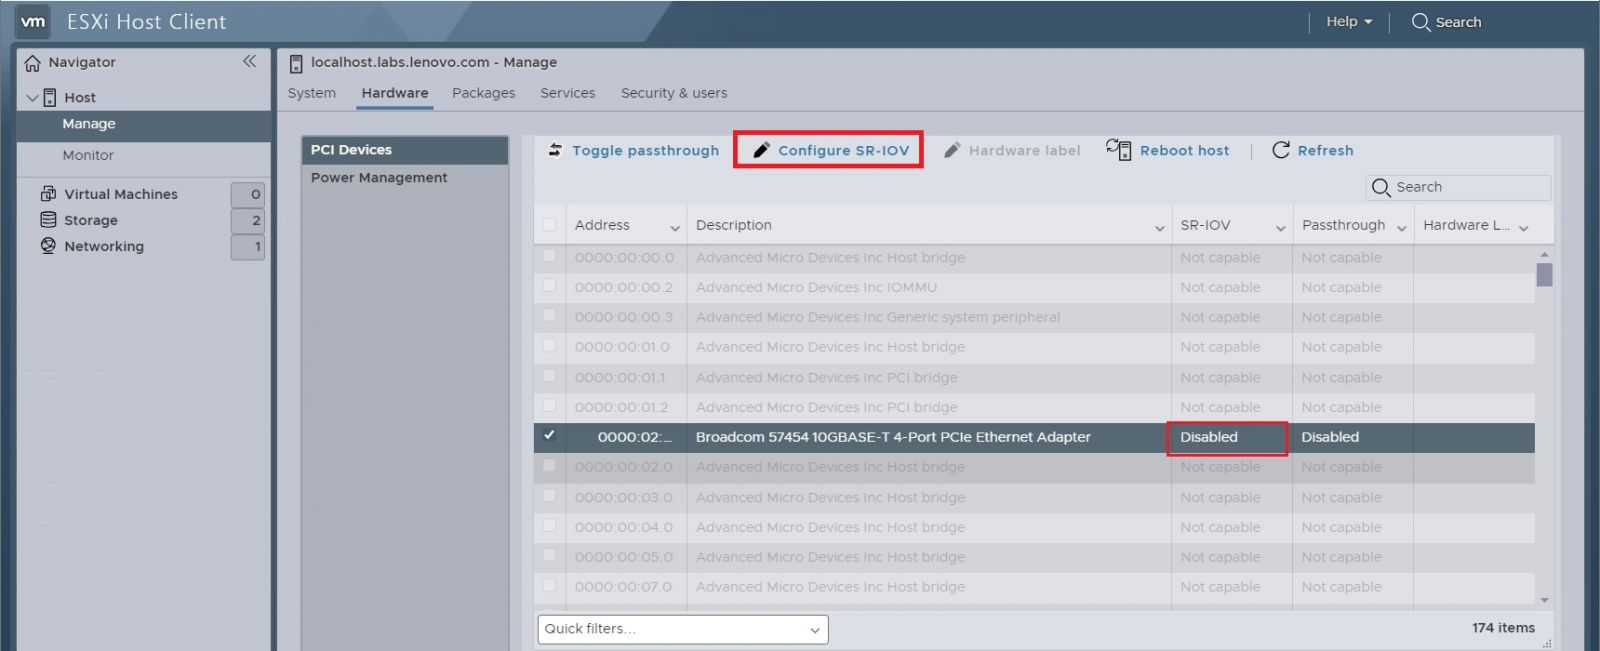
- Select Manage > Hardware > PCI Devices from the left navigation menu. Select the SR-IOV device, the SR-IOV item should be “Disabled” and select “Configure SR-IOV”. If the item is “Not Capable”, please check the configuration of the system and UEFI settings.
- As shown in the figure below, set the Enabled option to Yes and enter the desired number of virtual functions between 1 and the maximum value shown in the window.
- Save the Settings and reboot for the configuration to take effect.
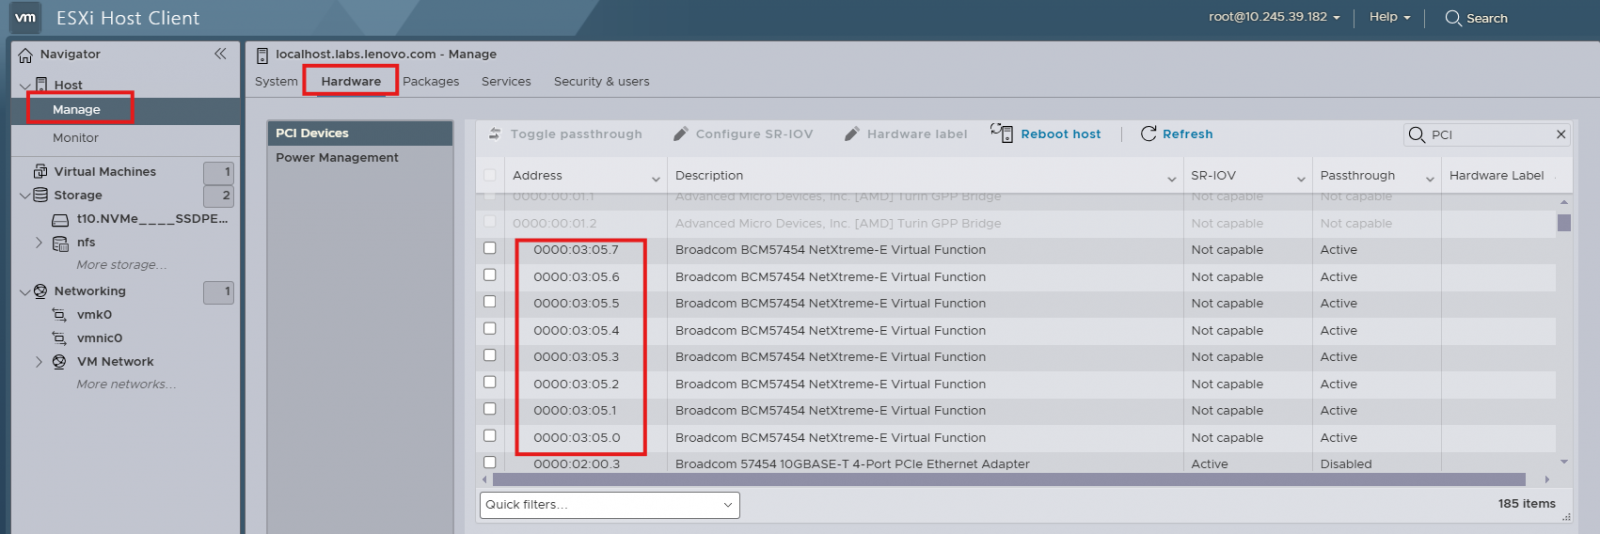
- Navigate to the PCI Device menu again to ensure the VF devices are on the list, as shown below. The number of VF devices is equal to the number set in Step 3. The function of each VF device is identical, with no priority order; The only difference is their PCI device ID, which you can use to distinguish them.
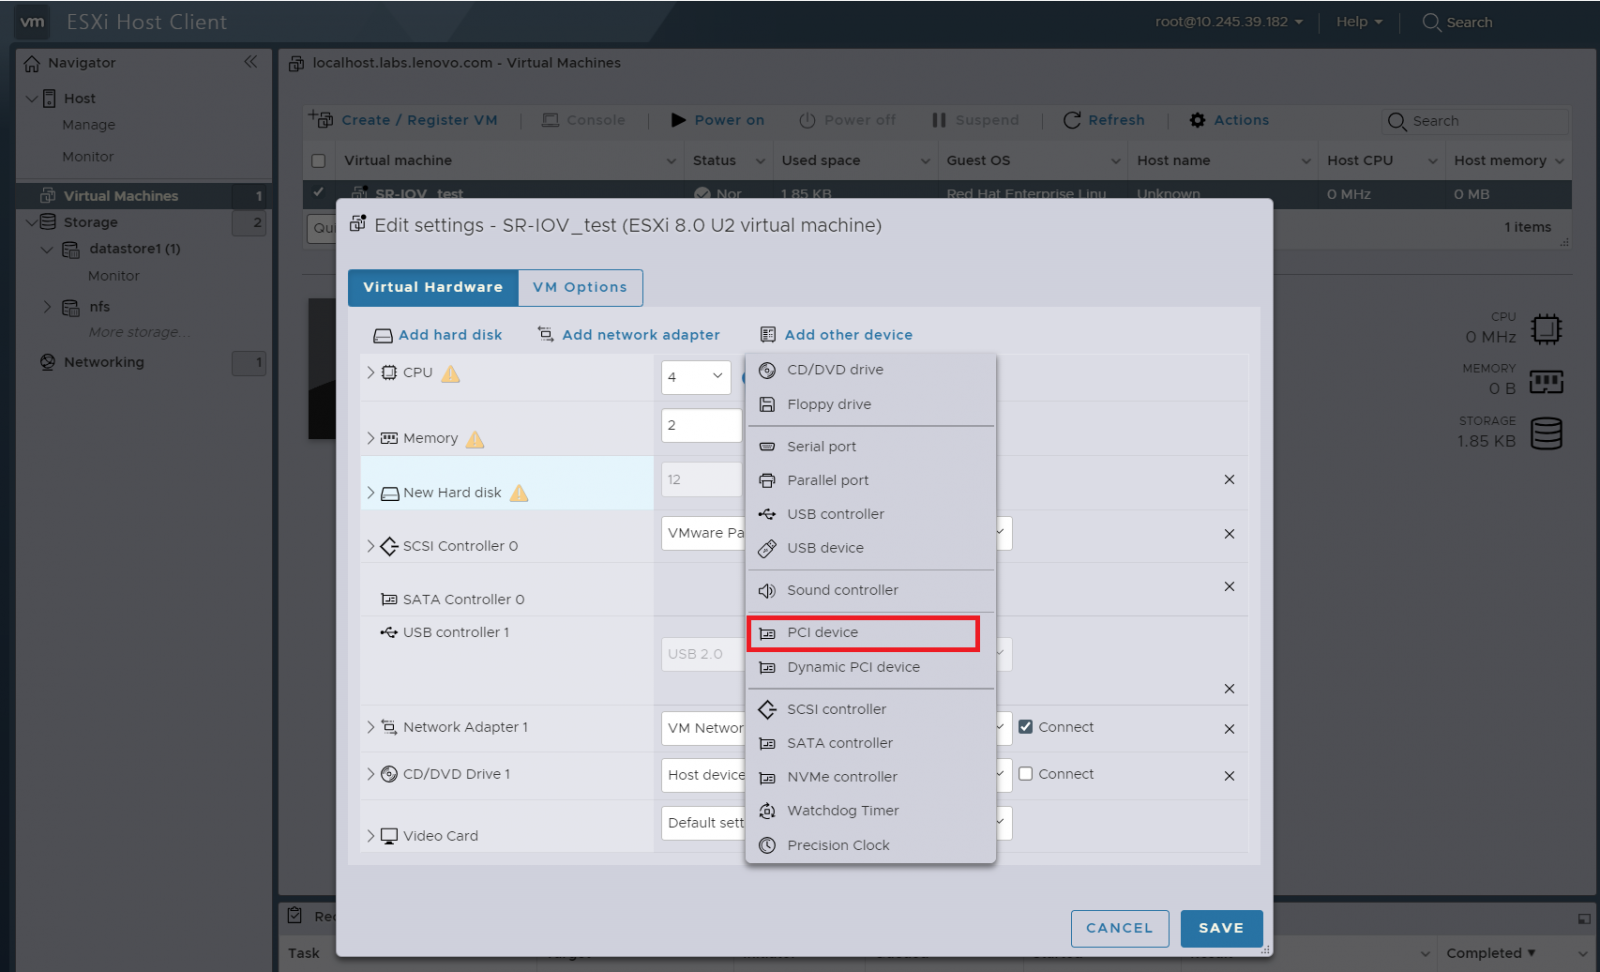
- Passthrough the VF to Virtual Machine (VM) as shown below. Choose a VM, click the Edit > Add other device > PCI device.
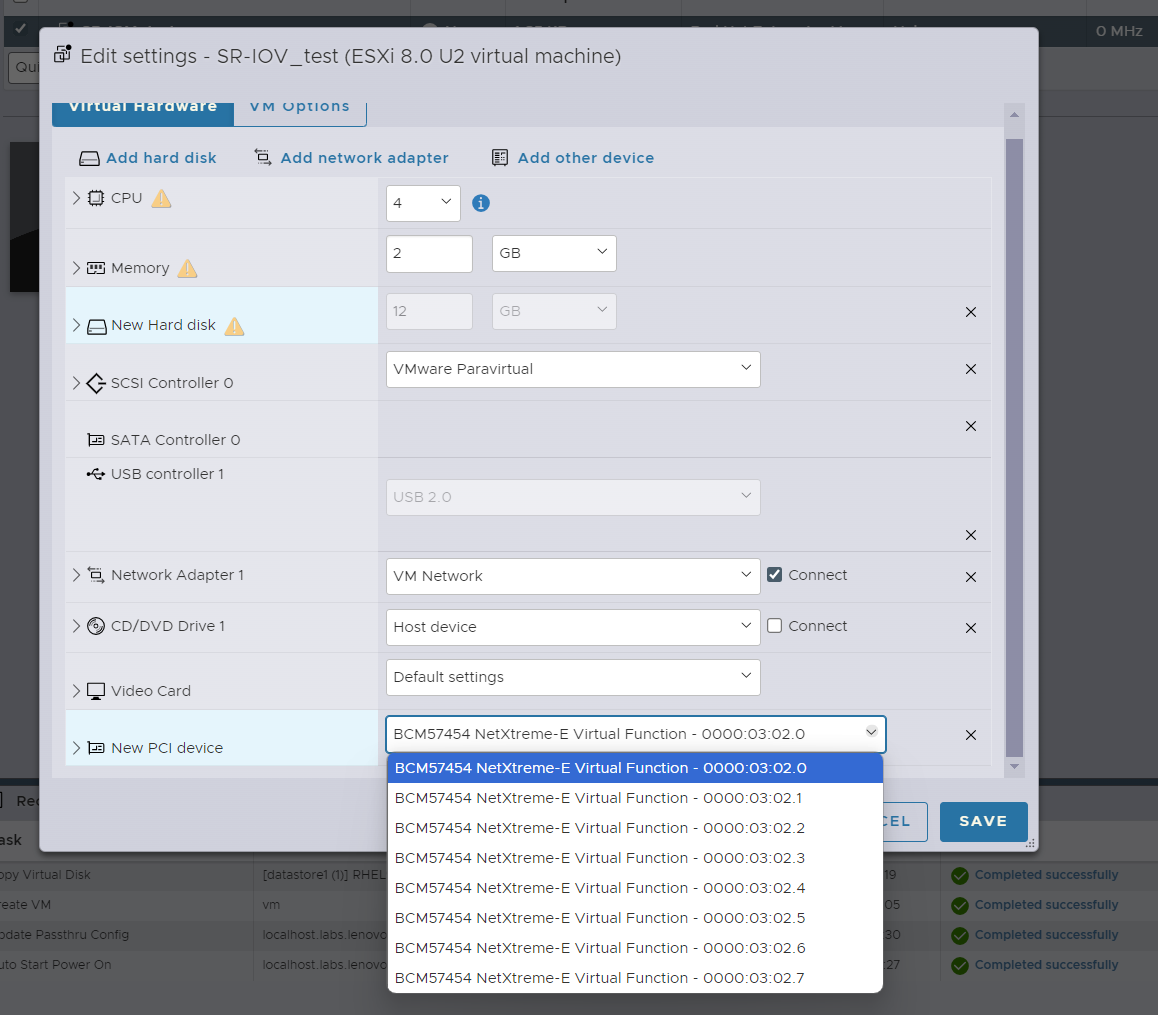
- You can see the VF devices that just appeared in the PCI device list under the New PCI device option as shown below. Determine the VF device to use based on the name and PCI device ID. In our lab environment, the SR-IOV device is the BCM57454 and we want to select VF0, so we select BCM57454 NexXtreme-E Virtual Function-000:03.02.0 as highlighted in the figure. Select it and save the settings.
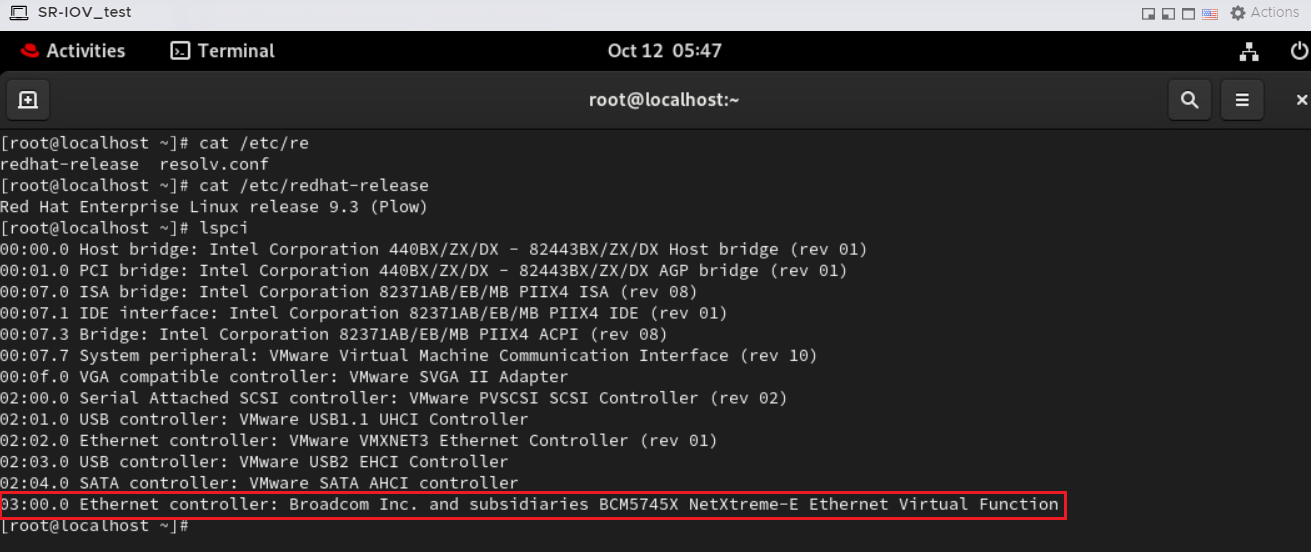
- Power on the VM and boot into the guest OS. You can see the VF in the PCI device list using the lspci command.

Implementing SIOV
This section describes the steps to configure and enable SIOV and passthrough VDEV to the virtual machine in VMware ESXi 8.0 U2 on the server.
In our lab tests, we are using the Intel QuickAssist Technology (Intel QAT) accelerator as an example. Intel QAT is PCIe device that provides cryptographic and compression acceleration. It enables sharing of a Physical Function across multiple guest Virtual Machines (VM) using SIOV.
The test configuration of ThinkSystem SR650 V3 is listed in the following table.
Prerequisites for SIOV
ESXi has these limitations when using SIOV:
- The device must be supported SIOV by ESXi: Check with the adapter vendor's web site to confirm that the device supports SIOV in ESXi.
- The vSphere ESXi host supports a limited number of PCI passthrough devices. Refer to the configuration maximum guide for more information: https://kb.vmware.com/s/article/1003497.
- The virtual IOMMU option for VM is not compatible with VDEVs on ESXi.
- vSphere Host Client doesn't support SIOV setting. You need VMware vCenter to complete the configuration of SIOV devices.
Enabling SIOV in UEFI
To enable SIOV in UEFI, follow the same steps to enable SR-IOV as described in Enabling SR-IOV in UEFI. The steps remain consistent across all devices, except Step 5. Step 5 depends on the specific device.
- Please skip Step 5 if the device does not have its own SR-IOV switch in BIOS.
- The configuration entry is device-specific if the device has its own SR-IOV switch in BIOS.
Consult your device manufacturer for information on whether the device has its own SR-IOV switch and how to configure it.
Configuring SIOV in ESXi
The following steps build on the assumption that Intel QAT devices are already available on ESXi. For more information on Intel QAT device driver selection and installation, see the Lenovo Press paper, Implementing the Intel DLB and Intel QAT Accelerators on ThinkSystem Servers Running VMware ESXi.
The steps are as follows:
- Log in to the VMware vCenter via vSphere Client.
Note: vSphere Host Client doesn't support VDEVs assignment to VM via VM settings.
- Locate the target VM in the inventory. Make sure the VM is powered down.
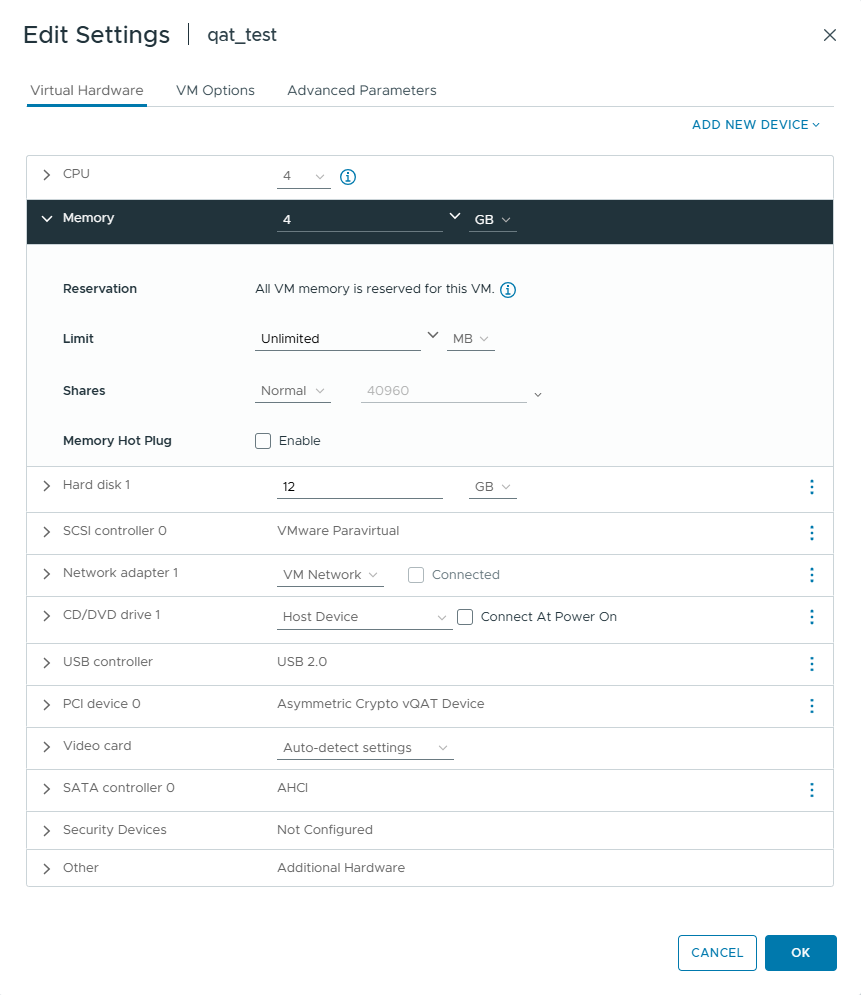
- In the center pane, click Edit Settings to edit VM configuration. A pop-up window with the VM settings will appear.
- All memory for the VM must be reserved. Expand Memory and check that Reservation section is reporting the following (see the figure below):
All VM memory is reserved for this VM.
If you do not see this message, check the Reserve all guest memory (All locked) checkbox.
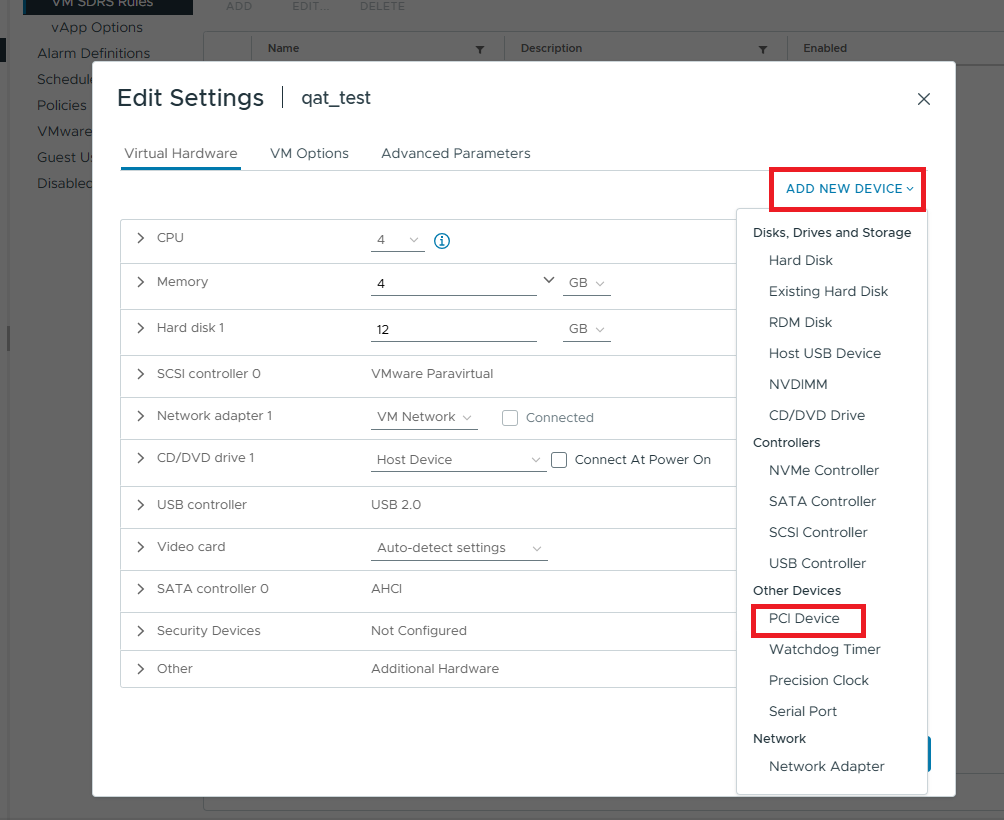
- Click the Add New Device dropdown menu and choose PCI Device as shown below.
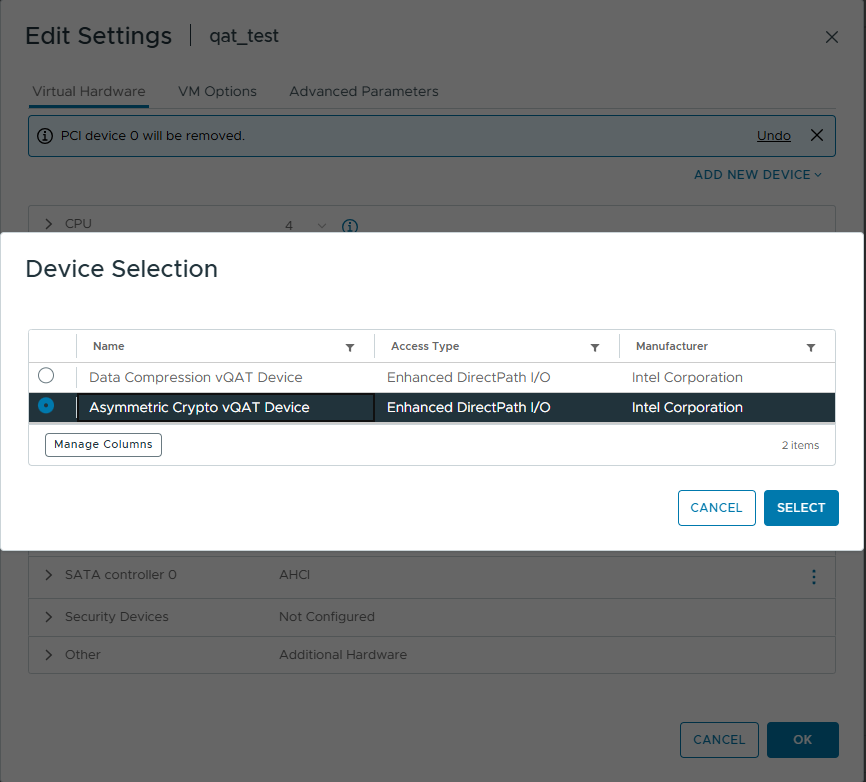
- The available VDEV devices are listed as shown below. Select the VDEV device that belongs to your SIOV device by name and apply to continue. Each SIOV device has its own VDEV name, which depends on the manufacturer of the device. If you do not know, consult the manufacturer of the SIOV device. In our lab configuration, the SIOV Device is Intel QAT and its VDEV device name is Asymmetric Crypto vQAT Device.
- Click OK to save the VM configuration and power on the VM.
- Log in to the guest OS.
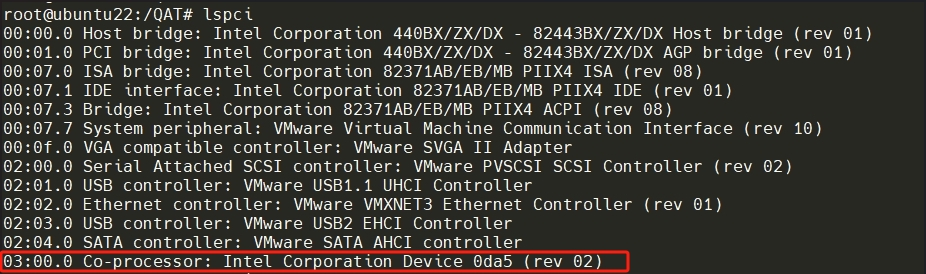
- Use the lspci command to view PCI devices including VDEV devices. The VDEV PCI device name and PCI device ID are specified by the device manufacturer. If you do not know, please consult your SIOV device manufacturer. In this case, the PCI Device identification for VDEV is 03:00.00: Intel Corporation Device 0da5.
References
For more information, see these resources:
- Configure a Virtual Machine to Use SR-IOV
https://docs.vmware.com/en/VMware-vSphere/8.0/vsphere-networking/GUID-CC021803-30EA-444D-BCBE-618E0D836B9F.html - Intel QAT downloads
https://www.intel.com/content/www/us/en/developer/topic-technology/open/quick-assist-technology/overview.html
Author
Skyler Zhang is a VMware Engineer at the Lenovo Infrastructure Soiutions Group, based in Beijing, China. She joined the OS team in 2022.
Thanks to the following specialists for their contributions and suggestions:
- Gary Cudak, Lenovo OS Architect
- Alpus Chen, Lenovo VMware Engineer
- Chengcheng Peng, Lenovo VMware Engineer
- David Hsia, Lenovo VMware Engineer
- David Watts, Lenovo Press
Trademarks
Lenovo and the Lenovo logo are trademarks or registered trademarks of Lenovo in the United States, other countries, or both. A current list of Lenovo trademarks is available on the Web at https://www.lenovo.com/us/en/legal/copytrade/.
The following terms are trademarks of Lenovo in the United States, other countries, or both:
Lenovo®
ThinkSystem®
The following terms are trademarks of other companies:
AMD, AMD Virtualization™, and AMD-V™ are trademarks of Advanced Micro Devices, Inc.
Intel®, the Intel logo and Xeon® are trademarks of Intel Corporation or its subsidiaries.
Other company, product, or service names may be trademarks or service marks of others.
Configure and Buy
Please select a locale
Full Change History
Course Detail
Employees Only Content
The content in this document with a is only visible to employees who are logged in. Logon using your Lenovo ITcode and password via Lenovo single-signon (SSO).
The author of the document has determined that this content is classified as Lenovo Internal and should not be normally be made available to people who are not employees or contractors. This includes partners, customers, and competitors. The reasons may vary and you should reach out to the authors of the document for clarification, if needed. Be cautious about sharing this content with others as it may contain sensitive information.
Any visitor to the Lenovo Press web site who is not logged on will not be able to see this employee-only content. This content is excluded from search engine indexes and will not appear in any search results.
For all users, including logged-in employees, this employee-only content does not appear in the PDF version of this document.
This functionality is cookie based. The web site will normally remember your login state between browser sessions, however, if you clear cookies at the end of a session or work in an Incognito/Private browser window, then you will need to log in each time.
If you have any questions about this feature of the Lenovo Press web, please email David Watts at dwatts@lenovo.com.


