

Top
Author
Published
5 May 2019Form Number
LP1093PDF size
21 pages, 5.9 MBSubscribed to LP1093.
Thank you for your feedback.
Download PDF
Table of Contents
Abstract
This document provides the instructions for the various methods of collecting service data on Lenovo servers. Users might be asked to collect service data by Lenovo service personnel or from a qualified business partner when opening a service ticket. This is sometimes referred to as collecting First Failure Data Capture (FFDC).
This guide provides instructions for users who are new to Lenovo ThinkSystem or System x servers. It will guide you to choose the right tool and then guide you to complete the task of collecting service data, which you can send to the qualified service personnel as the next step in the troubleshooting journey.
Introduction
This document provides the instructions for the various methods of collecting service data on Lenovo servers. Users might be asked to collect service data by Lenovo service personnel or from a qualified business partner when opening a service ticket. This is sometimes referred to as collecting First Failure Data Capture (FFDC).
This guide provides instructions for users who are new to Lenovo ThinkSystem or System x servers. It will guide you to choose the right tool and then guide you to complete the task of collecting service data, which you can send to the qualified service personnel as the next step in the troubleshooting journey.
Looking for the latest ThinkSystem servers? See Collecting Service Data on Lenovo ThinkSystem Servers
Choosing the right tool
It is recommended that you understand all methods for collecting service data that Lenovo provides so that you can quickly collect the data before calling for technical support. This way, you can avoid or minimize workload disruption while capturing the critical information that is needed, at a decisive moment, for precise and efficient troubleshooting.
However if you are in a hurry, the following table allows you to quickly jump to the section that best suits your current situation. Choose a row at the first column based on what you have access to, then choose one of the server brand columns to link to the right tool and steps.
| What access do you have? | Lenovo ThinkSystem including ThinkSystem branded Flex and NeXtScale servers | Lenovo System x including Lenovo branded Flex and NeXtScale servers |
IBM System x including IBM branded Flex, BladeCenter and NeXtScale servers |
|---|---|---|---|
| 1) I have access to the BMC web management interface. | Use XClarity Controller (XCC) | Use Integrated Management Module (IMM) | Use Integrated Management Module (IMM) |
| 2) I have access to the server OS* to run command line applications with root or Administrator privileges. | Use XClarity Essentials OneCLI | Use XClarity Essentials OneCLI | Use Dynamic System Analysis (DSA) Portable |
| 3) I have access to the server locally with KVM (keyboard & video) and I am able to reboot the server. | Use XClarity Provisioning Manager (LXPM) | Use Dynamic System Analysis (DSA) Preboot | Use Dynamic System Analysis (DSA) Preboot |
| 4) I am managing the servers with XClarity Administrator and would like to use it to collect service data on one or more servers. | Use XClarity Administrator (LXCA) | Use XClarity Administrator (LXCA) | Not supported |
| 5) I need to collect service data on Flex System CMM or components other than the compute node. | Use Chassis Management Module (CMM) | Use Chassis Management Module (CMM) | Use Chassis Management Module (CMM) |
* The OS here refers to a supported version of Windows and Linux on the server. Although VMware ESXi is also supported on the server, the support tool cannot be run directly in the hypervisor; in this case, the user can use the BMC, XClarity Administrator or local access to collect service data.
Where to get the tools
The following links show where to download the tool (if relevant) and where to find the documentation on how to use the tool.
- XClarity Controller (XCC)
- Download: This tool is embedded in the firmware of Lenovo ThinkSystem servers.
- Documentation: https://pubs.lenovo.com/xcc/
- XClarity Provisioning Manager (LXPM)
- Download: This tool is embedded in the firmware of Lenovo ThinkSystem servers.
- Documentation: https://pubs.lenovo.com/lxpm-overview/
- XClarity Essentials OneCLI (LXCE OneCLI)
- Download: https://datacentersupport.lenovo.com/us/en/solutions/lnvo-tcli
- Documentation: https://pubs.lenovo.com/lxce-onecli/
- XClarity Administrator (LXCA)
- Download: https://support.lenovo.com/us/en/solutions/lnvo-lxcaupd
- Documentation: https://pubs.lenovo.com/lxca/
- Integrated Management Module (IMM)
- Download: This tool is embedded in the firmware of Lenovo and IBM System x servers.
- Documentation: https://pubs.lenovo.com/imm2/
- Chassis Management Module (CMM)
- Download: This tool is embedded in the firmware of Lenovo and IBM System x servers.
- Documentation: https://pubs.lenovo.com/cmm2/
- Dynamic System Analysis (DSA) Preboot
- Download: This tool is embedded in the firmware of Lenovo and IBM System x servers.
- Documentation: https://pubs.lenovo.com/x3650-m5-5462/c_dsa_intro.html
- Dynamic System Analysis (DSA) Portable
- Download: https://datacentersupport.lenovo.com/us/en/solutions/lnvo-dsa
- Documentation: https://pubs.lenovo.com/static/dsa_bk.pdf
XClarity Controller (XCC)
Use the following steps to collect service data using XClarity Controller (XCC):
- Log in to the XClarity Controller web management interface.
- At the Home page, look for the Quick Actions panel as shown in the following figure.
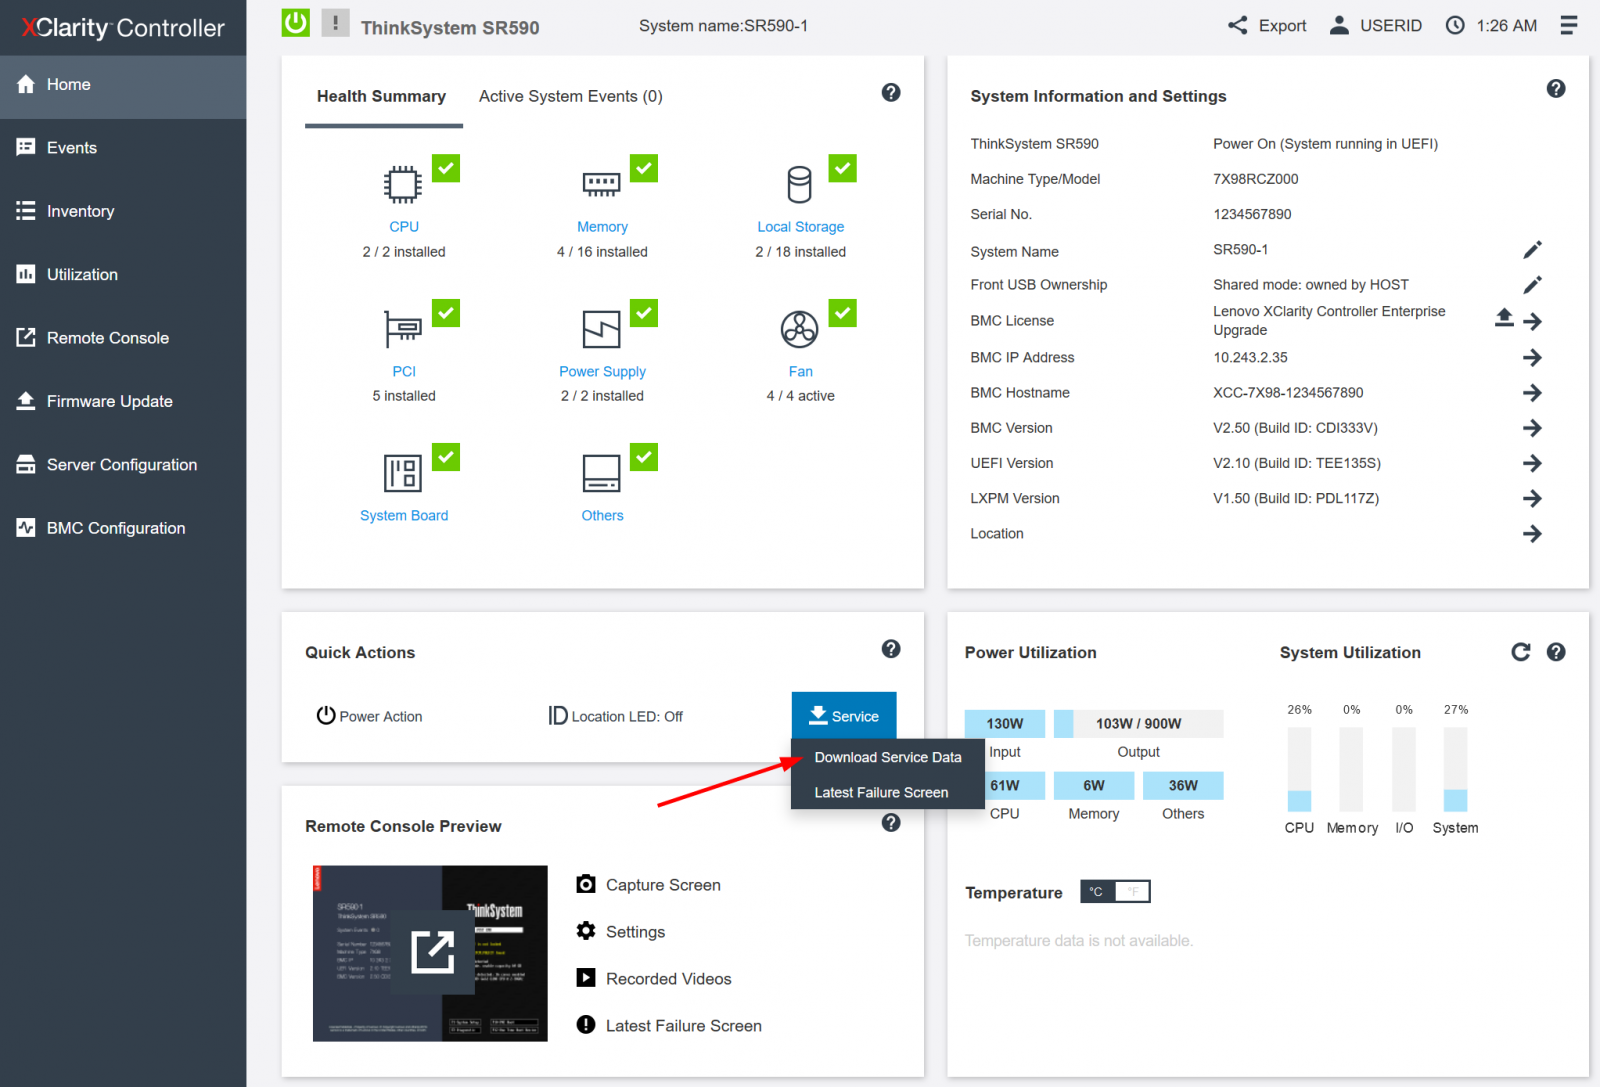
Figure 1. XClarity Controller home page - Click Service > Download Service Data.
- Click OK when prompted.
- The process may take a few minutes to complete, then you will be prompted by the browser to save the file to your workstation.
Additional information:
- The naming convention for the service data file is: MachineType+tzz, for example 7X1925Z000_S4AAC123_xcc_190325-104024.tzz
- The XCC service data file *.tzz cannot be extracted using a generic decompression tool, such as unzip or 7zip. Send the service data file to an authorized technical service personnel for further analysis.
XClarity Essentials OneCLI
Use the following steps to collect service data using XClarity Essentials OneCLI (LXCE OneCLI):
Instructions for Windows:
- Download the latest version of OneCLI at the following location:
https://datacentersupport.lenovo.com/us/en/solutions/lnvo-tcli - Decompress the downloaded zip file into a new directory.
- Open a command prompt as Administrator and change to the directory where the expanded version of OneCLI is found.
- Run this command to collect service data:
OneCli.exe inventory getinfor --ffdc - The process will take approximately 15 to 45 minutes to complete.
Instructions for Linux:
- Download the latest version of OneCLI at the following location:
https://datacentersupport.lenovo.com/us/en/solutions/lnvo-tcli - Decompress the downloaded .tgz file into a new directory.
- Open a shell as root privilege and change to the directory where the expanded version of OneCLI is found.
- Run this command to collect service data:
./OneCli inventory getinfor --ffdc - The process will take approximately 15 to 45 minutes to complete.
Additional information:
- A new directory will be created under the current execution directory to store the result of each run at logs/OneCli-pid-date-time, for example, logs/OneCli-5460-20190326-141910
- The resulting directory contains the service data file (.tgz/.tzz) that was retrieved from the BMC, the same as by downloading service data from the web interface.
- The directory also contains a detailed server inventory file that could be useful to technical support. If you’d like to have the detailed inventory in HTML instead of the XML, you can run this command:
OneCli.exe inventory getinfor --ffdc --htmlreport - You can compress the result directory as a file to send to technical support.
XClarity Provisioning Manager (LXPM)
Use the following steps to collect service data using XClarity Provisioning Manager (LXPM). You will need a USB memory key to save the service data to.
- Boot or reboot the server, wait until the POST splash screen is displayed.
- Press F1 to enter System Setup as shown in the following figure.
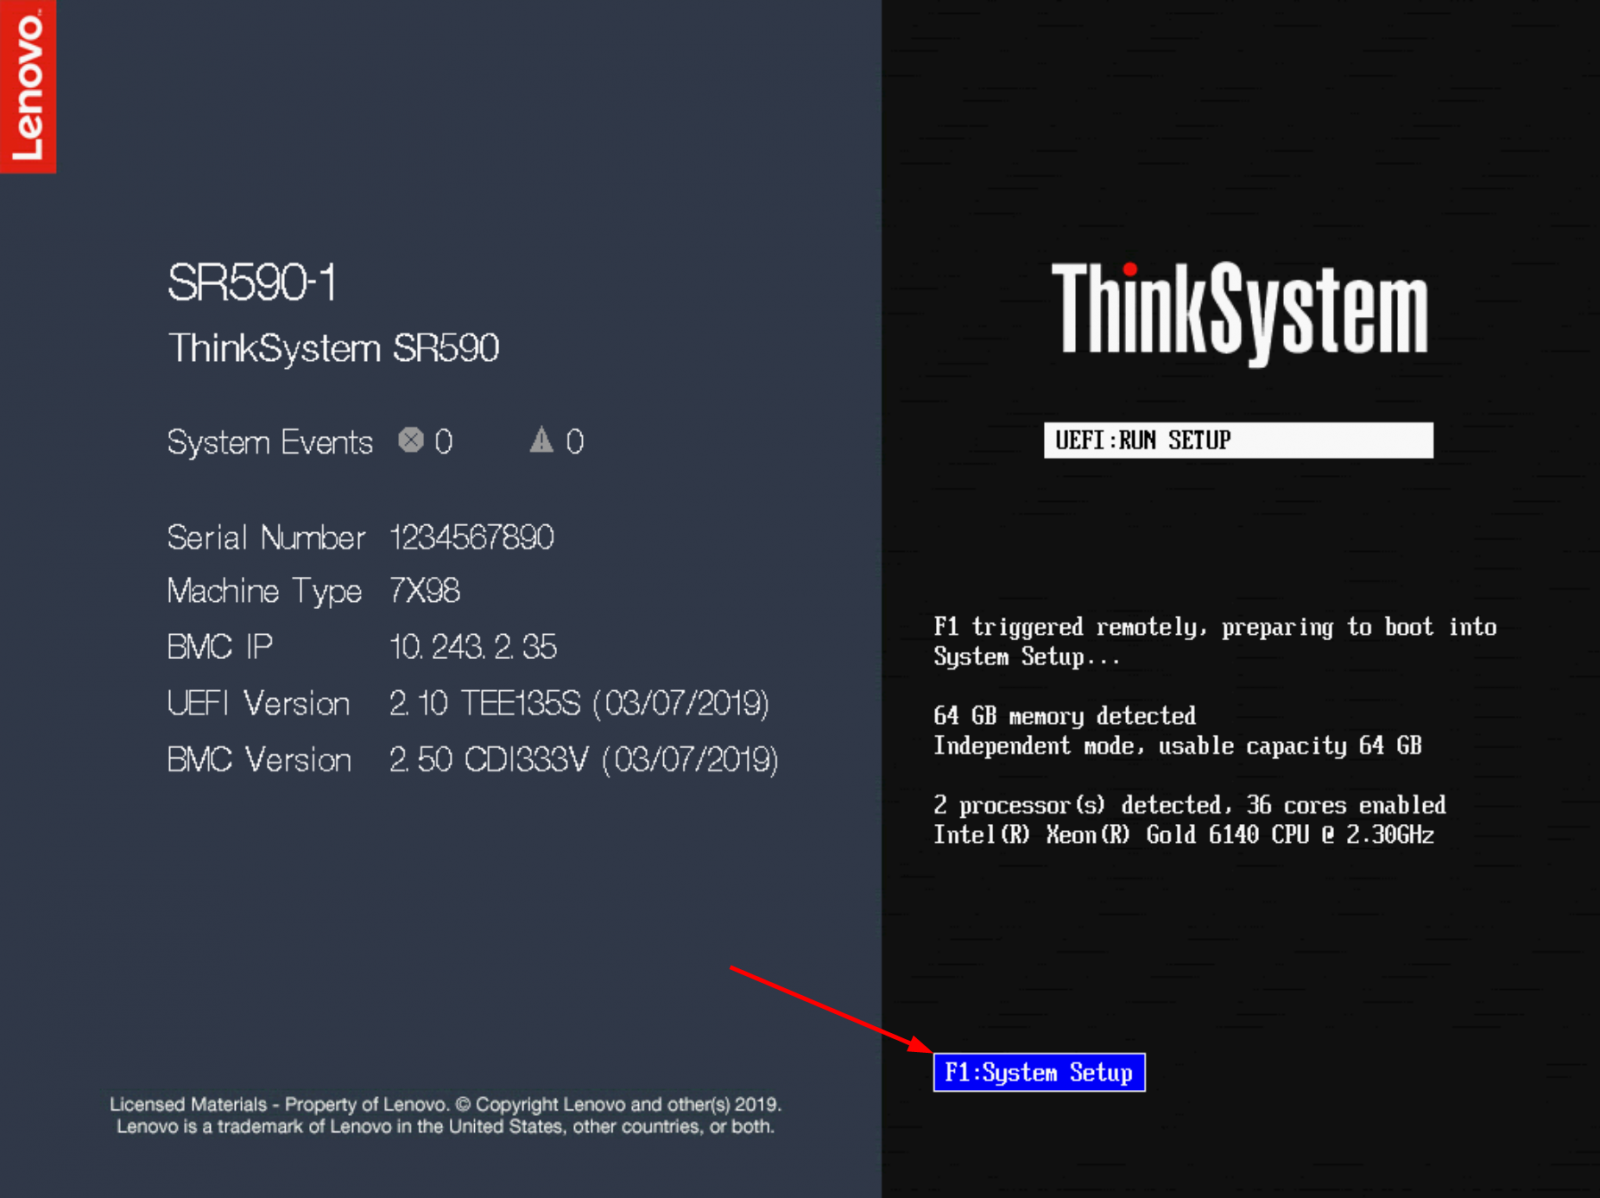
Figure 2. Lenovo ThinkSystem server POST splash screen - If you see text mode UEFI setup, as shown in the following figure, choose the option to Launch Graphical System Setup which launches XClarity Provisioning Manager.
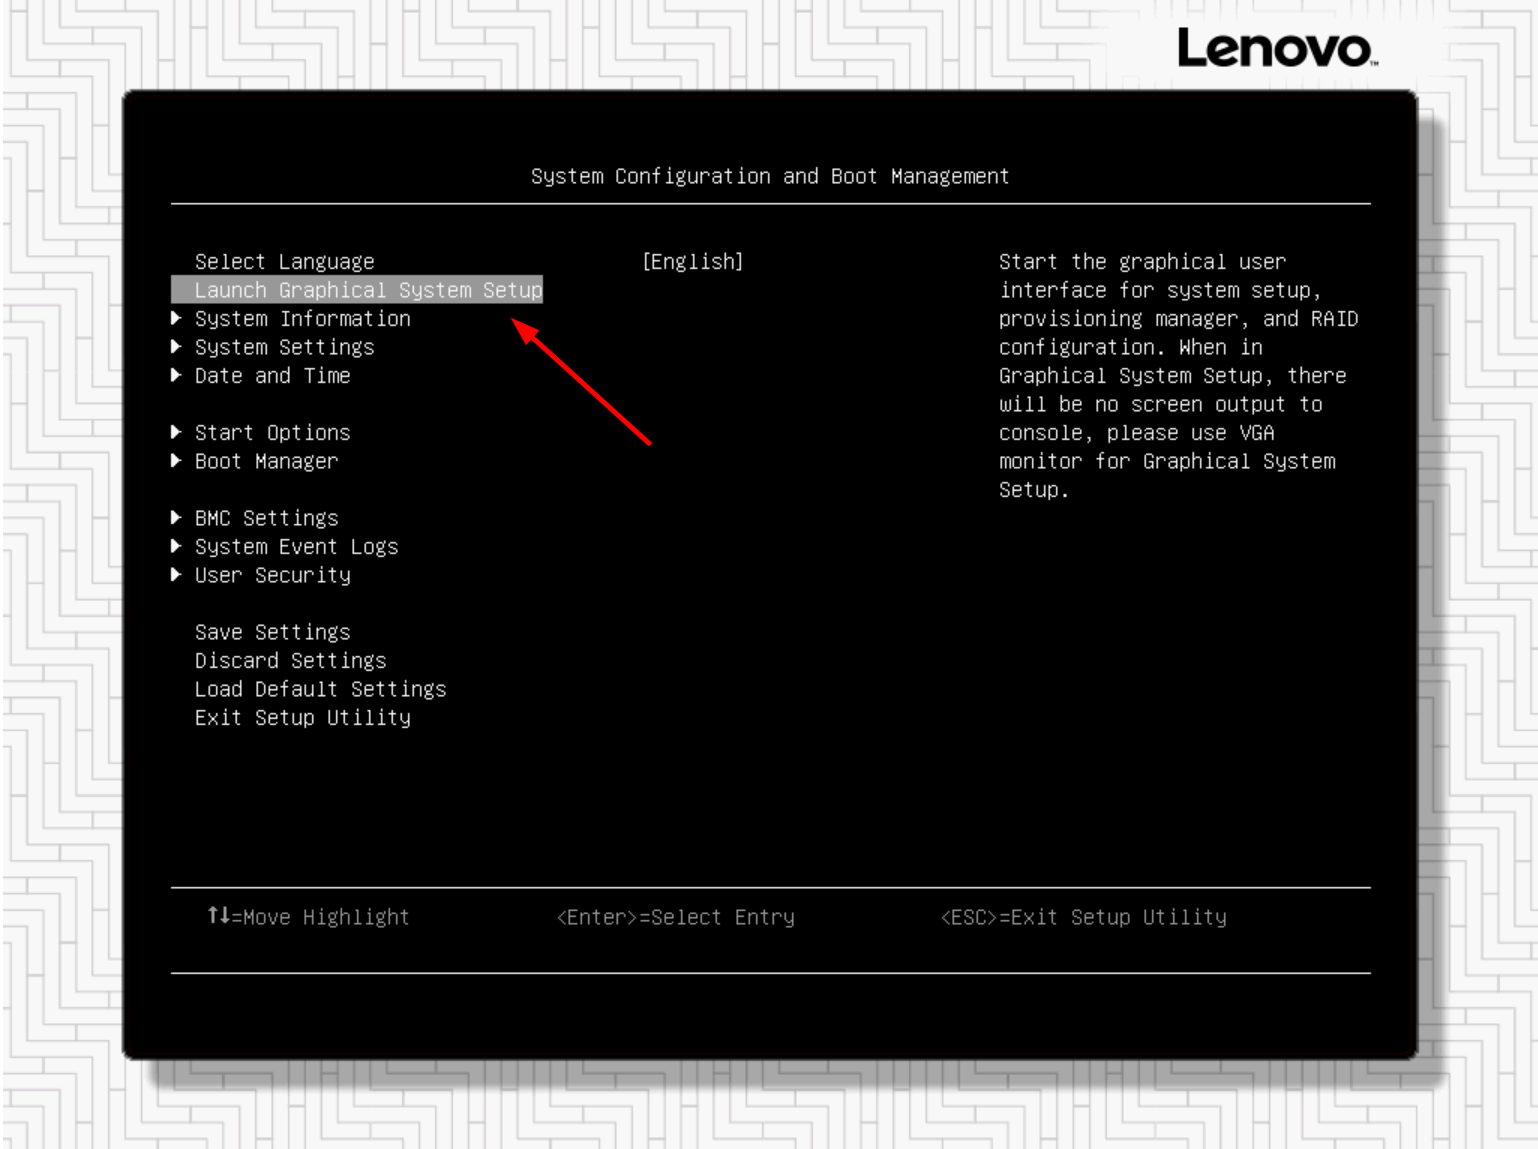
Figure 3. ThinkSystem server UEFI Setup Utility - In XClarity Provisioning Manager, click Diagnostics as in the following figure.
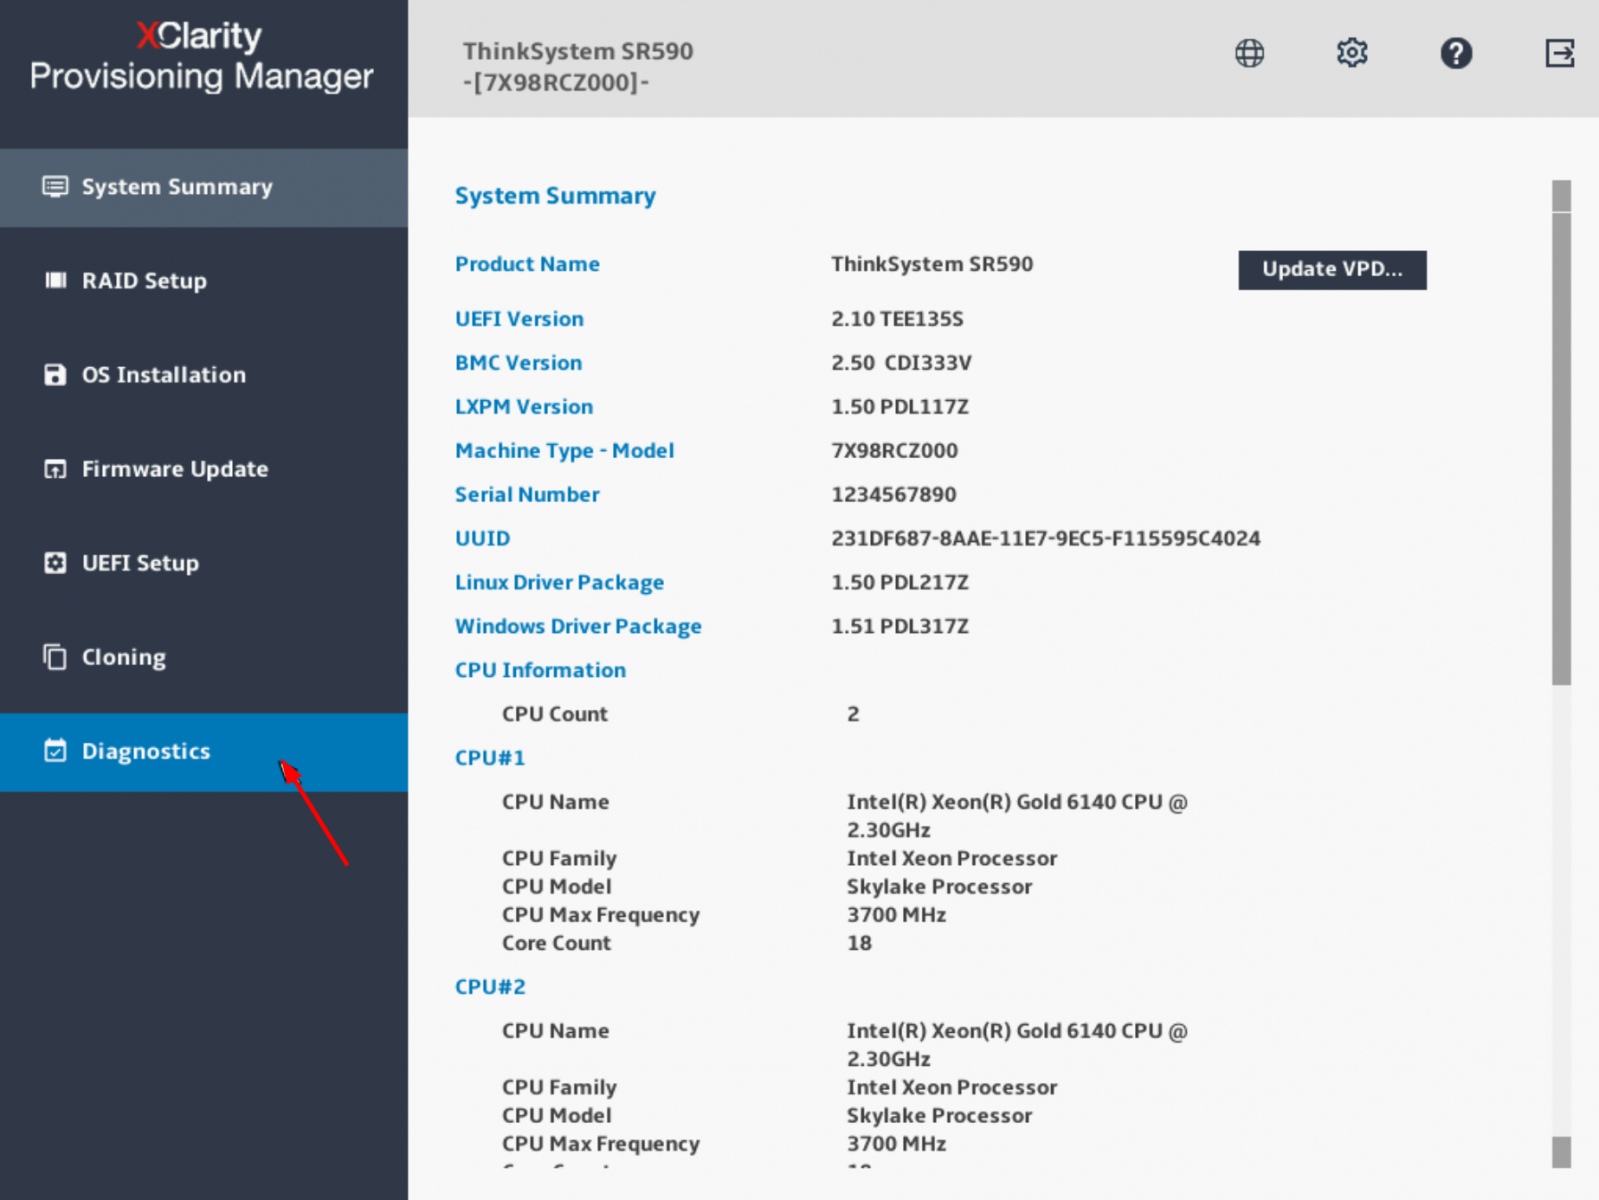
Figure 4. XClarity Provisioning Manager system summary page - Click Collect Service Data and then click the Next arrow as shown in the following figure.
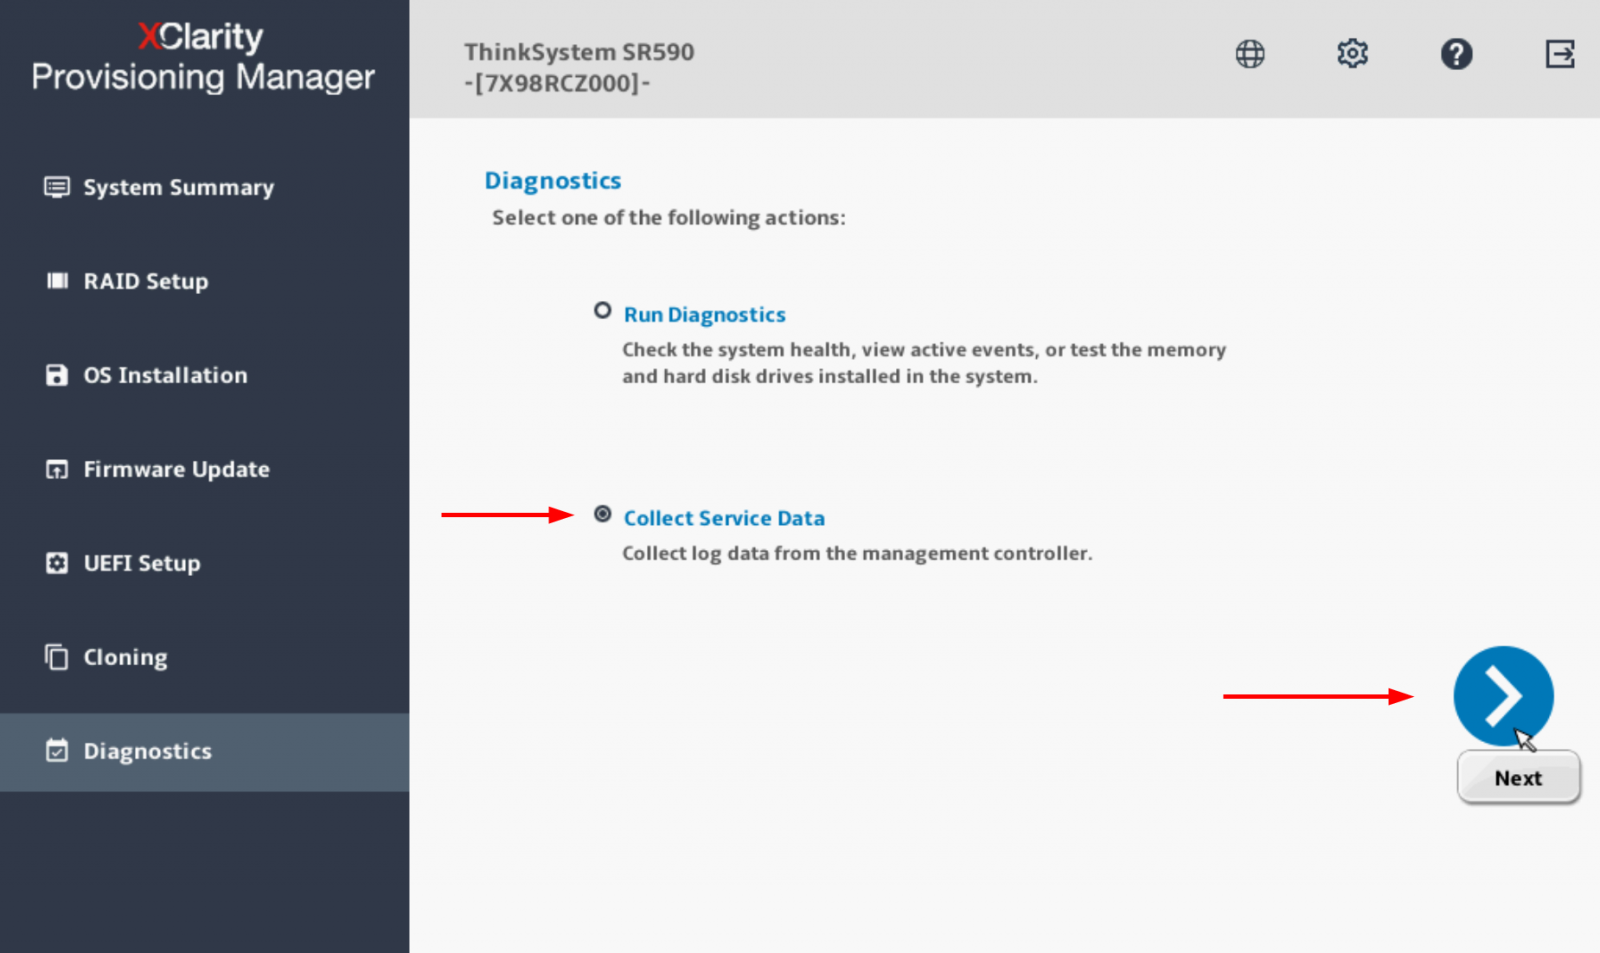
Figure 5. XClarity Provisioning Manager diagnostics page - Wait until the task is completed then click on the right arrow as shown in the following figure.
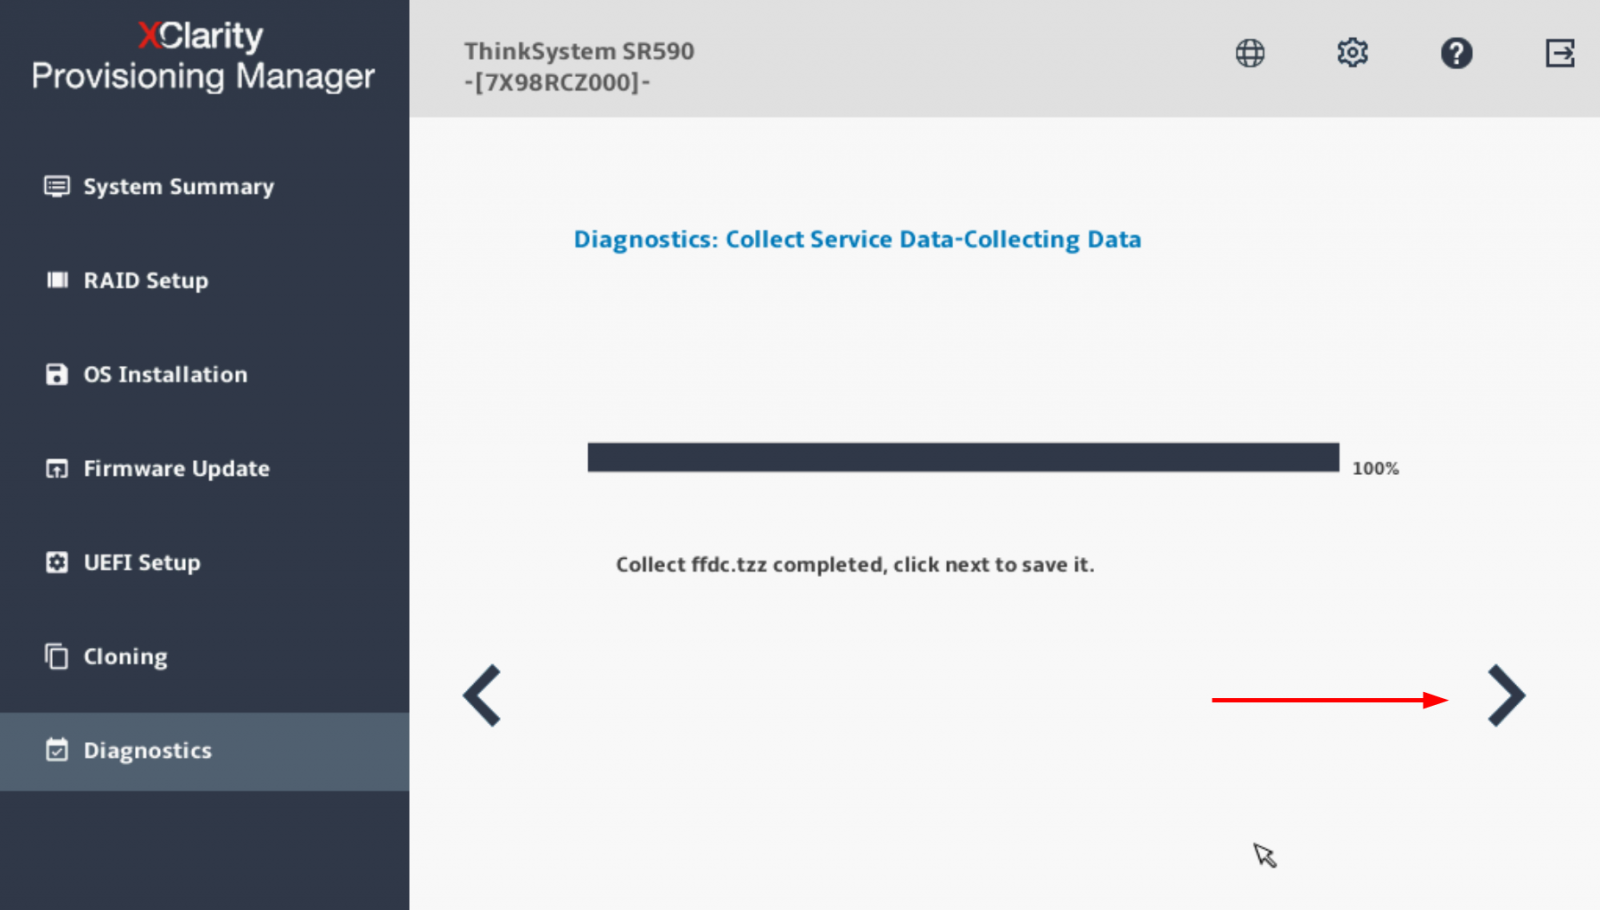
Figure 6. XClarity Provisioning Manager collecting service data - Choose a USB drive in the list; then click Save as shown in the following figure.
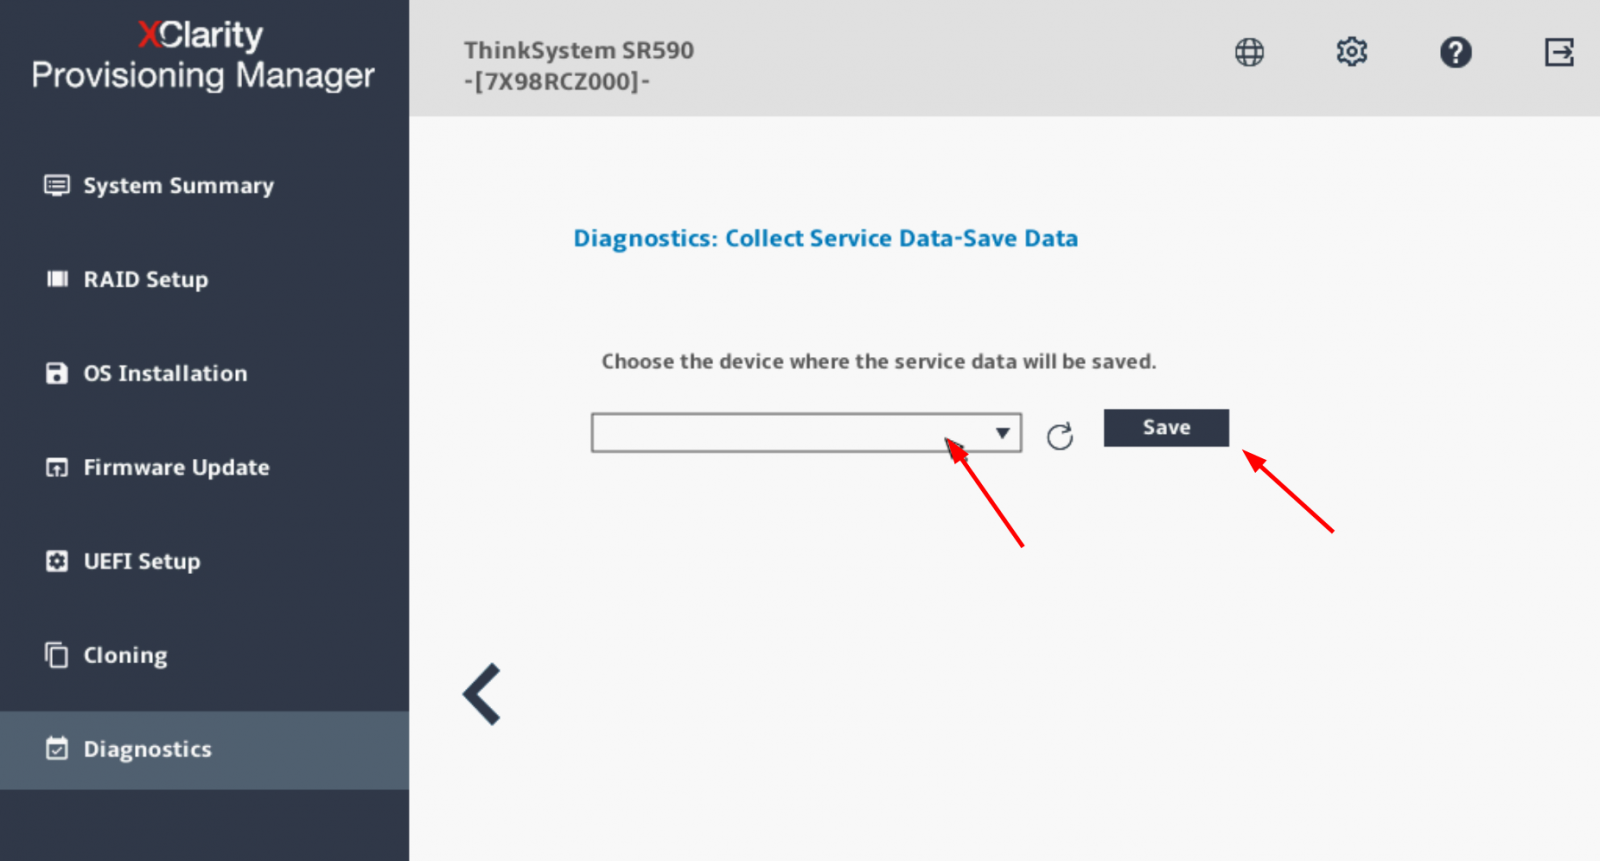
Figure 7. XClarity Provisioning Manager save service data
Integrated Management Module (IMM)
Use the following steps to collect service data using Integrated Management Module (IMM).
- Log in to the IMM web management interface.
- Click the Service and Support menu, then Download Service Data as shown in the following figure.

Figure 8. IMM home page - Click the button Download Now as shown in the following figure.
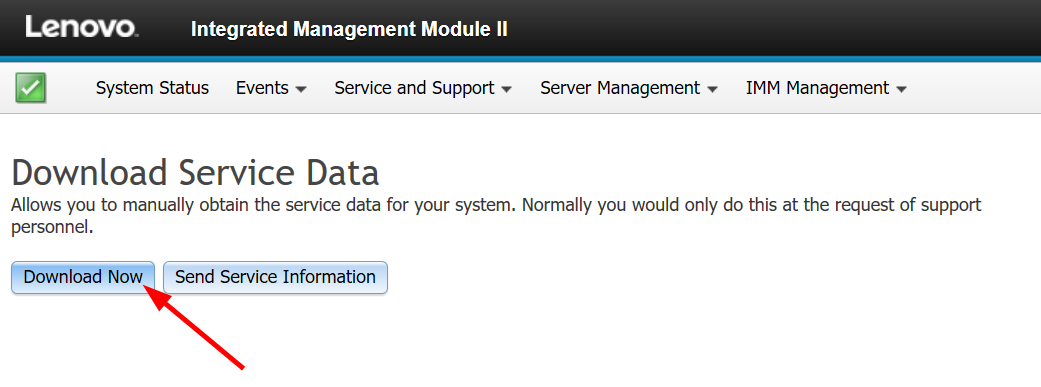
Figure 9. IMM download service data - This may take a few minutes to complete, then you will be prompted by the browser to save the file to your local workstation.
Additional information:
- The naming convention for the service data file is: MachineType+Model_SerialNumber_imm2_date_time.tgz, for example 5465AC1_06BMZEV_imm2_20190321_042452.tgz
- The IMM service data file *.tgz cannot be extracted using a generic decompression tool, such as unzip or 7zip. Please send the service data file to an authorized technical service personnel for further analysis.
Dynamic System Analysis (DSA) Preboot
Use the following steps to collect service data using Dynamic System Analysis (DSA) Preboot.
- Boot or reboot the server and when you see the POST splash screen, press F2 for Diagnostics as shown in the following figure.
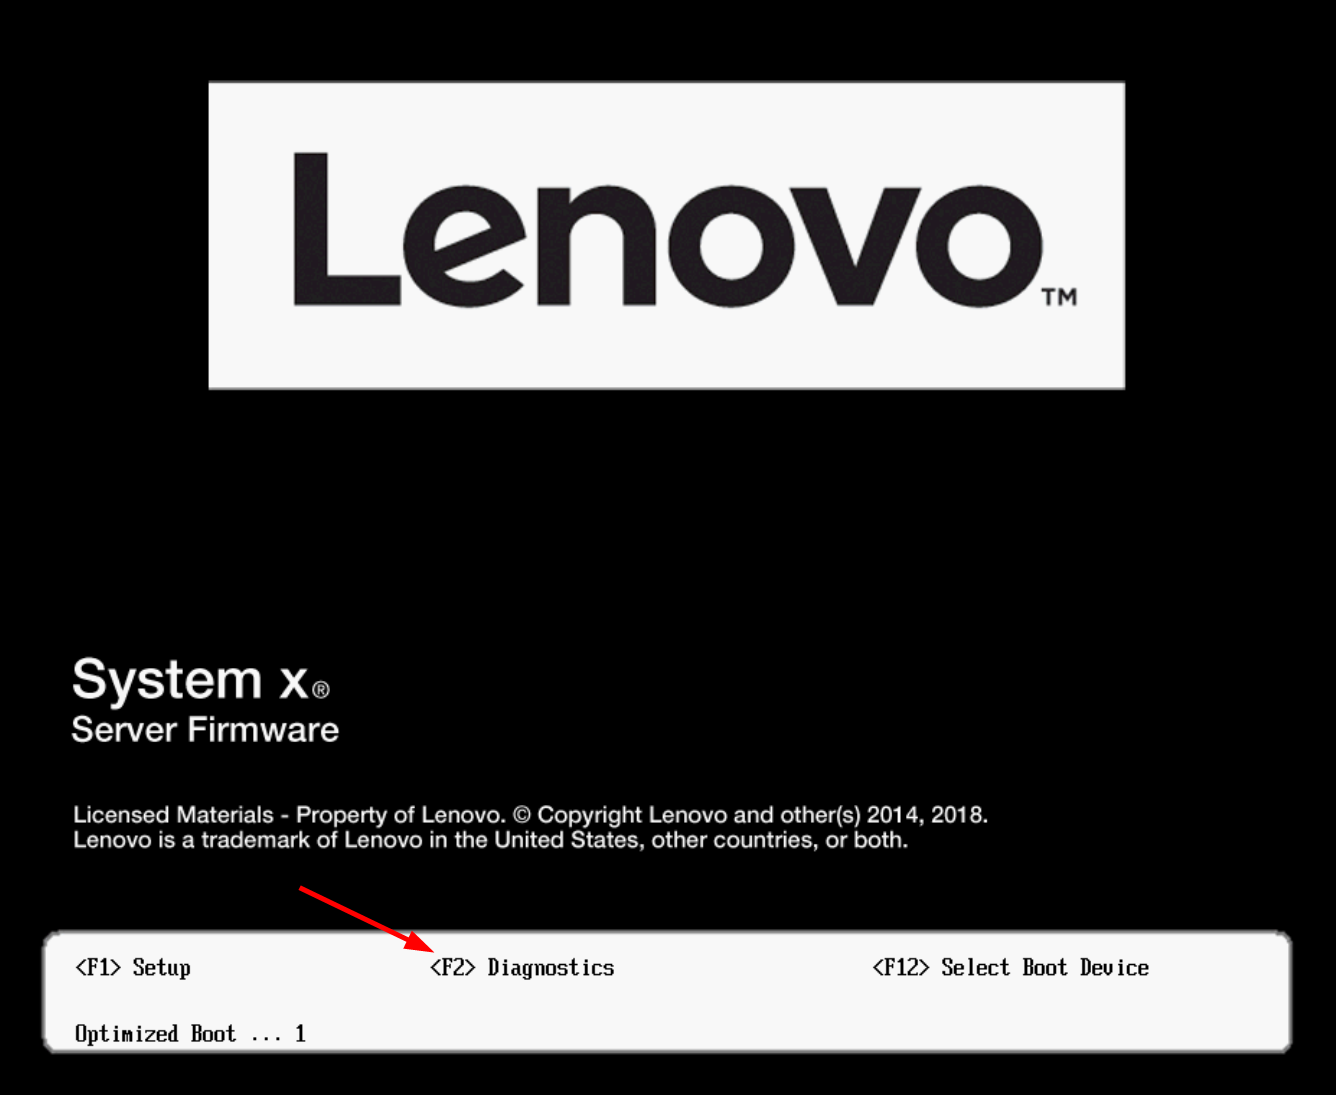
Figure 10. Lenovo System x server POST splash screen - You will be shown the Memory Test screen. Choose Quit > Quit to DSA.
- DSA will launch with a text screen prompt. Type gui and press Enter as shown in the following figure.
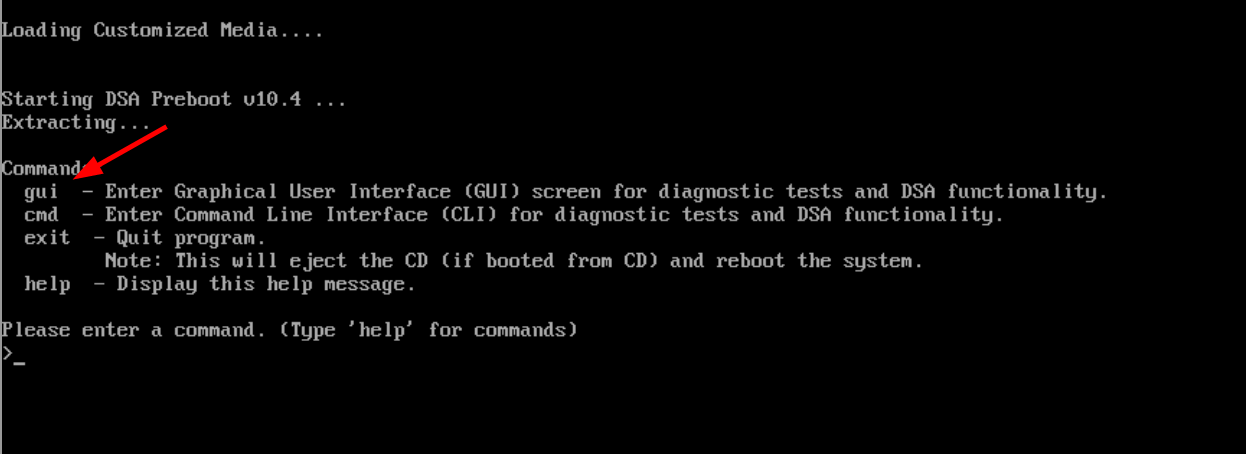
Figure 11. DSA Preboot text screen prompt - At the graphical DSA welcome page, click on Full Inventory Collection and Diagnosis as shown in the following figure.
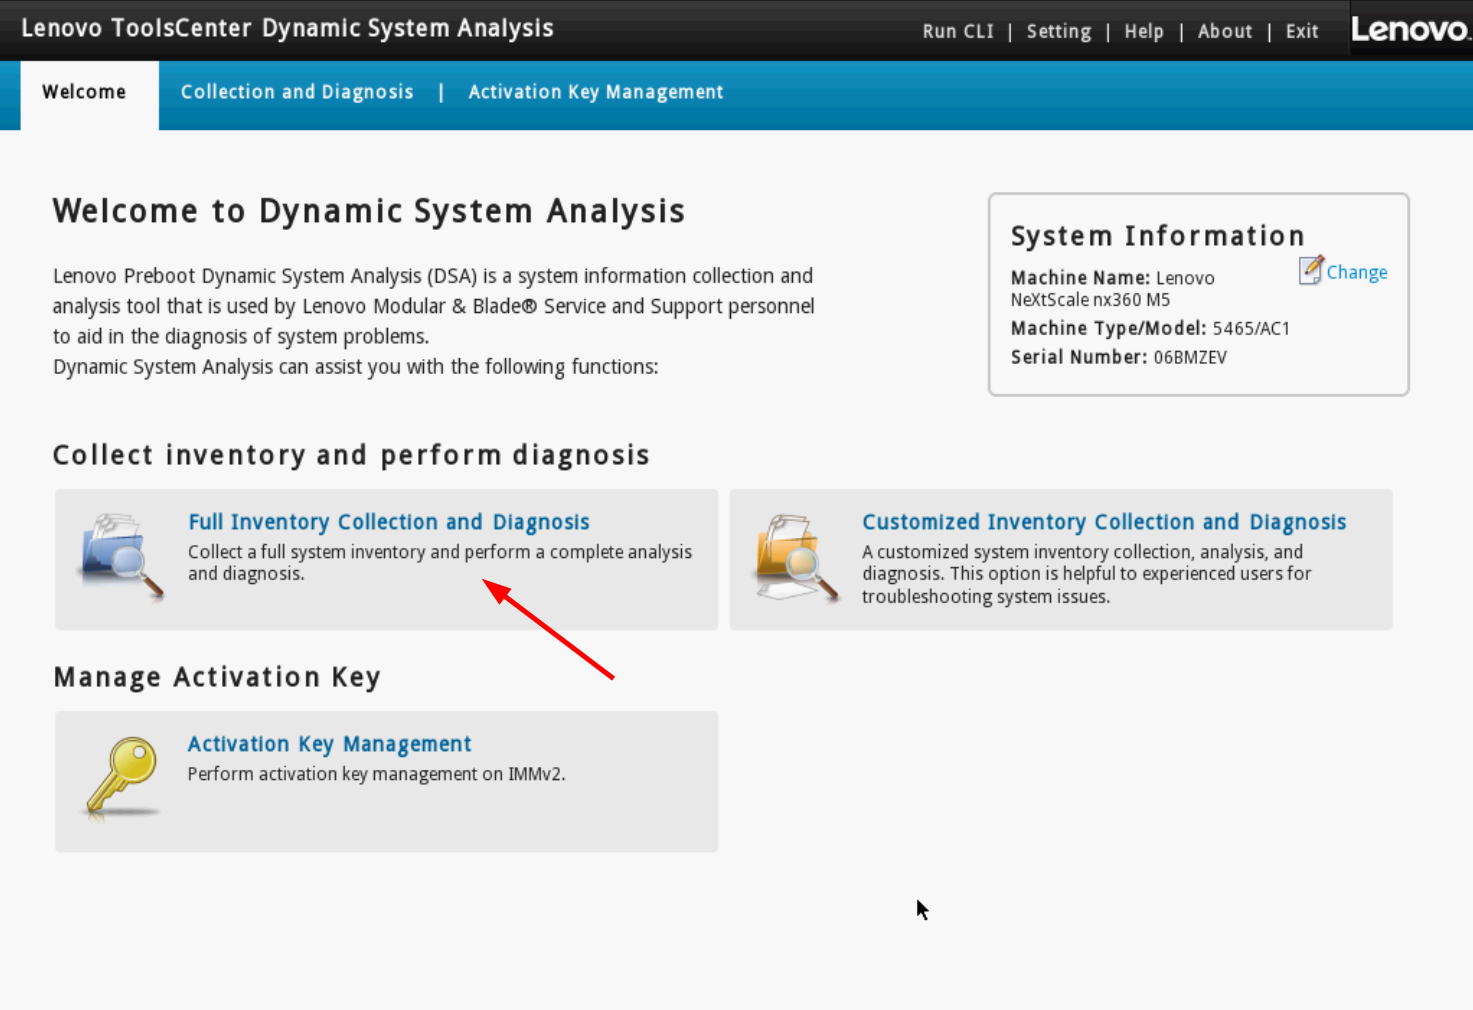
Figure 12. DSA Preboot welcome page - Select a target location to save the service data file; then click Run Now as shown in the following figure.
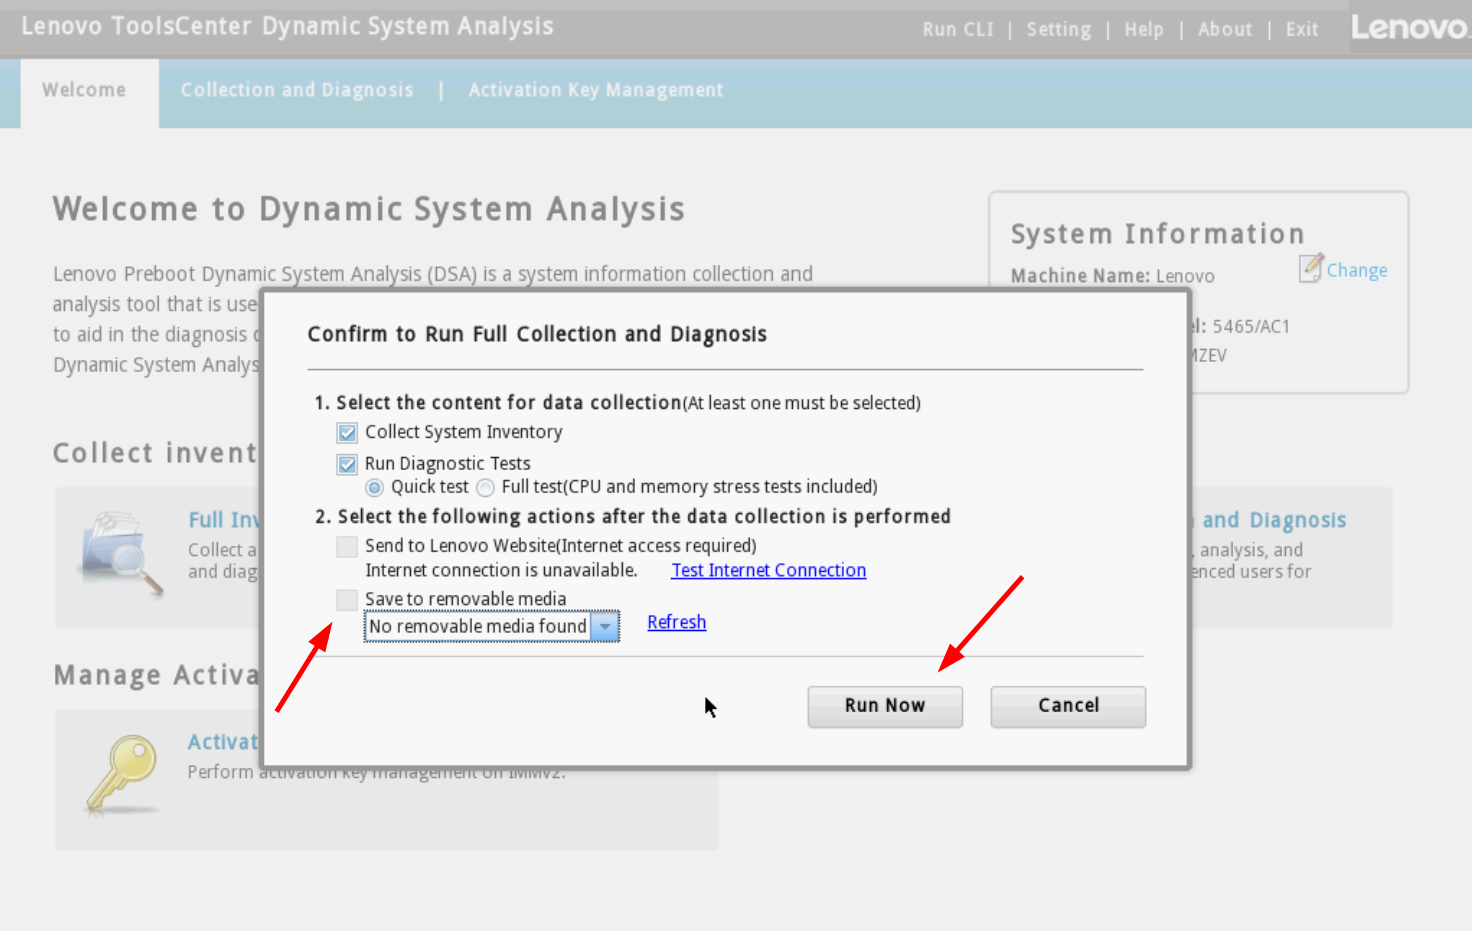
Figure 13. DSA Preboot run full collection and diagnostics - The task will take a few minutes to complete. If you have not chosen a target location at the previous step, you can click on Save to as shown in the following figure.
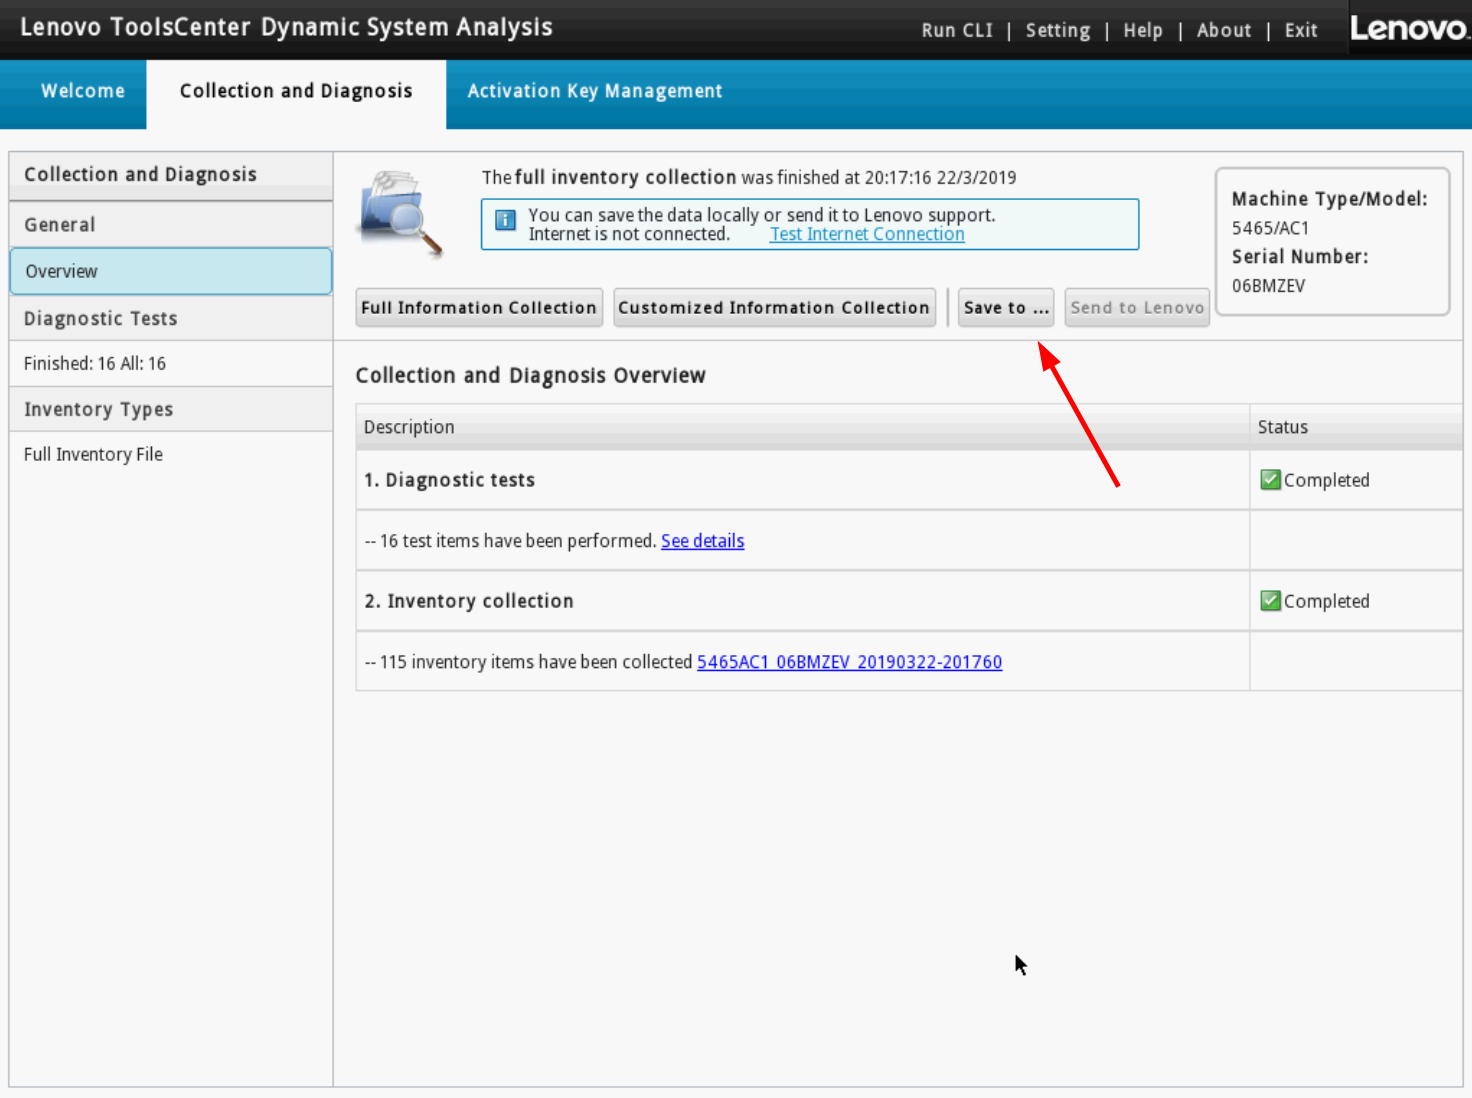
Figure 14. DSA Preboot collect service data completed
Dynamic System Analysis (DSA) Portable
Use the following steps to collect service data using Dynamic System Analysis (DSA) Portable.
Instructions for Windows:
- Download the latest version of DSA at the following location:
https://datacentersupport.lenovo.com/us/en/solutions/lnvo-dsa - Open a command prompt as Administrator and change to the directory where the DSA executable file is found.
- Run this command (actual file name might vary slightly as the version changes):
lnvgy_utl_dsa_dsala7j-10.4_portable_windows_x86-64.exe -–ffdc - The command will take approximately 15 to 45 minutes to complete.
Instructions for Linux:
- Download the latest version of DSA at the following location:
https://datacentersupport.lenovo.com/us/en/solutions/lnvo-dsa - Open a shell as root privilege and change to the directory where the DSA binary file is found.
- Make the binary file executable: (actual file name might vary slightly as the version changes):
chmod +x lnvgy_utl_dsa_dsala7j-10.4_portable_rhel7_x86-64.bin - Run this command:
./lnvgy_utl_dsa_dsala7j-10.4_portable_rhel7_x86-64.bin -–ffdc - The command will take approximately 15 to 45 minutes to complete.
Additional information
- A new directory will be created to store the result:
- Windows: C:\Lenovo_Support
- Linux: /var/log/Lenovo_Support
- The resulting directory contains the service data file (.tgz/.tzz) that was retreived from the BMC, same as by downloading service data from the web interface.
- The directory contains a detailed server inventory file that could be useful to technical support.
- You can compress the result directory as a file to send to technical support.
XClarity Administrator
Use the following steps to collect service data using XClarity Administrator.
- Log into the XClarity Administrator management interface..
- Click the menu Administration > Service and Support
- In the Service and Support page, navigate to Endpoint Actions as shown in the following figure.
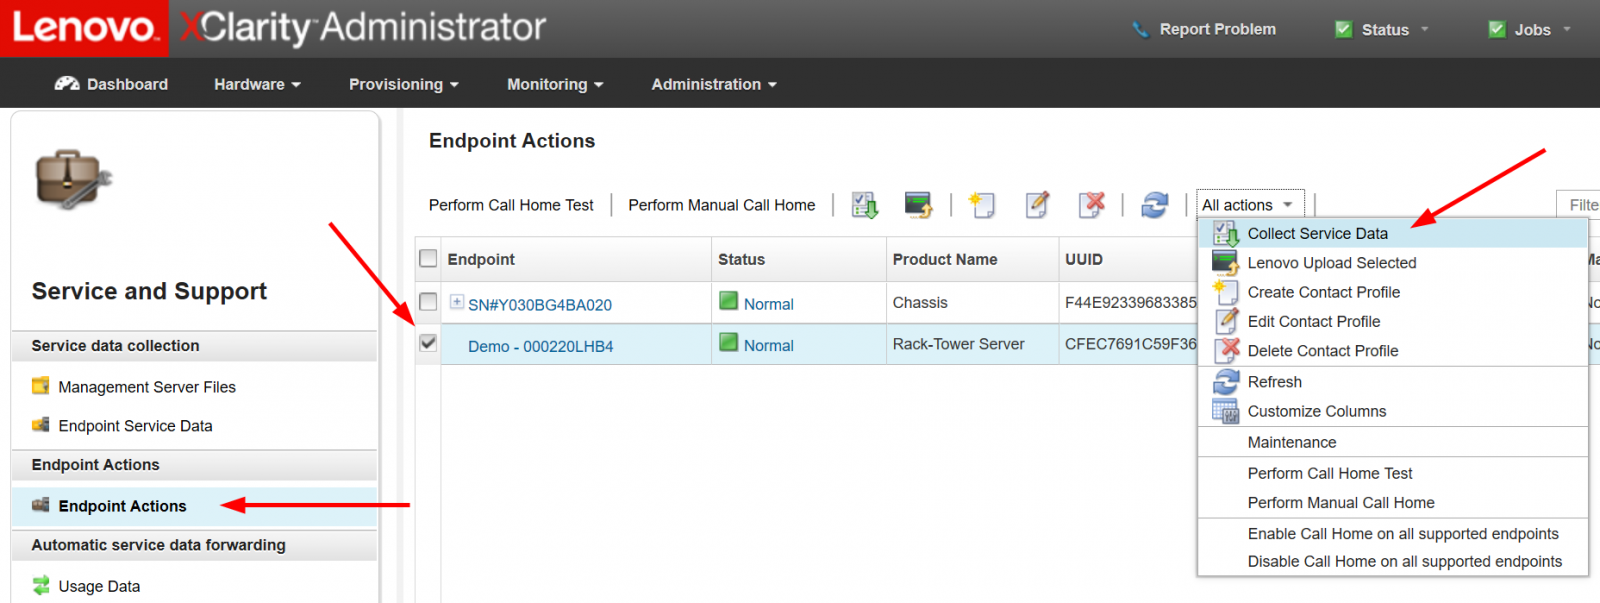
Figure 15. XClarity Administrator endpoint actions - Select one or more endpoints on which you’d like to collect service logs, then click the menu All Actions > Collect Service Data, confirm the action when prompted.
- The task will be launched in the background and should take a few minutes to complete.
- To download the service data file to your workstation, navigate to Endpoint Service Data.
- Select one or more files then click on the toolbar button or the equivalent menu in All Actions > Download Selected Service Files, as shown in the following figure.
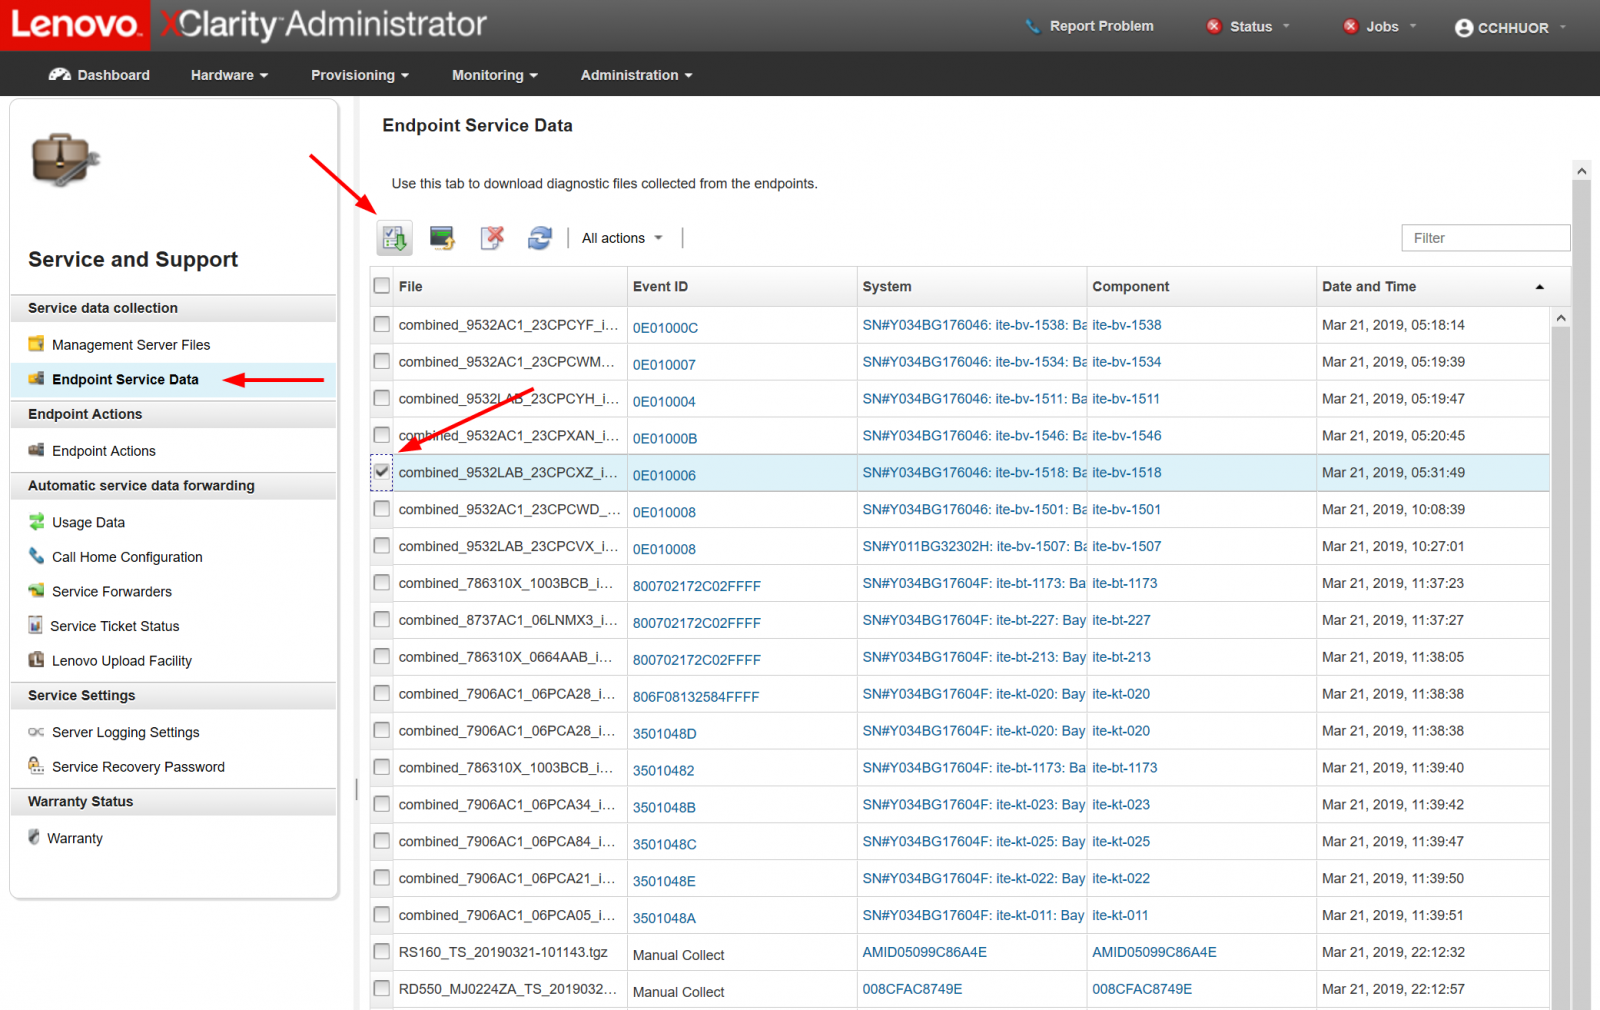
Figure 16. XClarity Administrator endpoint service data
Chassis Management Module (CMM)
Use the following steps to collect service data using Chassis Management Module (CMM) with Flex System.
- Log into the CMM web management interface.
- Click on the Service and Support menu, then Download Service Data, as shown in the following figure.
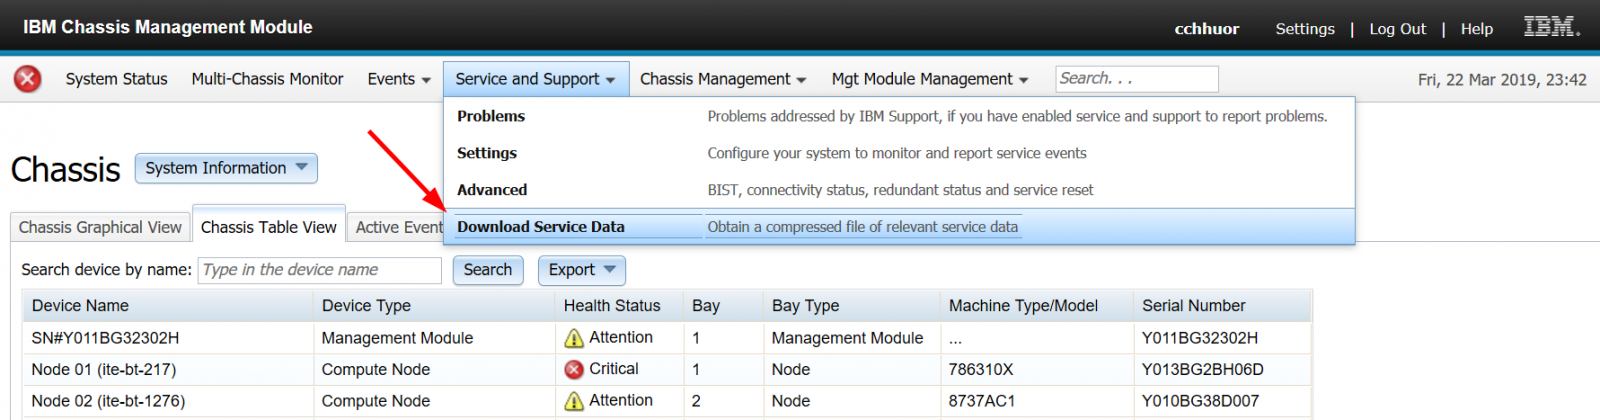
Figure 17. CMM home page - Click the button Download Mgmt Module Data Now, as shown in the following figure.
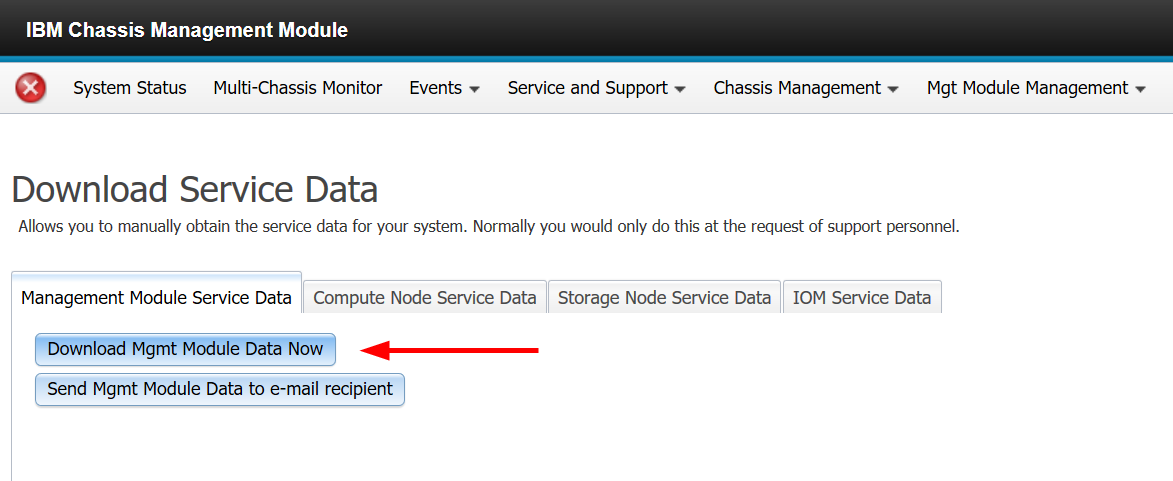
Figure 18. CMM download service data - This process will take a few minutes to complete then you will be prompted by the browser to save the file to your workstation.
Trademarks
Lenovo and the Lenovo logo are trademarks or registered trademarks of Lenovo in the United States, other countries, or both. A current list of Lenovo trademarks is available on the Web at https://www.lenovo.com/us/en/legal/copytrade/.
The following terms are trademarks of Lenovo in the United States, other countries, or both:
Lenovo®
System x®
ThinkSystem®
XClarity®
The following terms are trademarks of other companies:
Linux® is the trademark of Linus Torvalds in the U.S. and other countries.
Windows is a trademark of Microsoft Corporation in the United States, other countries, or both.
IBM® is a trademark of IBM in the United States, other countries, or both.
Other company, product, or service names may be trademarks or service marks of others.
Configure and Buy
Please select a locale
Full Change History
Course Detail
Employees Only Content
The content in this document with a is only visible to employees who are logged in. Logon using your Lenovo ITcode and password via Lenovo single-signon (SSO).
The author of the document has determined that this content is classified as Lenovo Internal and should not be normally be made available to people who are not employees or contractors. This includes partners, customers, and competitors. The reasons may vary and you should reach out to the authors of the document for clarification, if needed. Be cautious about sharing this content with others as it may contain sensitive information.
Any visitor to the Lenovo Press web site who is not logged on will not be able to see this employee-only content. This content is excluded from search engine indexes and will not appear in any search results.
For all users, including logged-in employees, this employee-only content does not appear in the PDF version of this document.
This functionality is cookie based. The web site will normally remember your login state between browser sessions, however, if you clear cookies at the end of a session or work in an Incognito/Private browser window, then you will need to log in each time.
If you have any questions about this feature of the Lenovo Press web, please email David Watts at dwatts@lenovo.com.


